
Table of Contents
Mill is a Scala build tool that offers an alternative to the venerable SBT toolchain. Mill aims for simplicity by reusing concepts you are already familiar with, borrowing ideas from Functional Programming and modern tools like Bazel. Feedback from users of Mill is often surprisingly positive, with people saying it is "intuitive" or feels "just right".
In this post, we'll explore why Mill is such an intuitive build tool. We'll get familiar with Mill, do a deep dive into the core ideas of what Mill is all about, and finally discuss how these core design decisions build up to a surprisingly intuitive and flexible user experience that is much more than the sum of its parts.
About the Author: Haoyi is a software engineer, and the author of many open-source Scala tools such as the Ammonite REPL and the Mill Build Tool. If you enjoyed the contents on this blog, you may also enjoy Haoyi's book Hands-on Scala Programming
This blog post is a companion to the talk I gave at Scaladays Madrid, 12 September 2023:
To start off, why should anyone care about the Mill build tool? Aren’t there plenty of other build tools already on the market? SBT? Gradle? Maven? Bazel?
For now, maybe the most important thing to know is that people like Mill as a build tool. People grumble about gradle or fuss about SBT, but the feedback from people using Mill is largely positive:
Gradle is such garbage. I can't count the number of times our ex-Gradler has said "you're not going to like the answer..."
SBT's bizarre abstraction and unreadable syntax is a huge, frustrating obstacle to adopting Scala
I only have good things to say about Mill, except maybe that I wish it had been released 10 years earlier or so :)
The developer experience is so delightful compared to the other build system in the JVM land. And the task model seems just right - Hacker News
Perhaps the last line is worth highlighting: "the task model seems just right". Beyond all the functionality, performance, built-in utilities, documentation, and other "technical" improvements that the Mill build tool provides, there is something about Mill that people find intuitive or familiar. While that feeling can be fuzzy and subjective, this post will try and explore what it is in the Mill build tool that makes it feel so good to use.
This post has 4 sections: first, we’ll discuss why build tools are hard. Next, we’ll dip our toes into the getting started experience with Mill, using it to build a few small Scala projects. We’ll then dive into Mill’s fundamentals to get a feel for its core building blocks. Lastly, we’ll use this experience as a basis to discuss why Mill works as well as it does.
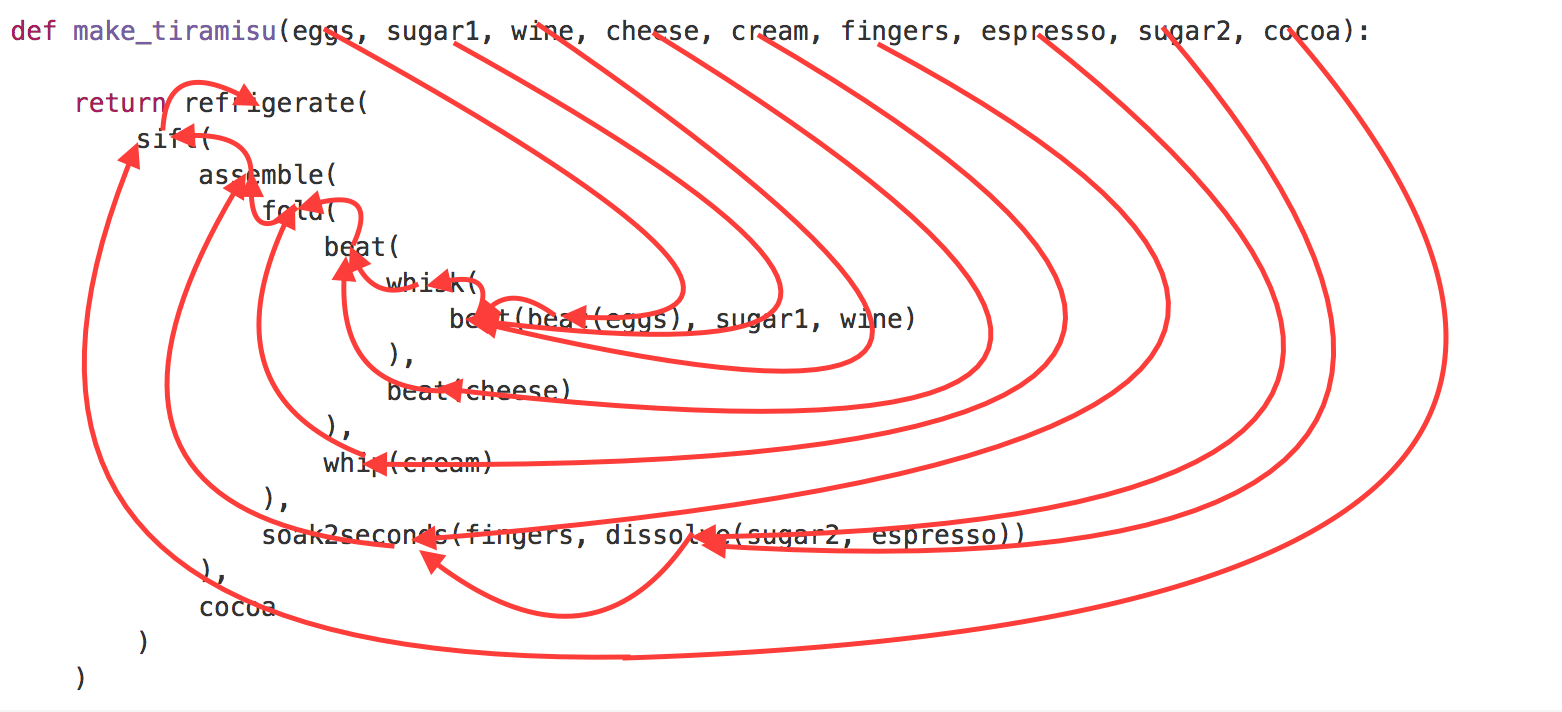
Build pipelines and pure functional programming have a lot in common. Consider this "functional" pseudocode for making a cake, a Tiramisu, from my earlier post What's Functional Programming All About:
def make_tiramisu(eggs, sugar1, wine, cheese, cream, fingers, espresso, sugar2, cocoa):
    beat_eggs = beat(eggs)
    mixture = beat(beat_eggs, sugar1, wine)
    whisked = whisk(mixture)
    beat_cheese = beat(cheese)
    cheese_mixture = beat(whisked, beat_cheese)
    whipped_cream = whip(cream)
    folded_mixture = fold(cheese_mixture, whipped_cream)
    sweet_espresso = dissolve(sugar2, espresso)
    wet_fingers = soak2seconds(fingers, sweet_espresso)
    assembled = assemble(folded_mixture, wet_fingers)
    complete = sift(assembled, cocoa)
    ready_tiramisu = refrigerate(complete)
    return ready_tiramisu
This Python pseudocode is pretty straightforward: a function that takes values, transforms the values or combines them via other functions, and returns the final result. No side effects, no mutability, every step just takes inputs as arguments and return outputs. Pure functional programming.
We can re-arrange this code a bit to eliminate the intermediate values and draw a graph to indicate the dataflow.
This "recipe graph" in the pure-functional code is identical to the graph represented by this so-called "pipeline" view of the same recipe below.
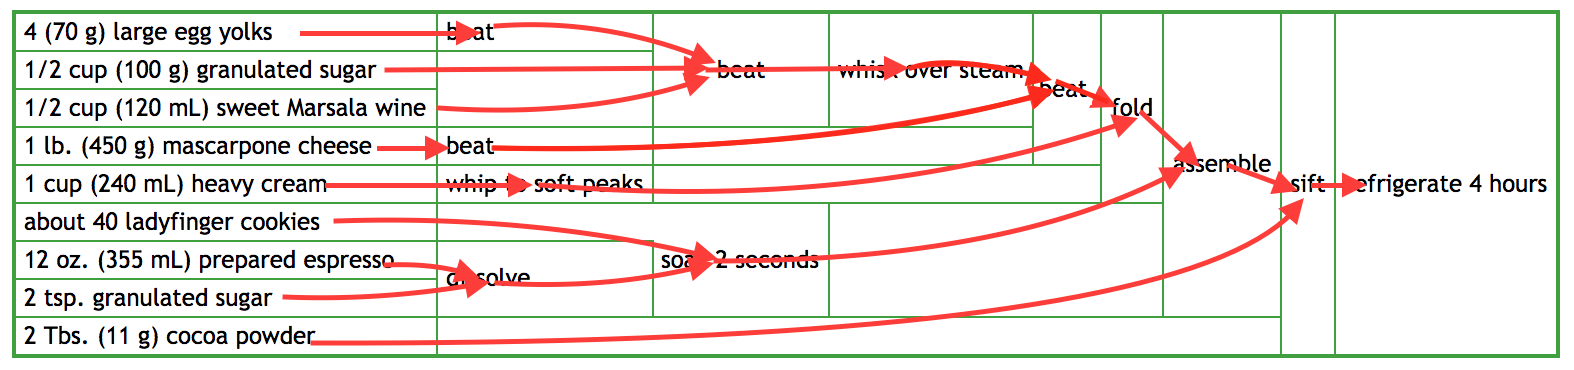
Both the "build pipeline diagram" for making a Tiramisu, and the "pure functional program" describe the same thing: a direct acyclic graph! The structure of a build pipeline is, at its core, identical to the structure of a simple pure functional program:
Both involve explicit dependencies between computations.
Both lack side effects, avoiding spooky action at a distance.
Both lack mutable variables
"Pipeline diagram" and "pure functional program" are simply different ways of representing the exact same graph structure. So if you want a way for a user to specify some kind of graph to define their build pipelines, having them write some simple pure-functional code is a very reasonable starting point.
But if that's the case, then why are build tools such a mess? Why aren’t we all writing our build pipelines in simple pure-functional Haskell? Or in MIT-Scheme?
It turns out that apart from managing a dataflow graph, build tools have a bunch of additional requirements that diverge from those of simple pure-functional programs. A build tool needs answers for all of the following questions:
compile, run, test)Some questions the build graph helps answer: e.g. what tasks depend on what, or what runs in what order. But for other questions, the build graph helps not at all: e.g. how does caching work? CLI invocations? Custom tasks?
This list is not exhaustive, but already we can see the problem: build tools need to answer a lot of questions that naive pure functional programs can ignore: question around caching, I/O, introspectability, naming, and so on. And that's why we don't see people configuring their real-world build systems using introductory-level pure-functional Haskell.
One thing to note is that each bullet above is easily a whole chapter worth of documentation - tens of pages to learn how a particular build tool does a particular thing. Below are some examples of sections of the Gradle and SBT documentation to illustrate just how much detail you might need to know about a single bullet point above:
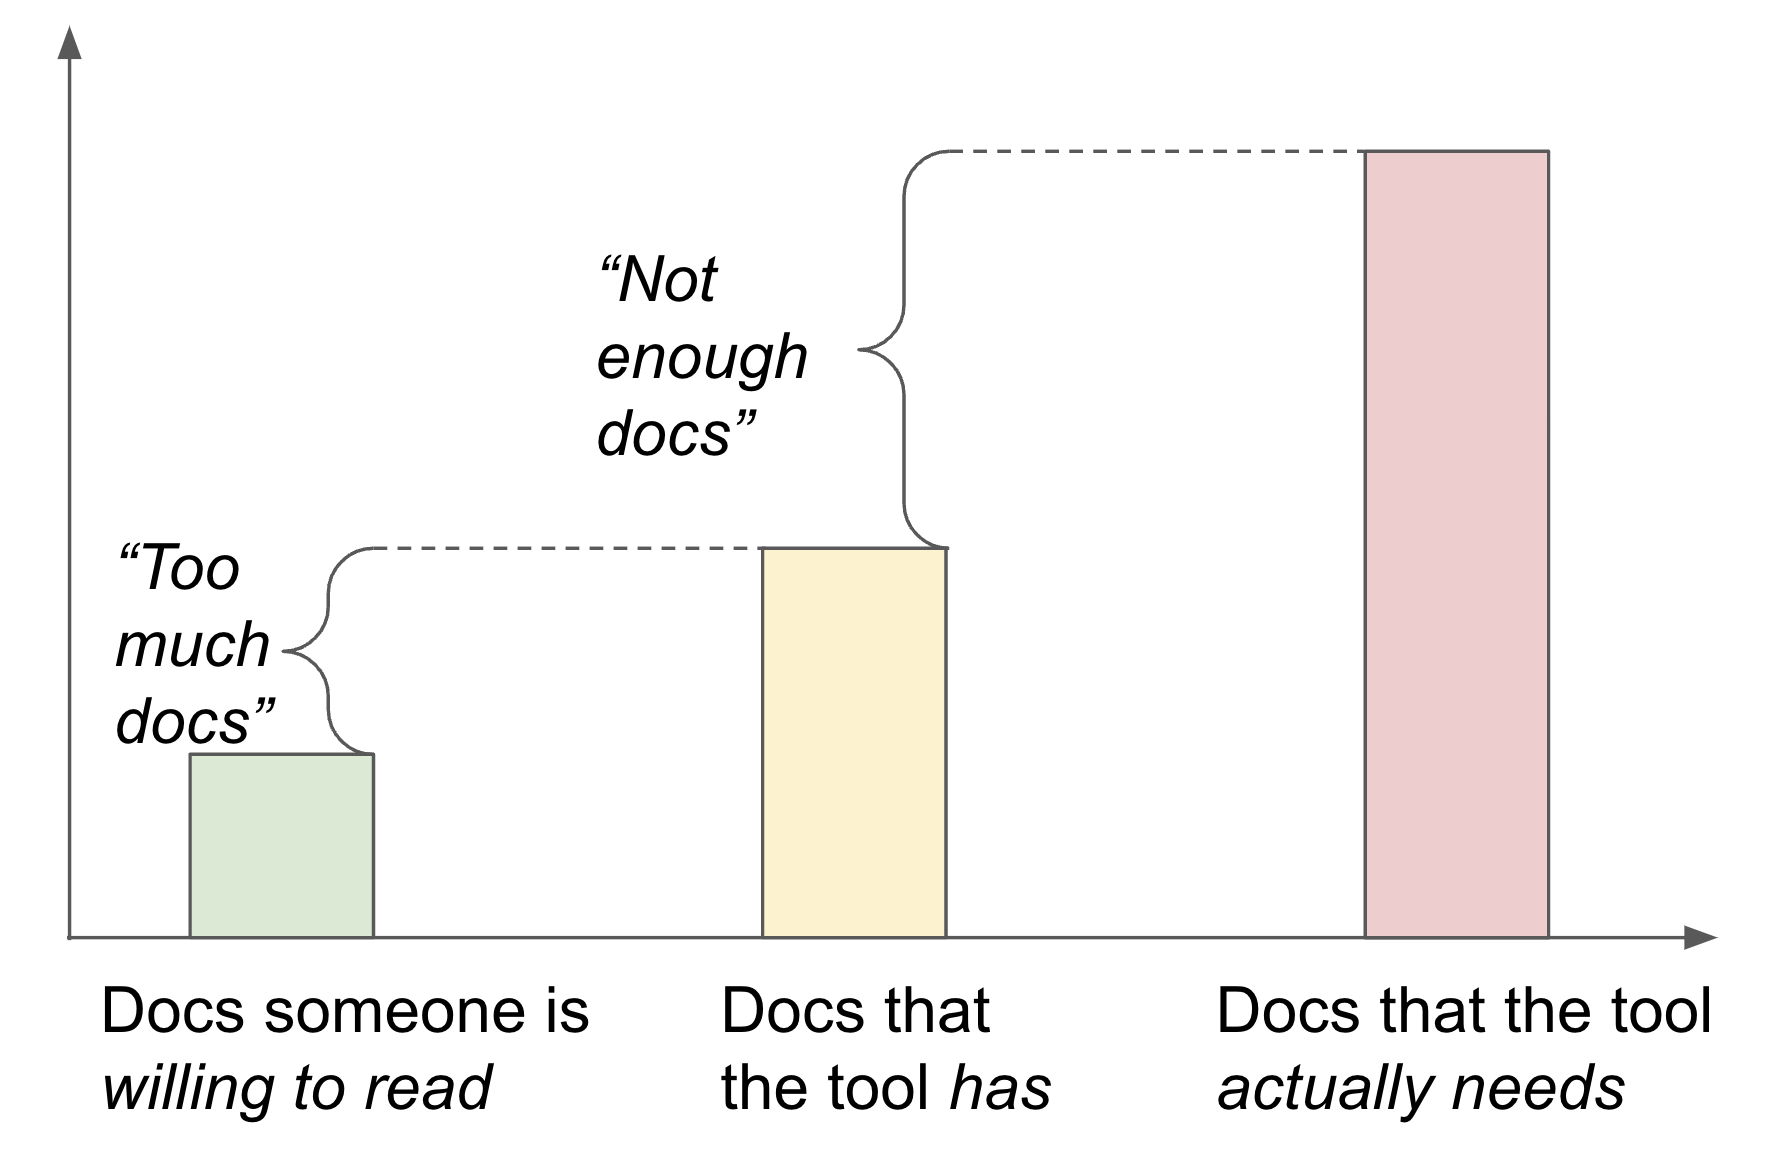
Unless we find some shortcut, it seems inevitable that any build tool would need you to read 10, 15, 20 chapters worth of documentation in order to learn how it does even the most basic build-tool things! Having "reasonable defaults" can take you pretty far, letting you get away with copy-pasting example snippets without understanding. But at some point you'll hit some problem, or you'll need some customizations, and then you're back to digging deep into how the build system really works.
For anyone who has tried to use SBT or Gradle or Bazel, this may sound familiar. All of those tool works great cargo-culting simple examples, but can be challenging to understand in-depth. Each of these tools has hundreds of pages of documentation, which is somehow both "too much" but also "not enough". These tools aren’t hard due to lack of documentation, or due to too much documentation, they are hard because there simply is so much stuff to learn that it proves to be a challenge. Even with more docs than a typical person may have the time to read, it can still fall short of enough docs to cover everything the build tool would need them to learn.
So that’s why build tools are hard. While they may naively look like simple pure functional programs, they have a lot more details that they need to manage that may not be obvious at first glance. If not done carefully it can result in an explosion of things that a user would need to learn to be productive.
Many build tools fall into this trap. Let's now look at how the Mill build tool works, so we can see how Mill manages to avoid it.
This section will touch on getting started with using Mill for Scala, through three examples: a single Scala module, customizing some tasks on that module, and a multi-module project.
// build.sc
import mill._, scalalib._

object foo extends RootModule with ScalaModule {
  def scalaVersion = "2.13.11"
  def ivyDeps = Agg(
    ivy"com.lihaoyi::scalatags:0.8.2",
    ivy"com.lihaoyi::mainargs:0.4.0"
  )

  object test extends ScalaTests {
    def ivyDeps = Agg(ivy"com.lihaoyi::utest:0.7.11")
    def testFramework = "utest.runner.Framework"
  }
}
This is a Mill build for a single Scala module. The module uses Scala 2.13.11, has two third-party dependencies, and has a test suite with a testing framework configured. with ScalaModule specifies that this module is for building Scala code - while RootModule puts the module foo at the root of the project rather than under a foo/ subfolder. Since the module lives at the root, the source code would live under src/, e.g. the Foo.scala file below:
// src/Foo.scala
package foo
import scalatags.Text.all._
import mainargs.{main, ParserForMethods}

object Foo {
  def generateHtml(text: String) = h1(text).toString

  @main
  def main(text: String) = println(generateHtml(text))

  def main(args: Array[String]): Unit = ParserForMethods(this).runOrExit(args)
}
You can run mill resolve _ with a wildcard _ to list out the available tasks to run:
> ./mill resolve _
assembly
...
clean
...
compile
...
run
...
show
...
inspect
...
You can run mill inspect to look up the metadata of a particular task: where it was defined, it’s scaladoc, it’s inputs, etc.
> ./mill inspect compile
compile(ScalaModule.scala:212)
    Compiles the current module to generate compiled classfiles/bytecode.
Inputs:
    scalaVersion
    upstreamCompileOutput
    allSourceFiles
    compileClasspath
And compile, run, test, or assembly to actually do the work:
> ./mill compile # compile sources into classfiles
...
compiling 1 Scala source to...
> ./mill run # run the main method, if any
error: Missing argument: --text <str>
> ./mill run --text hello
<h1>hello</h1>
> ./mill test
...
+ foo.FooTests.simple ... <h1>hello</h1>
+ foo.FooTests.escaping ... <h1><hello></h1>
> ./mill assembly # bundle classfiles and libraries into a jar for deployment
> ./mill show assembly # show the output of the assembly task
".../out/assembly.dest/out.jar"
> java -jar ./out/assembly.dest/out.jar --text hello
<h1>hello</h1>
> ./out/assembly.dest/out.jar --text hello # mac/linux
<h1>hello</h1>
And there you have it! That’s all you need to get started using Mill: downloading third party dependencies, compiling, running tests, and packaging a module for deployment and distribution. You can even publish libraries to Maven Central right out-of-the-box. In general, Mill has enough things built-in that you can get pretty far without needing to reach for third-party plugins or advanced configuration. While the build.sc above isn’t trivial, hopefully it’s simple enough you can skim over, guess what the various parts do, and guess correctly.
So that’s building and packaging single Scala module, end-to-end. Next, let’s look at how customizing how a task or module is done.
Mill makes it very easy to customize your build pipelines, overriding portions of it with custom logic. In the example below we override the JVM resources (defined by ScalaModule, normally the resources/ folder), to additionally contain a single generated text file containing the line count of all the source files in that module:
// build.sc
import mill._, scalalib._

object foo extends RootModule with ScalaModule {
  def scalaVersion = "2.13.11"

  /** Total number of lines in modules source files */
  def lineCount = T{
    allSourceFiles().map(f => os.read.lines(f.path).size).sum
  }

  /** Generate resources using lineCount of sources */
  override def resources = T{
    os.write(T.dest / "line-count.txt", "" + lineCount())
    super.resources() ++ Seq(PathRef(T.dest))
  }
}
lineCount takes the output of allSourceFiles (also defined by ScalaModule), counts how many lines are in each file (using os.read.lines from OS-Lib) and sums them up returning a single integer. That’s all we need to create a custom task! We can use mill show from the CLI to see its return value, or mill inspect to see the metadata about it:
> ./mill show lineCount
11

> ./mill inspect lineCount
lineCount(build.sc:7)
    Total number of lines in modules source files
Inputs:
    allSourceFiles
Next, with an appropriate src/Foo.scala file, we can run our ScalaModule to see Mill in action:
// foo/src/Foo.scala
package foo

object Foo{
  def main(args: Array[String]): Unit = {
    val lineCount = scala.io.Source
      .fromResource("line-count.txt")
      .mkString

    println(s"Line Count: $lineCount")
  }
}
> ./mill run
...
Line Count: 11
lineCount by reading the source filesoverride def resources will bundle it into line-count.txt in the resource pathrun will invoke the main method which reads the resources, fishes out the generated file, and prints out the line count at run-timeWhile this is a toy example, it shows how easy it is to customize your Mill build to include the kinds of custom logic common in most real-world projects. Almost every project needs to do something custom, but that something differs from project to project, e.g.
Mill can’t build-in support for everyone’s requirements, but it can make it easy and safe for you to implement what you need yourself, and have it integrate well with the rest of the build system.
Unlike the ad-hoc monkey patching or mutation common in other build tools, Mill customizations are principled:
Using object-oriented overrides: this means your IDE understands and can help you navigate up and down the inheritance hierarchy and overrides, to understand what is being overriden and what actually will get run
Automatically parallelizable: lineCount and resources can run in parallel with compile if given the threads.
Automatically cached and incremental: the result of lintCount will automatically be cached unless the upstream source code changes, and will then be automatically invalidated.
While these things may not matter for such a trivial example that runs quickly, they become increasingly important as the size and complexity of your build logic grows.
Lastly, lets look at an example of multiple Scala modules in a single Mill build.
import mill._, scalalib._

trait MyModule extends ScalaModule {
  def scalaVersion = "2.13.11"
}

object foo extends MyModule {
  def moduleDeps = Seq(bar)
  def ivyDeps = Agg(ivy"com.lihaoyi::mainargs:0.4.0")
}

object bar extends MyModule {
  def ivyDeps = Agg(ivy"com.lihaoyi::scalatags:0.8.2")
}
This example build contains two modules, foo and bar. You can define multiple modules the same way you define a single module, via objects, using def moduleDeps to specify the relationship between them.
Note that we split out the scalaVersion config common to both modules into a separate trait MyModule extends ScalaModule. This lets us avoid the need to copy-paste common configuration, while still letting us define any per-module config such as ivyDeps unique to each particular module.
As we no longer extend RootModule, each module is given a folder on disk corresponding to it's name foo/ or bar/. The above builds this expects the following project layout:
build.sc
foo/
    src/
        Foo.scala
    resources/
        ...
bar/
    src/
        Bar.scala
    resources/
        ...
out/
    foo/
        compile.json
        compile.dest/
        ...
    bar/
        compile.json
        compile.dest/
        ...
Both source code and output files in Mill follow the module hierarchy, so e.g. input to the foo module lives in foo/src/ and output to foo.compile lives in out/foo/compile.json and the folder out/foo/compile.dest/
You can resolve to see what targets are available, use the __ wildcards to run multiple tasks at once (e.g. compiling everything), invoke a specific module’s main method via the run task, or generate multiple assemblies at once using brace expansion:
> ./mill resolve __.run
foo.run
Bar.run

> ./mill __.compile

> ./mill foo.run --foo-text hello --bar-text world
Foo.value: hello
Bar.value: <p>world</p>

> ./mill show {foo,bar}.assembly
{
  "foo.assembly": "out/foo/assembly.dest/out.jar",
  "bar.assembly": "out/foo/assembly.dest/out.jar"
}
Mill will ensure that the modules and tasks such as compile or assembly are evaluated in the right order, parallelized where possible if you tell it to (via the --jobs <n> flag), and re-evaluated as necessary when source code in each module changes.
We’ve just gone through a quick tour of what it’s like getting started using Mill: a single module, a module with customizations, and multiple related modules. As you’ve seen, Mill comes with most common workflows built in, including generating self-contained assemblies and publishing artifacts. That means you can be productive right off the bat, without needing to spend up front fiddling with third-party plugins and configuration. Mill's simple CLI input and JSON output makes it integrate well with other tools and scripts.
So far, we have relied heavily on the defaults provided by the ScalaModule trait: this provides a reasonable set of common tasks for building Scala code, and we've only needed to do a minimal amount of work wiring them up. But Mill is more than just a tool for wiring up pre-defined modules. Let’s now dive into using Mill without such pre-built scaffolding, so we can truly understand what Mill is all about.
This section has 3 parts: we’ll explore Mill Tasks, Mill Modules, and combine them together to come up with our own DIYJavaModule implementation that we can use to compile and package a multi-module Java codebase. These will be similar to the builtin ScalaModule traits we saw earlier, but built ourselves entirely from first principles.
The first core concept to understand in Mill are Tasks.
The most important Tasks to know about are:
T.source sources, which specify an input file or folder,T{} targets, which specify some kind of computation dependent on one or more other upstream tasks.// build.sc
import mill._
def sources = T.source { millSourcePath / "src" }
def allSources = T {
os.walk(sources().path)
.filter(_.ext == "java")
.map(PathRef(_))
}
def lineCount: T[Int] = T {
println("Computing line count")
allSources()
.map(p => os.read.lines(p.path).size)
.sum
}
This simple build sets up the following build graph: sources is a T.source that references the src/ folder, and is used by the downstream targets allSources and lineCount
Here we have no ScalaModule or any other such helpers. The only logic we have in this build.sc file is the logic in the code snippet above.
lineCount is not used anywhere, but we can evaluate it and use show to print its value.
> ./mill show lineCount
Computing line count
16

> ./mill show lineCount # line count already cached, doesn't need to be computed
16
Targets can run arbitrary code. Below, we add two targets: a classFiles target that loads allSources and passes them to a javac subprocess to compile, and an assembly target that loads classFiles and passes them to the a jar subprocess to bundle up into an out.jar file.
def classFiles = T {
  println("Generating classfiles")
  val javacArgs = allSources().map(_.path)
  os.proc("javac", javacArgs, "-d", T.dest)
    .call(cwd = T.dest)

  PathRef(T.dest)
}

def assembly = T {
  println("Generating assembly")
  val jarPath = T.dest / "out.jar"
  os.proc("jar", "-cfe", jarPath, "foo.Foo", ".")
    .call(cwd = classFiles().path)

  PathRef(T.dest / "out.jar")
}
The resultant task graph is shown below, now with additional classFiles and assembly tasks, downstream of allSources
Again, you can see that if we run assembly, both classFiles and assembly are evaluated the first time. They are re-used if we run assembly again, until when we make changes to the src/ folder.
> ./mill show assembly
Generating classfiles
Generating assembly
".../out/assembly.dest/out.jar"

> ./mill show assembly
".../out/assembly.dest/out.jar"

> echo "package hello2" > src/hello2.java

> ./mill show assembly
Generating classfiles
Generating assembly
".../out/assembly.dest/out.jar"
The generated assembly jar is a normal Java Jar file, and can be run using java -jar:
> java -jar out/assembly.dest/out.jar  i am cow
Foo.value: 31337
args: i am cow
Mill tasks can have logic either running in-process on the JVM or via sub-processes. The assumption that Mill makes is that all inputs to the task that may change are defined by upstream tasks, whether Targets or Sources, and all outputs for a task must be included in the return value. Tasks may read and write to disk, but only within their dedicated T.dest folder, which helps avoid filesystem conflicts or unexpected interactions.
In this way, Mill lets you implement a task however you want, but guides you to a pure-functional style even for tasks that may include heavy use of the io, disk, and the filesystem. This avoids problems common in other build tools where different tasks may read or write arbitrarily to different places on disk, making it hard to see what exactly a task is outputting or causing tasks to
interfere with each other by accidentally overwriting files.
Now that we’ve played around with some simple tasks, using them to compile and some package Java code, let’s look at how Mill Modules work
Modules, at their simplest, are just namespaces you can put tasks in. Here, we have foo module containing the foo.bar target, and the foo.qux module containing the foo.qux.baz target.
// build.sc
import mill._

object foo extends Module {
  def bar = T { "hello" }
  object qux extends Module {
    def baz = T { "world" }
  }
}
Modules form a tree. This simple build file forms the tree shown below, with dashed boxes indicating the modules and solid boxes indicating the targets at the leaves of the tree
The path to a Mill module from the root of your build file corresponds to the path you would use to run tasks within that module from the command line. Below, you can see how we can run these targets from the CLI: foo.bar and foo.qux.baz. We can also look at their metadata directly in the out/ folder at their respective paths out/foo/bar.json and out/foo/qux/baz.json.
> ./mill show foo.bar
"hello"

> ./mill show foo.qux.baz
"world"

> cat ./out/foo/bar.json
..."value": "hello"...

> cat ./out/foo/qux/baz.json
..."value": "world"...
This example is trivial: the tasks just return constant strings. But it illustrates the core module tree structure and how it is reflected throughout Mill: in code in build.sc, logically in the tree diagram, and in the CLI and on disk in the usage examples. Mill keeps these representations as consistent as possible, to make it easy to navigate back and forth between them.
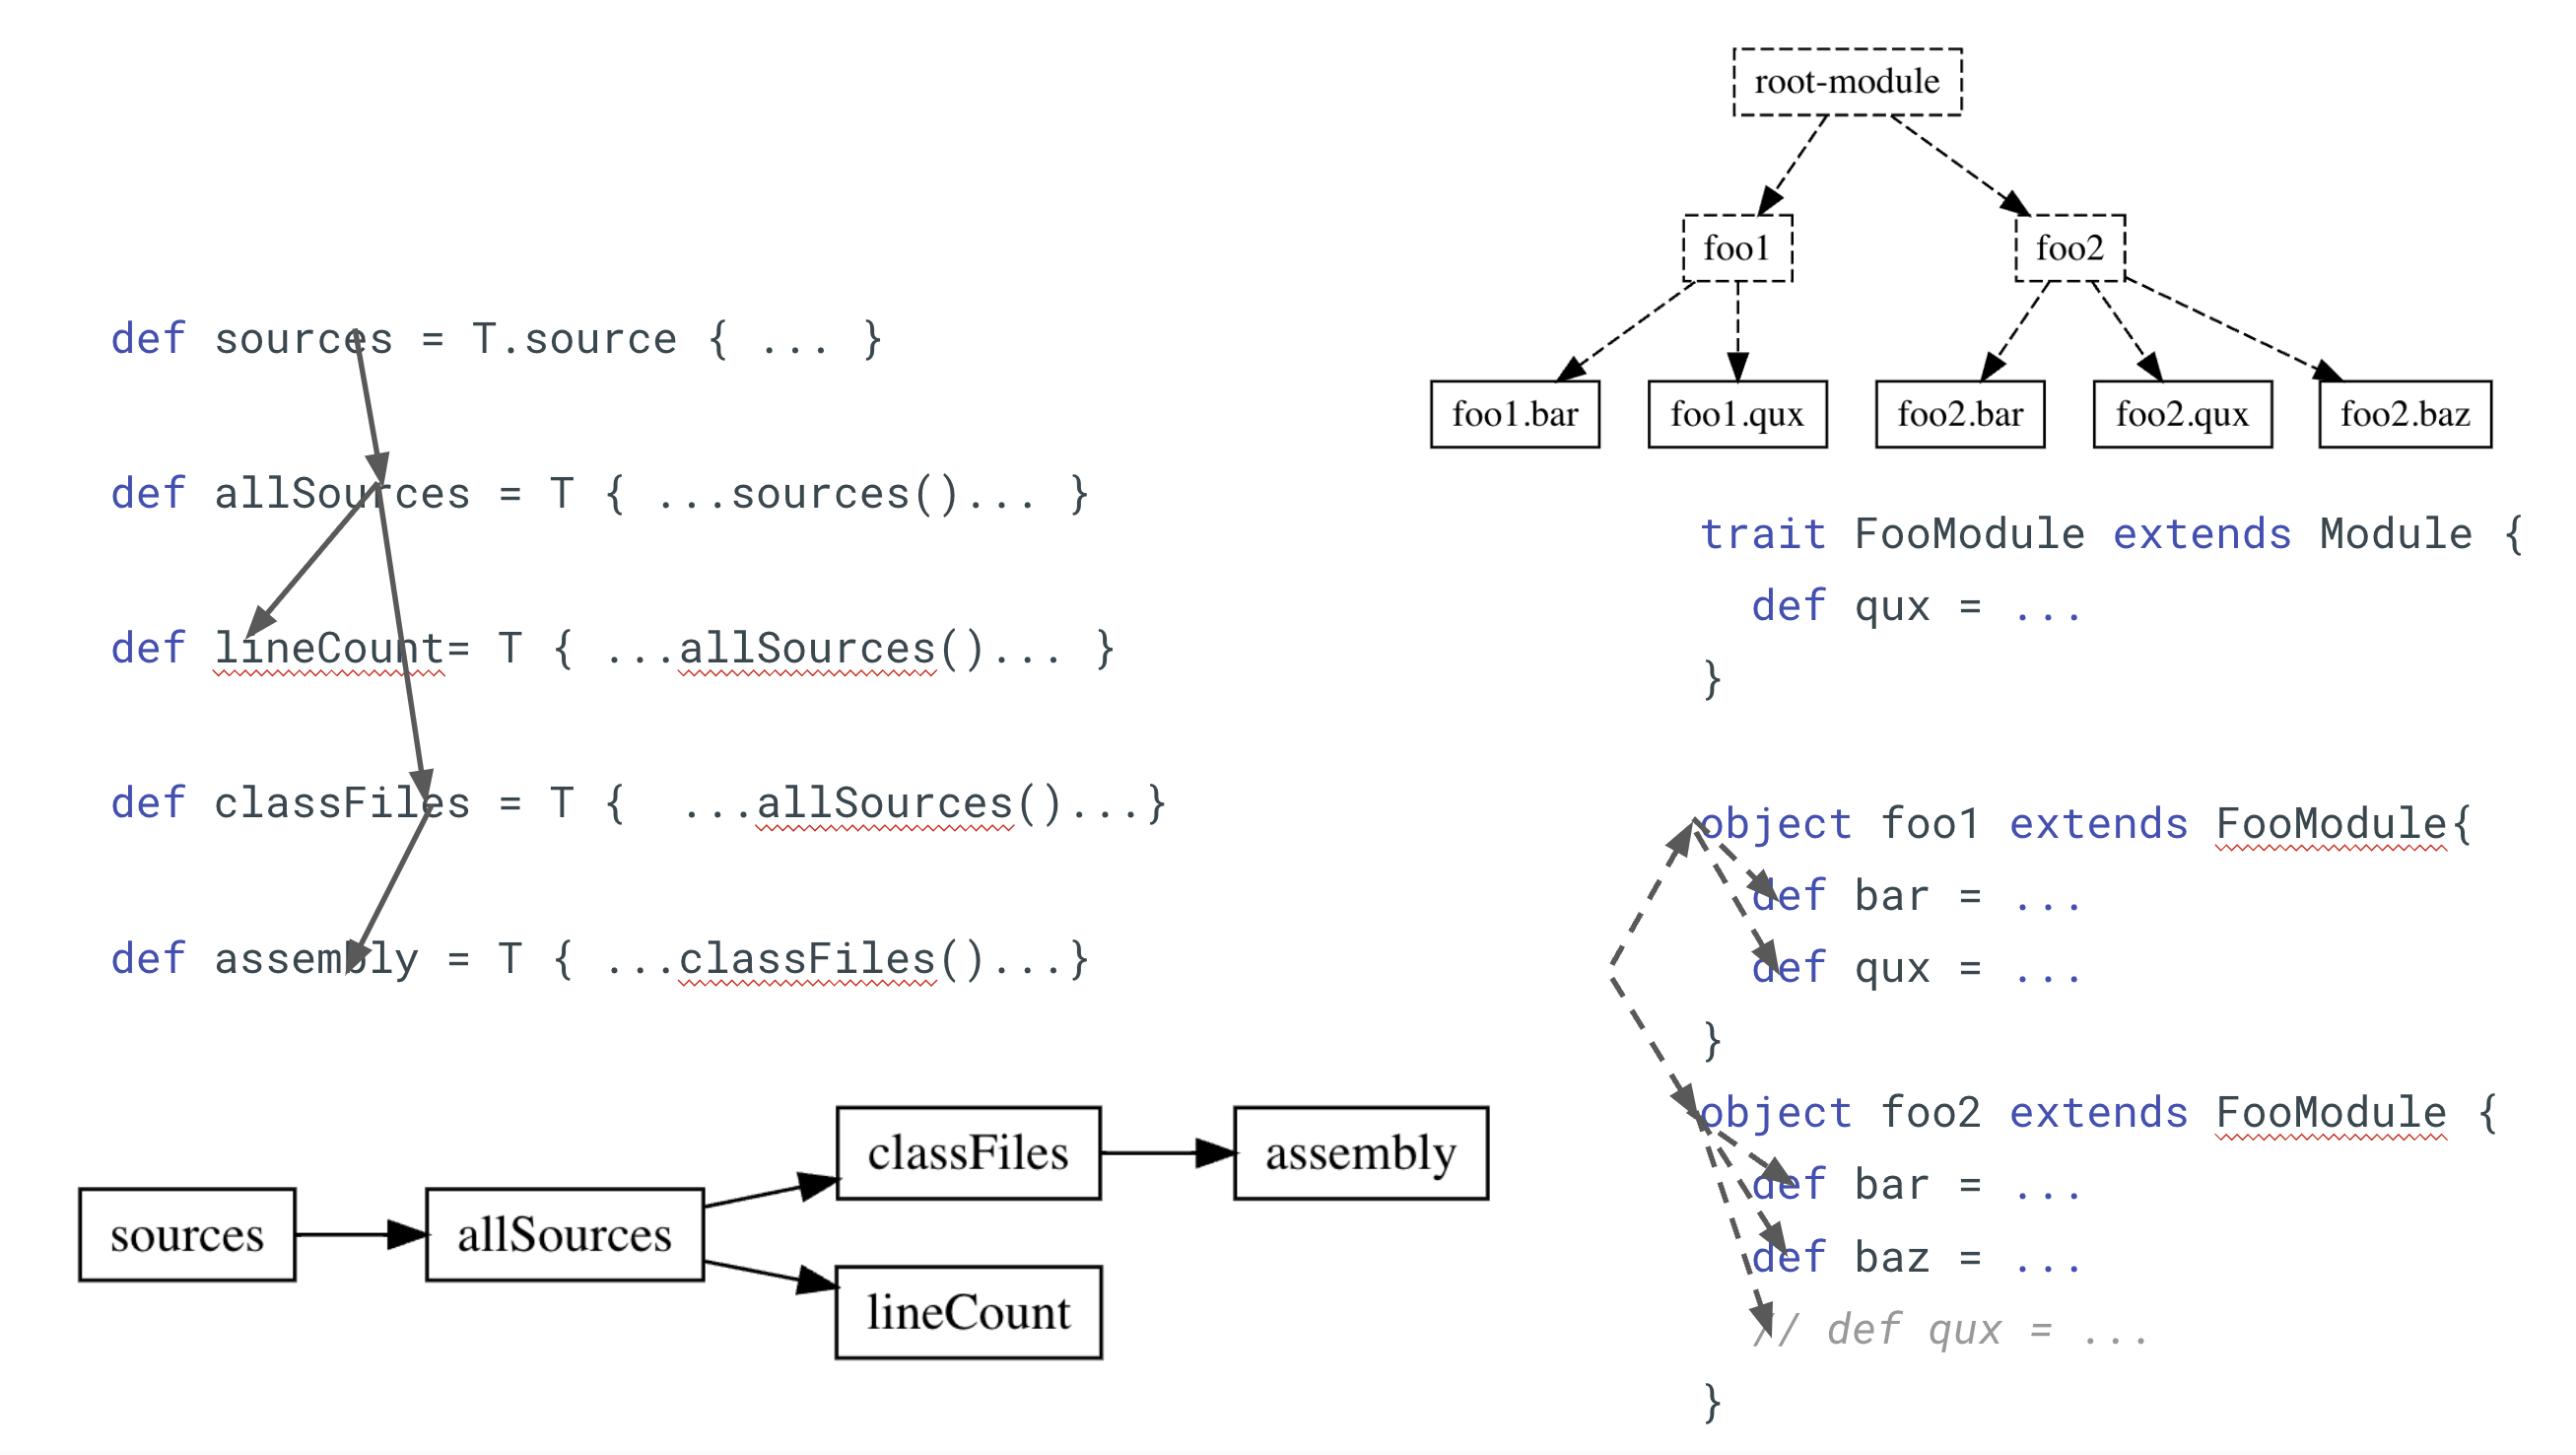
Modules can be turned into traits for re-use. We saw some of this in our earlier example with trait MyModule extends ScalaModule, but below is a standalone example that does not make use of any builtin helpers. We have trait FooModule extending mill.Module, defining one abstract target bar and one concrete target qux:
trait FooModule extends Module {
  def bar: T[String] // required override
  def qux = T { bar() + " world" }
}
This trait can then be instantiated multiple times, potentially with different customizations each time:
object foo1 extends FooModule{
  def bar = "hello"
  def qux = super.qux().toUpperCase // refer to overridden value via super
}
object foo2 extends FooModule {
  def bar = "hi"
  def baz = T { qux() + " I am Cow" } // add a new `def`
}
This results in a module tree as shown below
And you can see the values printed by show are as you would expect:
> ./mill show foo1.bar
"hello"

> ./mill show foo1.qux
"HELLO WORLD"

> ./mill show foo2.bar
"hi"

> ./mill show foo2.qux
"hi world"

> ./mill show foo2.baz
"hi world I am Cow"
The built-in mill.scalalib package uses traits to define ScalaModule, JavaModule, ScalaTestsModule, etc. each of which contain some set of "standard" operations such as compile, run or assembly. But those traits are not privileged in any way. You can easily extend and customize them to your own specific use case, or write your own Module traits from scratch if you need something different.
Now that we have learned about tasks, and we’ve learned about modules, let’s dig into an example where we use both of them together in a more realistic setting. We’ll write a re-usable module trait that can compile a multi-module Java codebase into distributable assemblies - in an parallelizable, incremental, and extensible fashion - from first principles using Mill.
The code below implements our own minimal version of mill.scalalib.JavaModule, named DiyJavaModule. This is similar to the sets of targets we saw earlier: you have a sources task, a compile task that shells out to javac, and an assembly task that shells out to the jar command:
import mill._

trait DiyJavaModule extends Module{
  def moduleDeps: Seq[DiyJavaModule] = Nil
  def mainClass: T[Option[String]] = None

  def upstream: T[Seq[PathRef]] = T{ T.traverse(moduleDeps)(_.classPath)().flatten }
  def sources = T.source(millSourcePath / "src")

  def compile = T {
    val allSources = os.walk(sources().path)
    val cpFlag = Seq("-cp", upstream().map(_.path).mkString(":"))
    os.proc("javac", cpFlag, allSources, "-d", T.dest).call()
    PathRef(T.dest)
  }

  def classPath = T{ Seq(compile()) ++ upstream() }

  def assembly = T {
    for(cp <- classPath()) os.copy(cp.path, T.dest, mergeFolders = true)

    val mainFlags = mainClass().toSeq.flatMap(Seq("-e", _))
    os.proc("jar", "-c", mainFlags, "-f", T.dest / "out.jar", ".")
      .call(cwd = T.dest)

    PathRef(T.dest / "out.jar")
  }
}
Some notable changes to call out:
All the tasks are bundled together inside a trait DiyJavaModule extends Module. This lets us instantiate the entire target graph multiple times
def moduleDeps lets us define the module-level dependencies, which are then used by def upstream
def upstream turns the module-level dependencies defined by moduleDeps into task-level dependencies, via the T.traverse helper that combines all their classPaths, each a sequence of paths, together into one big sequence. I won’t go too deeply into this, but it works similar to traverse methods you may have seen elsewhere, such as Future.traverse
We need to combine the upstream classpath and compile classpath into a single classPath task, and now that we have multiple classPath folders, one for each module, assembly needs to merge all of them before generating the jar
Overall, it’s a non-trivial amount of code, but relatively straightforward: compile takes the Java source code and passes them to a javac subprocess, assembly takes multiple folders full of compiled classfiles and passing them to a jar subprocesses, and there's some code to feed the compile output from upstream modules to downstream modules.
This results in the target graph shown below, with the dashed arrows coming into compile and classPath indicating the unknown inputs from def upstream/def moduleDeps that we might not know yet.
DiyJavaModule can be used by instantiating it: just object foo extends DiyJavaModule while implementing or overriding anything we want. This is identical to what we saw earlier when instantiating the built-in ScalaModule trait. Modules can be siblings like foo and qux, or nested like with foo.bar inside foo below.
object foo extends DiyJavaModule {
  def moduleDeps = Seq(bar)
  def mainClass = Some("foo.Foo")

  object bar extends DiyJavaModule
}

object qux extends DiyJavaModule {
  def moduleDeps = Seq(foo)
  def mainClass = Some("qux.Qux")
}
That’s all we need to start constructing Java assemblies using our DiyJavaModules:
> ./mill showNamed __.sources
{
  "foo.sources": ".../foo/src",
  "foo.bar.sources": ".../foo/bar/src",
  "qux.sources": ".../qux/src"
}

> ./mill show qux.assembly
".../out/qux/assembly.dest/out.jar"

> java -jar out/qux/assembly.dest/out.jar
Foo.value: 31337
Bar.value: 271828
Qux.value: 9000
The source code for foo/src, foo/bar/src, and qux/src are not shown, but this example just demonstrates that running the out.jar built by qux.assembly is able to print out the values Foo.value, Bar.value, and Qux.value defined in the both qux as well as the upstream foo and foo.bar modules.
Below is the final build graph, after we’ve instantiated and wired together our three DiyJavaModules.
Like any other set of Targets and Modules, the compilation and packaging of the Java code via DiyJavaModule is:
Incremental: if you change a file in foo/src/ (foo.sources) and run qux.assembly, foo.compile and qux.compile will be re-evaluated, but foo.bar.compile will not as it does not transitively depend on foo.sources
Parallelizable: if you give Mill 3 threads, foo.bar.compile/foo.compile/qux.compile will have to happen one after the other due to the dependencies between them, but foo.bar.assembly/foo.assembly/qux.assembly can happen in parallel because they have no mutual dependencies
Introspectable: you can run ./mill inspect or ./mill show to see the metadata and return value for any task in the graph. Very useful for debugging purposes. You can also find this data and files on disk at each task’s respective filesystem paths
Re-usable: you can instantiate as many DiyJavaModules as you want: top-level modules, sibling modules, sub-modules, etc.
Extensible: you can override any target you want with a custom implementation, you can call super if necessary.
It’s worth calling out again that the build.sc file that the user writes does not contain any logic at all related to incremental computation, parallelization, introspectability, re-use, or extensibility. The user only needs to write the build logic unique to their specific use case: where do input files live, what normal Scala data transformations do I need, what subprocesses do I shell out to with what flags. Mill will take care of everything else.
Earlier in this post, we saw an example with two modules extending the Mill built-in ScalaModule. With DiyJavaModule, we have now implemented our own re-usable module trait from first principles that can be wired up the same way and perform some of the same tasks of compiling and packaging a multi-module Java codebase. The built-in ScalaModule may be more complicated for added performance or flexibility, but at its core it works no differently from the DiyJavaModule we defined ourselves in this post.
While Mill comes with built-in support for Java and Scala, you can use it to define build pipelines for other things as well: generating a static blog, creating PDFs, hashing and preparing static web assets for deployment on CDN. As a user of Mill, you can write whatever logic you want, in normal Scala code, using whatever normal JVM libraries or subprocess utilities you have available. Mill will take whatever you throw at it and turn it into a parallel, incremental, extensible build pipeline.
Now, we’ve talked at length about how Mill works. Now let’s discuss why it works, as an intuitive and understandable build tool.
This comes down to Mill's two core concepts - the Task Graph and the Module Tree - and how they are embedded into the core syntax and semantics of the Scala language.
The first core concept behind Mill is the Task Graph. Consider again the graph from our DIY Java Modules example earlier.
Re-visiting the big list of questions What's Hard about Build Tools, we can see that the Task Graph answers the first few of them with a single data structure:
What tasks depends on what? the edges of a task graph
Where do input files come from? the "roots" of the task graph
What needs to run in what order? topological traversal of the task graph, serial or parallel
What can be parallelized and what can’t? whether they transitively depend on each other in the task graph
Most developers are already familiar with graphs, and should find these answers relatively "obvious". Once shown the task graphs above, they should be able to intuitively identify what tasks can be parallelized or what tasks need to run in a particular order.
The idea of a task graph isn't unique to Mill: even make has a task graph of sorts, as do most modern build tools. Nevertheless, it is an core part of what makes Mill work, and becomes especially important when combined with the module tree and embedding into the Scala language below.
The second core concept behind Mill is the Module Tree. Consider again this tree from an earlier example:
Modules are just objects that extend mill.Module. These form a tree and can contain targets.
The structure of the Module Tree intentionally mirrors the tree structure of your filesystem. Basically every software project is managed as files and folders on disk, and by following this Mill makes it very easy to make your Mill build match up with how you are already structuring your codebase.
It’s worth calling out that not every build tool makes the same decision here: SBT is famous for having a Four Dimensional Hyper-Matrix as its core data structure. Below is a visualization of what a 4-dimensional hyper-matrix looks like, if you're not already familiar with them:
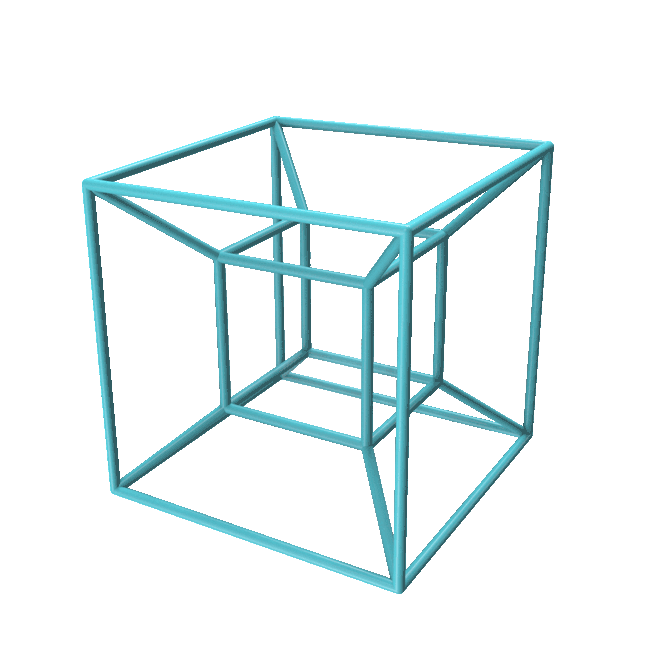
The issue is that while most developers are familiar with trees, not nearly as many are familiar with four-dimensional hyper-matrices! Mill's choice of the Tree as its core data structure really helps keeping things familiar with what any developer already knows even before they get started using Mill.
Apart from bringing familiarity, the Module Tree ends up answering the next few questions from our big list:
Where can tasks read/write to disk? In a .dest folder matching the task’s position in the tree
How are tasks cached? In a .json file matching the task’s position in the tree
How are tasks run from the CLI? Via their dot-delimited fully-qualified name or path in the tree
How are cross-builds handled? by having multiple modules in the tree, one for each cross version
The tree structure of the Module Tree acts as an "anchor" for the tasks in the Mill task graph: gives each one a place to live on disk, a cache key, a name. This strict tree structure is halfway between "objects" and "packages" in a typical programming language. the former anonymous and floating freely in the heap until garbage collected, while the latter arranged in a strict hierarchy. Both "objects" and "packages" are familiar to any programmer, and this combination is enough to help answer many of the difficult questions that any build tool needs to answer.
The last and final reason Mill works so well is that it embeds itself into the Scala language smoothly enough that you may not even notice there is magic going on. Consider again this example build.sc from earlier:
// build.sc
import mill._, scalalib._

object foo extends RootModule with ScalaModule {
  def scalaVersion = "2.13.11"

  /** Total number of lines in modules source files */
  def lineCount = T{
    allSourceFiles().map(f => os.read.lines(f.path).size).sum
  }

  /** Generate resources using lineCount of sources */
  override def resources = T{
    os.write(T.dest / "line-count.txt", "" + lineCount())
    super.resources() ++ Seq(PathRef(T.dest))
  }
}
Mill uses the Scala language to answer the last few questions from our list:
How do I define my own custom tasks? Write a Scala def and call other defs
How do tasks pass data to each other? Via their Scala return value
How to manage the repetition inherent in a build? Define Scala traits and re-use them
What is a "Module"? How do they relate to "Tasks"? Modules are just Scala objects that contain defs which are Tasks
How do you customize a task or module to do something different? override and super
What APIs do tasks use to actually do things? The same libraries you might use in normal code! OS-Lib provides the os.read/os.write/os.proc calls we've see in snippets, data is serialized using uPickle, command line parameters are parsed using MainArgs
How is in-memory caching handled? Via long-lived in-memory stateful objects, where Mill helps managing their instantiation and invalidation
Earlier in this post we discussed how pure functional programs have a lot of similarities to the build graph. It turns out that the rest of Scala has a lot to give as well: the way we use def tasks, use objects-as-namespaces, build a reference tree of objects, use overrides and super for customization, and so on. Each of these provides an answer to a necessary build-tool question, one that should already be familiar to anyone with prior experience not just in Scala but in any other modern programming language.
With just three core concepts, we've answered our entire laundry-list of questions that any build tool needs answers for. But that's not all!
The seamless embedding into Scala means that the Task Graph matches the method Call Graph. And the Module Tree matches the object Reference Graph.
Call Graphs and Reference Graphs are concepts that are already familiar to any programmer with prior experience in any almost programming language. Python, Java, Javascript, C++: they all have call graphs and reference graphs too! Programmers already know this stuff, long before they ever set eyes on the Scala programming language or the Mill Build Tool.
So what’s left as required-learning for someone to use Mill? It turns out, the only pre-requisite for knowing how to use Mill is knowing how to write code. All your existing programming experience - method calls returning values, classes with inheritance and overrides, objects referencing other objects - translates directly into using Mill. Sure, a Java programmer may take a moment to get used to the Scala syntax, as well as some of Mill's own quirks. But the core model of what a Mill build is all about - objects referencing other objects that define methods calling other methods - should be immediately familiar.
That means that an existing programmer can begin using Mill and immediately be familiar with how Mill answers our whole laundry list of important build-tool questions, while in other build tools they may first need to read chapters and chapters of documentation before they can step beyond what is possible via cargo-cult copy-pasting. This immediate sense of familiarity and productivity, leveraging everything someone would already know as a programmer, is what makes the Mill build tool such a delightful and intuitive experience.
In this post, we did a deep dive into what makes the Mill build tool special.
We started off by looking at why build tools are hard, explored getting started with Mill for Scala, dug into the fundamental concepts that make up the Mill build tool, and lastly discussed the core ways Mill lets a programmer immediately understand how it works without tediously digging through chapters and chapters of documentation.
People talk a lot about build tools, but the discussion is often focused on very superficial aspects: is Scala better than Groovy? Is YAML better than code? But once you crack the surface, it turns out that what really matters is how the build tool comes up with answers for every single entry in our rather long list of questions, and how it avoids a developer needing to read an entire book’s worth of documentation in order to understand those answers. Not every build tool succeeds in this, but Mill, by and large, does.
Among all the attempts at writing alternate Scala build tools to replace SBT, Mill is one of the only ones that can confidently be used today. Major projects like Coursier and Scala-CLI are built using Mill, as is the whole com-lihaoyi ecosystem. Mill works!
But Mill is more than just a "better SBT". It is unique as a build tool that leverages everything you already know about programming, seamlessly enough to feel familiar from the moment you pick it up. A tool that lets you learn nothing, have a great time configuring your build system up front, and enjoy continuing to maintain it months and years into the future. And that is what makes the Mill build tool so special.
Check out the Mill website if you would like to learn more:
About the Author: Haoyi is a software engineer, and the author of many open-source Scala tools such as the Ammonite REPL and the Mill Build Tool. If you enjoyed the contents on this blog, you may also enjoy Haoyi's book Hands-on Scala Programming