
Table of Contents
Web and API servers are the backbone of internet systems: they provide the basic interface for computers to interact over a network, especially at the boundary between different companies and organizations. This tutorial will teach you the basics of setting up a simple HTTP server in Scala to serve Web and API requests, and walk you through a complete example of building a simple real-time chat website serving both HTML web pages and JSON API endpoints.
About the Author: Haoyi is a software engineer, and the author of many open-source Scala tools such as the Ammonite REPL and the Mill Build Tool. If you enjoyed the contents on this blog, you may also enjoy Haoyi's book Hands-on Scala Programming
The goal of this tutorial is to show you how to set up a simple HTTP server in Scala that can serve web pages and respond to API requests. We will work towards setting up a simple chat website, which will allow users to post chat messages and have other users viewing the website see them. For simplicity, we will ignore concerns such as authentication, performance, user management, and database persistence. Nevertheless, this tutorial should be enough for you to get started building web and API servers in Scala, and provide a foundation for you to learn more and build more production-ready projects.
To begin with, we are going to use the Cask web framework:
Cask is a Scala HTTP micro-framework that lets you get a simple website up and running quickly.
To begin working with Cask, simply download and unzip the example application:
$ curl -L https://github.com/lihaoyi/cask/releases/download/0.3.0/minimalApplication-0.3.0.zip > cask.zip

$ unzip cask.zip

$ cd minimalApplication-0.3.0
We can run find to see what we have available:
$ find . -type f
./build.sc
./app/test/src/ExampleTests.scala
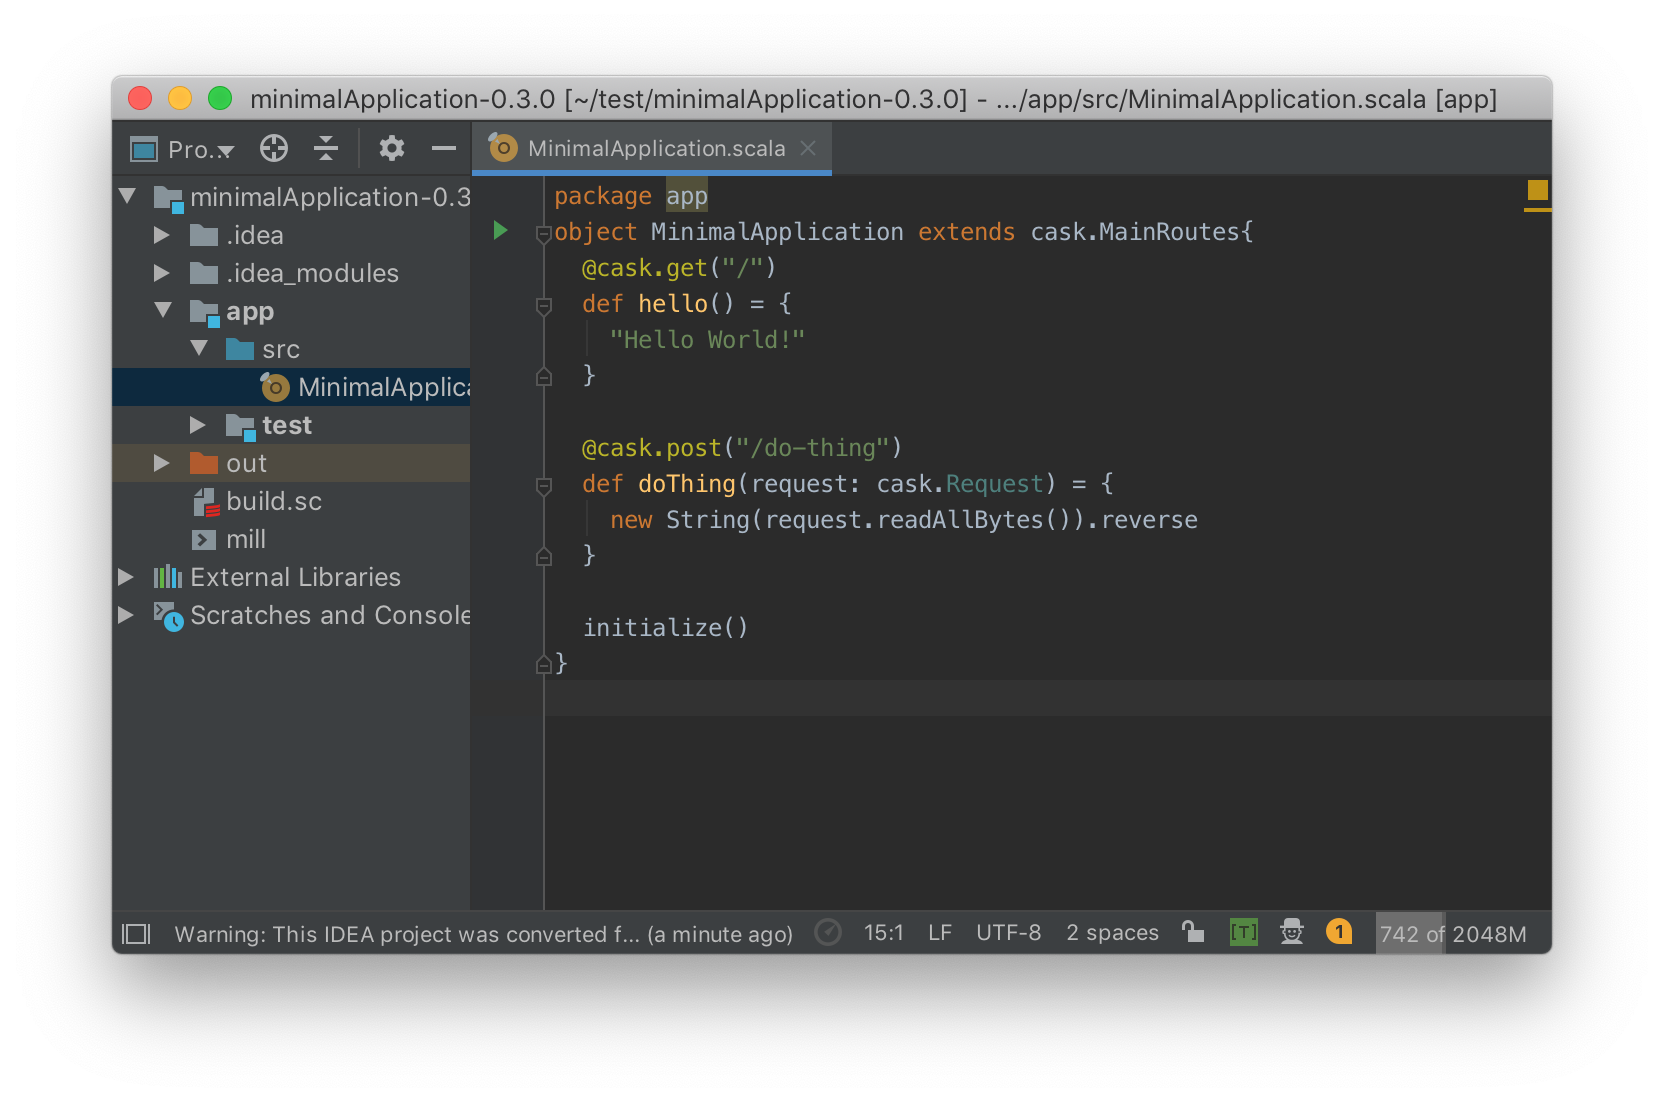
./app/src/MinimalApplication.scala
./mill
Most of what we're interested in lives in app/src/MinimalApplication.scala:
package app
object MinimalApplication extends cask.MainRoutes{
  @cask.get("/")
  def hello() = {
    "Hello World!"
  }

  @cask.post("/do-thing")
  def doThing(request: cask.Request) = {
    new String(request.readAllBytes()).reverse
  }

  initialize()
}
Which is built using the build.sc:
import mill._, scalalib._

object app extends ScalaModule{
  def scalaVersion = "2.13.0"
  def ivyDeps = Agg(
    ivy"com.lihaoyi::cask:0.3.0"
  )
  object test extends Tests{
    def testFrameworks = Seq("utest.runner.Framework")

    def ivyDeps = Agg(
      ivy"com.lihaoyi::utest::0.7.1",
      ivy"com.lihaoyi::requests::0.2.0",
    )
  }
}
If you are using Intellij, you can run the following command to set up the Intelij project configuration:
$ ./mill mill.scalalib.GenIdea/idea
Now you can open up your minimalApplication-0.3.0/ folder in Intellij and see your project indexed and ready for editing:
We can run this program with the Mill build tool, using the ./mill executable:
$ ./mill -w app.runBackground
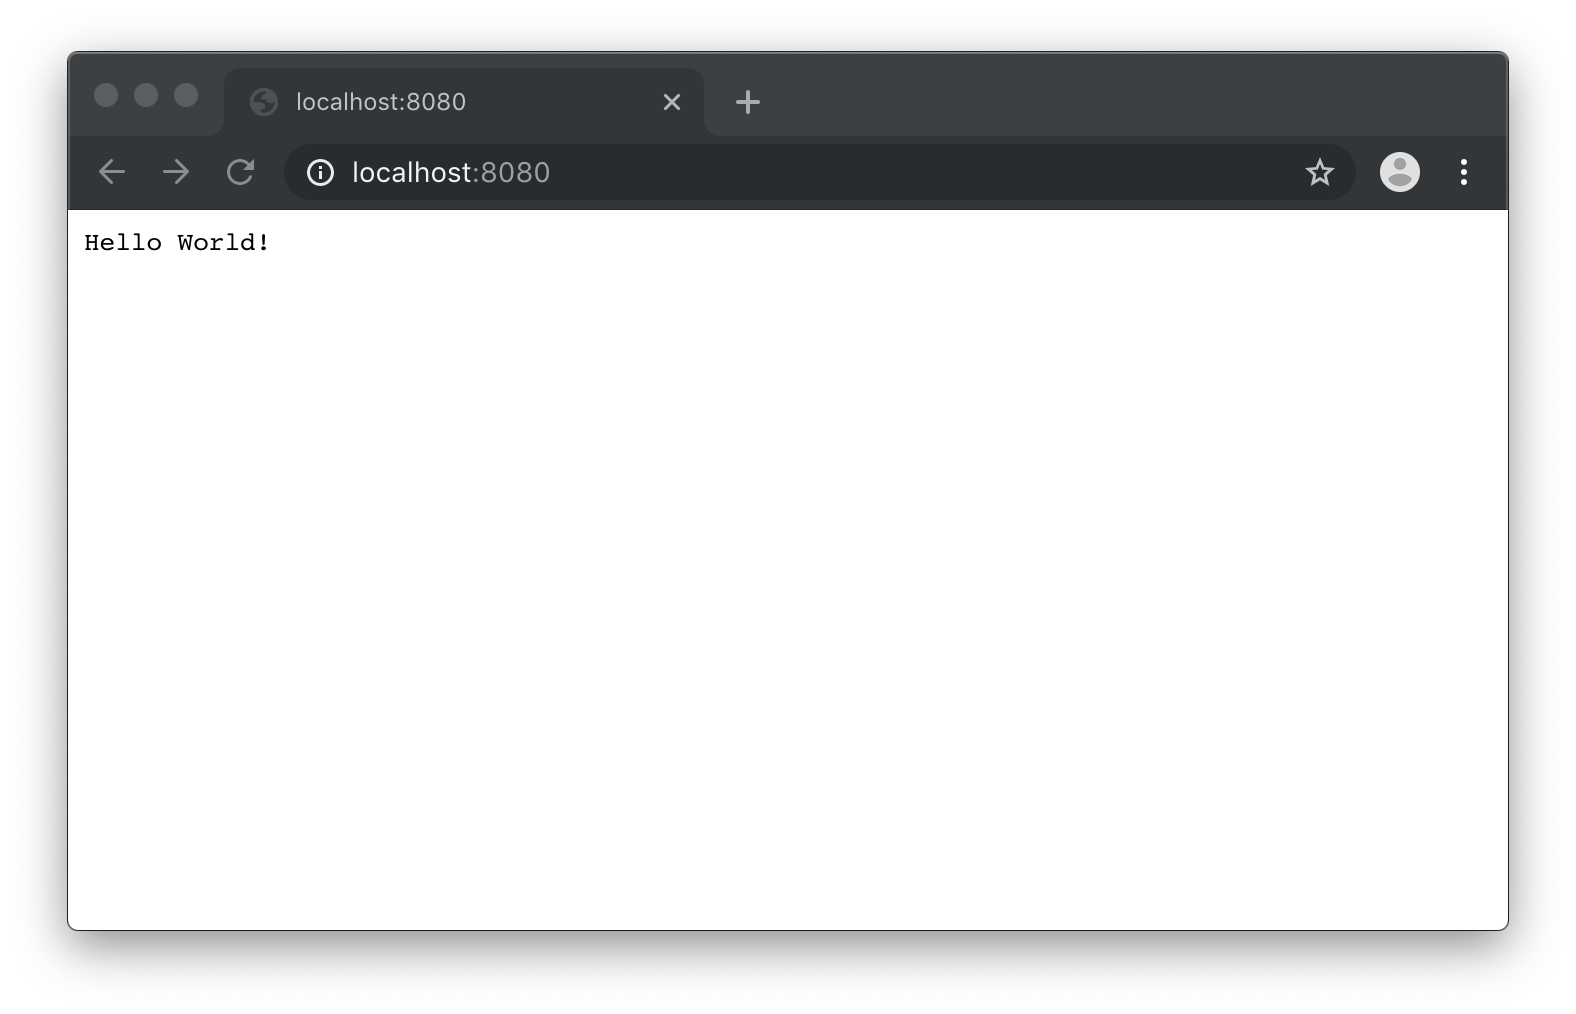
Which will run the Cask webserver in the background while also monitoring the filesystem so if the code changes it can restart. We can then navigate to the server in the browser, by default at localhost:8080:
There is also a POST endpoint at /do-thing we can try out by running curl in another terminal window:
$ curl -X POST --data hello http://localhost:8080/do-thing
olleh
As you can see, it takes the data payload hello and reverses it before sending it back to the client.
You can also run the automated tests in app/test/src/ExampleTests.scala:
$ ./mill clean app.runBackground # stop the webserver running in the background

$ ./mill app.test
[50/56] app.test.compile
[info] Compiling 1 Scala source to /Users/lihaoyi/test/minimalApplication-0.3.0/out/app/test/compile/dest/classes ...
[info] Done compiling.
[56/56] app.test.test
-------------------------------- Running Tests --------------------------------
+ app.ExampleTests.MinimalApplication 629ms
Now that we've got the basics up and running, let's get the webserver running again:
$ ./mill -w app.runBackground
And get started with our chat website!
The first thing to do is to convert our plain-text "Hello World!" website into a HTML web page. The easiest way to do this is via the Scalatags HTML generation library, similar to the one we explored in the blog post Scala Scripting and the 15 Minute Blog Engine. To use Scalatags in this project, simply add it as a dependency to your build.sc file:
   def ivyDeps = Agg(
+    ivy"com.lihaoyi::scalatags:0.7.0",
     ivy"com.lihaoyi::cask:0.3.0"
   )
If using Intellij, you'll have to run the ./mill mill.scalalib.GenIdea/idea command again to pick up the changes in your dependencies, followed by ./mill -w app.runBackground to get the webserver listening for changes again.
We can then import Scalatags into our MinimalApplication.scala file:
 package app
+import scalatags.Text.all._
 object MinimalApplication extends cask.MainRoutes{
And replace the "Hello World!" string with a minimal Scalatags HTML template:
   def hello() = {
-    "Hello World!"
+    html(
+      head(),
+      body(
+        h1("Hello!"),
+        p("World")
+      )
+    ).render
   }
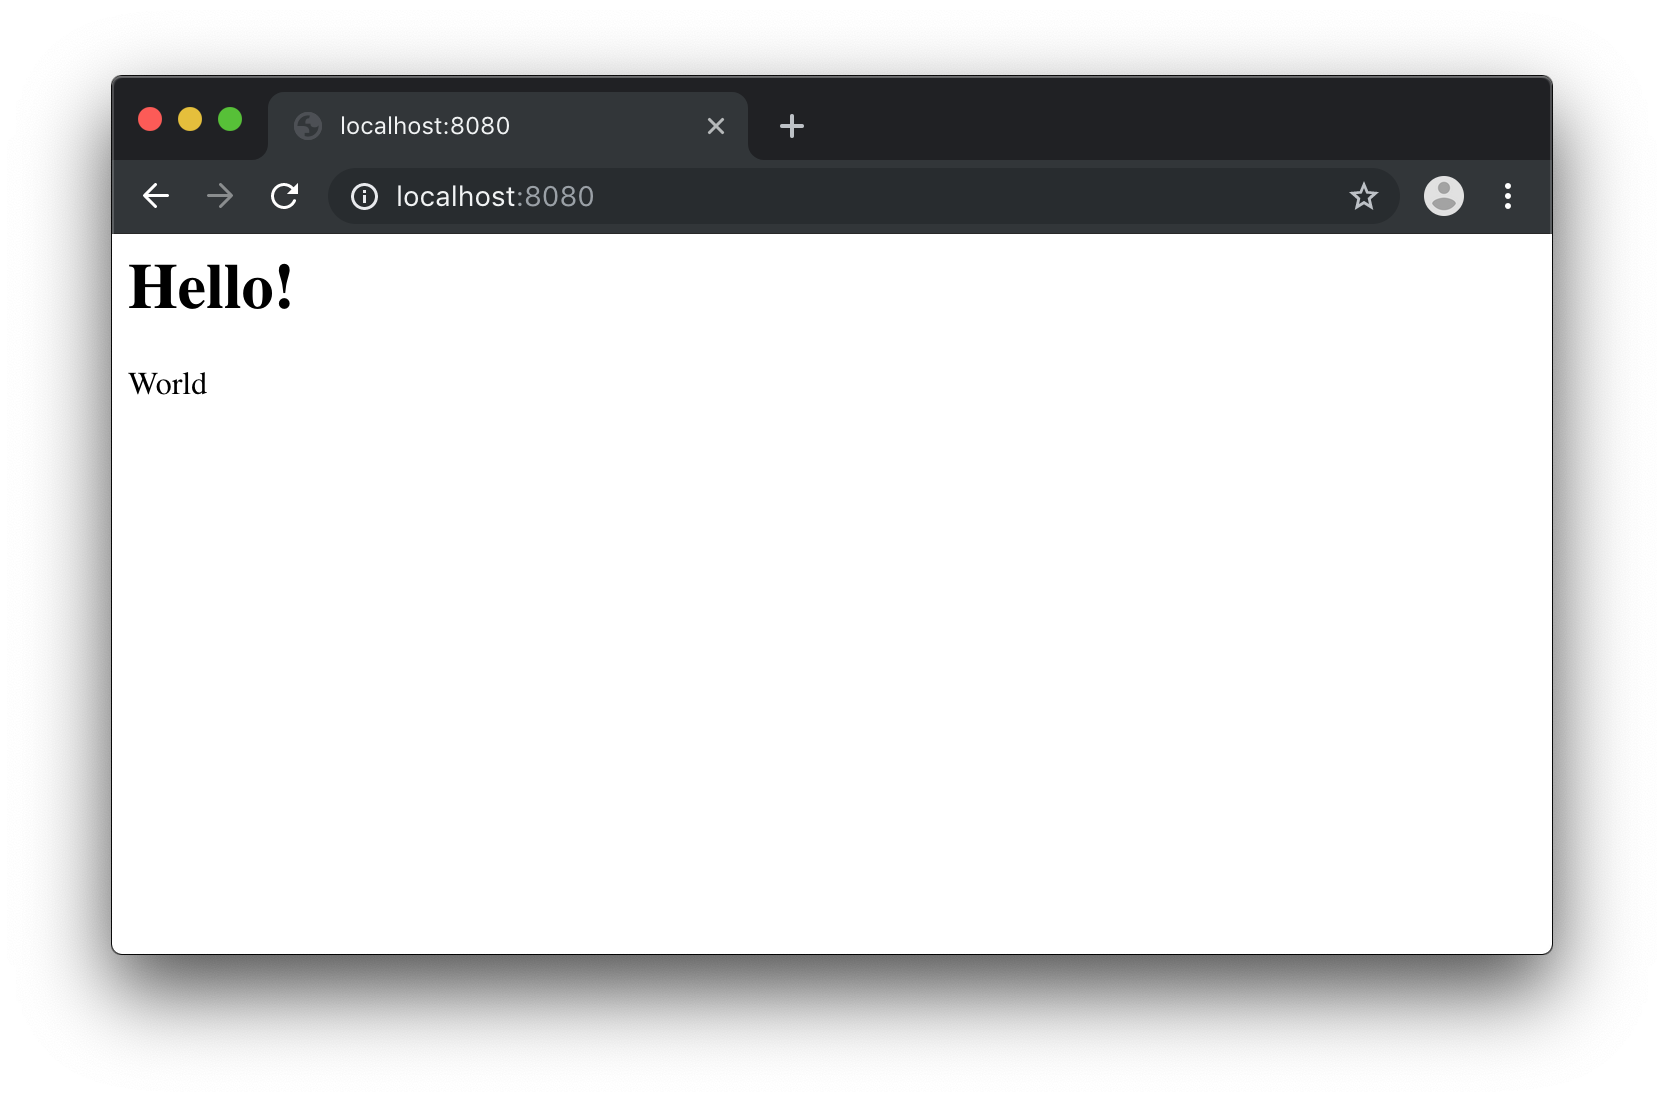
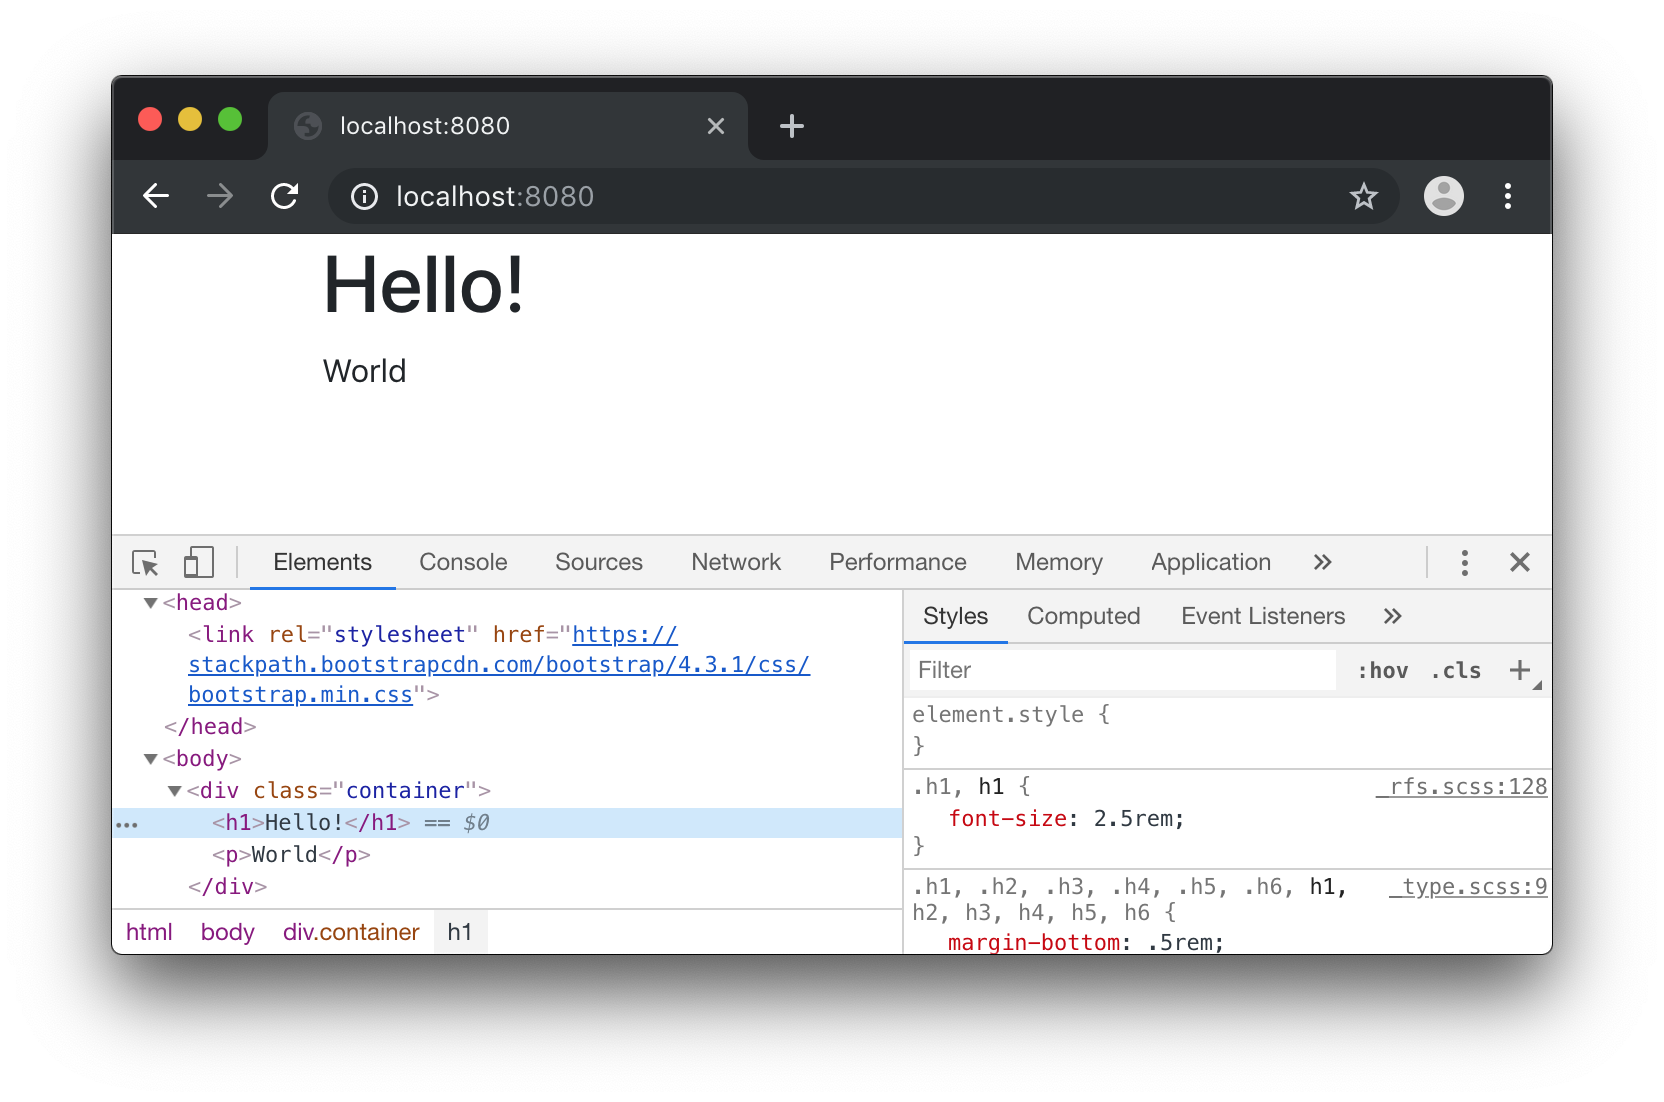
We should see the ./mill -w app.runBackground command re-compile our code and restart the server. We can then refresh the page to see our plain text response has been replaced by a basic HTML page:
In order to make our page look a bit pretties, we will use the Boostrap CSS framework to style it. We can include bootstrap via a link tag, following their getting started instructions:
       head(
+        link(
+          rel := "stylesheet",
+          href := "https://stackpath.bootstrapcdn.com/bootstrap/4.3.1/css/bootstrap.min.css"
+        )
       ),
       body(
-        h1("Hello!"),
-        p("World")
+        div(cls := "container")(
+          h1("Hello!"),
+          p("World")
+        )
       )
Now our fonts look slightly better:
Not the prettiest website around, but it will do for now.
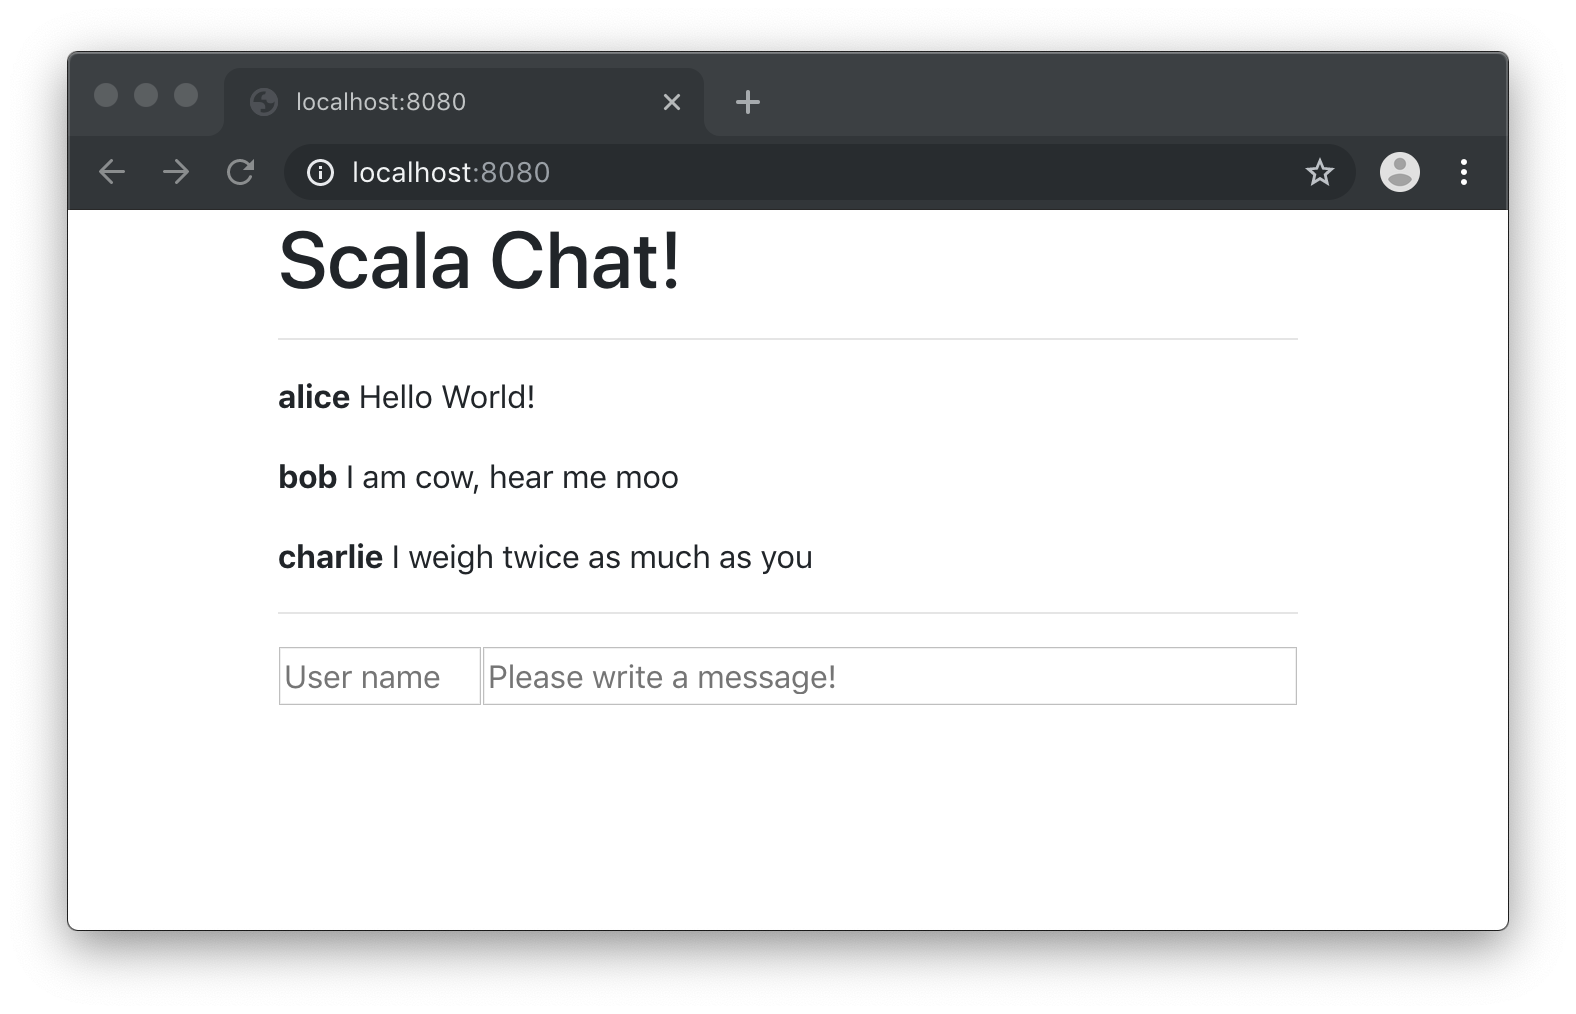
To finish off this section, let's flesh out our Scalatags HTML template to look like a mock chat application: with hardcoded chats and dummy input boxes.
       body(
         div(cls := "container")(
-          h1("Hello!"),
-          p("World")
+          h1("Scala Chat!"),
+          hr,
+          div(
+            p(b("alice"), " ", "Hello World!"),
+            p(b("bob"), " ", "I am cow, hear me moo"),
+            p(b("charlie"), " ", "I weigh twice as much as you")
+          ),
+          hr,
+          div(
+            input(`type` := "text", placeholder := "User name", width := "20%"),
+            input(`type` := "text", placeholder := "Please write a message!", width := "80%")
+          )
         )
       )
We now have a simple static website, serving HTML pages, using the Cask web framework and the Scalatags HTML library. The current server code now looks as follows:
package app
import scalatags.Text.all._
object MinimalApplication extends cask.MainRoutes{
  @cask.get("/")
  def hello() = {
    html(
      head(
        link(
          rel := "stylesheet",
          href := "https://stackpath.bootstrapcdn.com/bootstrap/4.3.1/css/bootstrap.min.css"
        )
      ),
      body(
        div(cls := "container")(
          h1("Scala Chat!"),
          hr,
          div(
            p(b("alice"), " ", "Hello World!"),
            p(b("bob"), " ", "I am cow, hear me moo"),
            p(b("charlie"), " ", "I weigh twice as much as you")
          ),
          hr,
          div(
            input(`type` := "text", placeholder := "User name", width := "20%"),
            input(`type` := "text", placeholder := "Please write a message!", width := "80%")
          )
        )
      )
    ).render
  }

  initialize()
}
Next, let's look at making this website actually work interactively!
Out first attempt at making this website interactive will be to use HTML forms. First we need to remove the hardcoded list of messages and instead render the HTML page based on data:
 object MinimalApplication extends cask.MainRoutes{
+  var messages = Vector(
+    ("alice", "Hello World!"),
+    ("bob", "I am cow, hear me moo"),
+    ("charlie", "I weigh twice as much as you"),
+  )
  @cask.get("/")
           div(
-            p(b("alice"), " ", "Hello World!"),
-            p(b("bob"), " ", "I am cow, hear me moo"),
-            p(b("charlie"), " ", "I weight twice as much as you")
+            for((name, msg) <- messages)
+            yield p(b(name), " ", msg)
           ),
For now, we will simply use an in memory messages store. Persistence of messages to a database will be left to a subsequent tutorial.
Next, we need to make the two inputs at the bottom of the page interactive. To do so, we need to wrap them in a form element:
           hr,
-          div(
-            input(`type` := "text", placeholder := "User name", width := "20%"),
-            input(`type` := "text", placeholder := "Please write a message!", width := "80%")
+          form(action := "/", method := "post")(
+            input(`type` := "text", name := "name", placeholder := "User name", width := "20%"),
+            input(`type` := "text", name := "msg", placeholder := "Please write a message!", width := "60%"),
+            input(`type` := "submit", width := "20%")
          )
This gives us an interactive form that looks similar to the mock we had earlier. However, submitting the form gives us a Error 404: Not Found page. This is because we still haven't wired up the server to handle the form submission and receive the new chat message. We can do so as follows:
-  )
+
+  @cask.postForm("/")
+  def postHello(name: String, msg: String) = {
+    messages = messages :+ (name -> msg)
+    hello()
+  }
+
   @cask.get("/")
This @cask.postForm definition adds another handler for the root / URL, except this one handles POST requests instead of GET requests. The Cask Documentation contains examples of the other @cask.* annotations you can use to define handlers.
Now we can enter a user name and message, and post a message to the room:
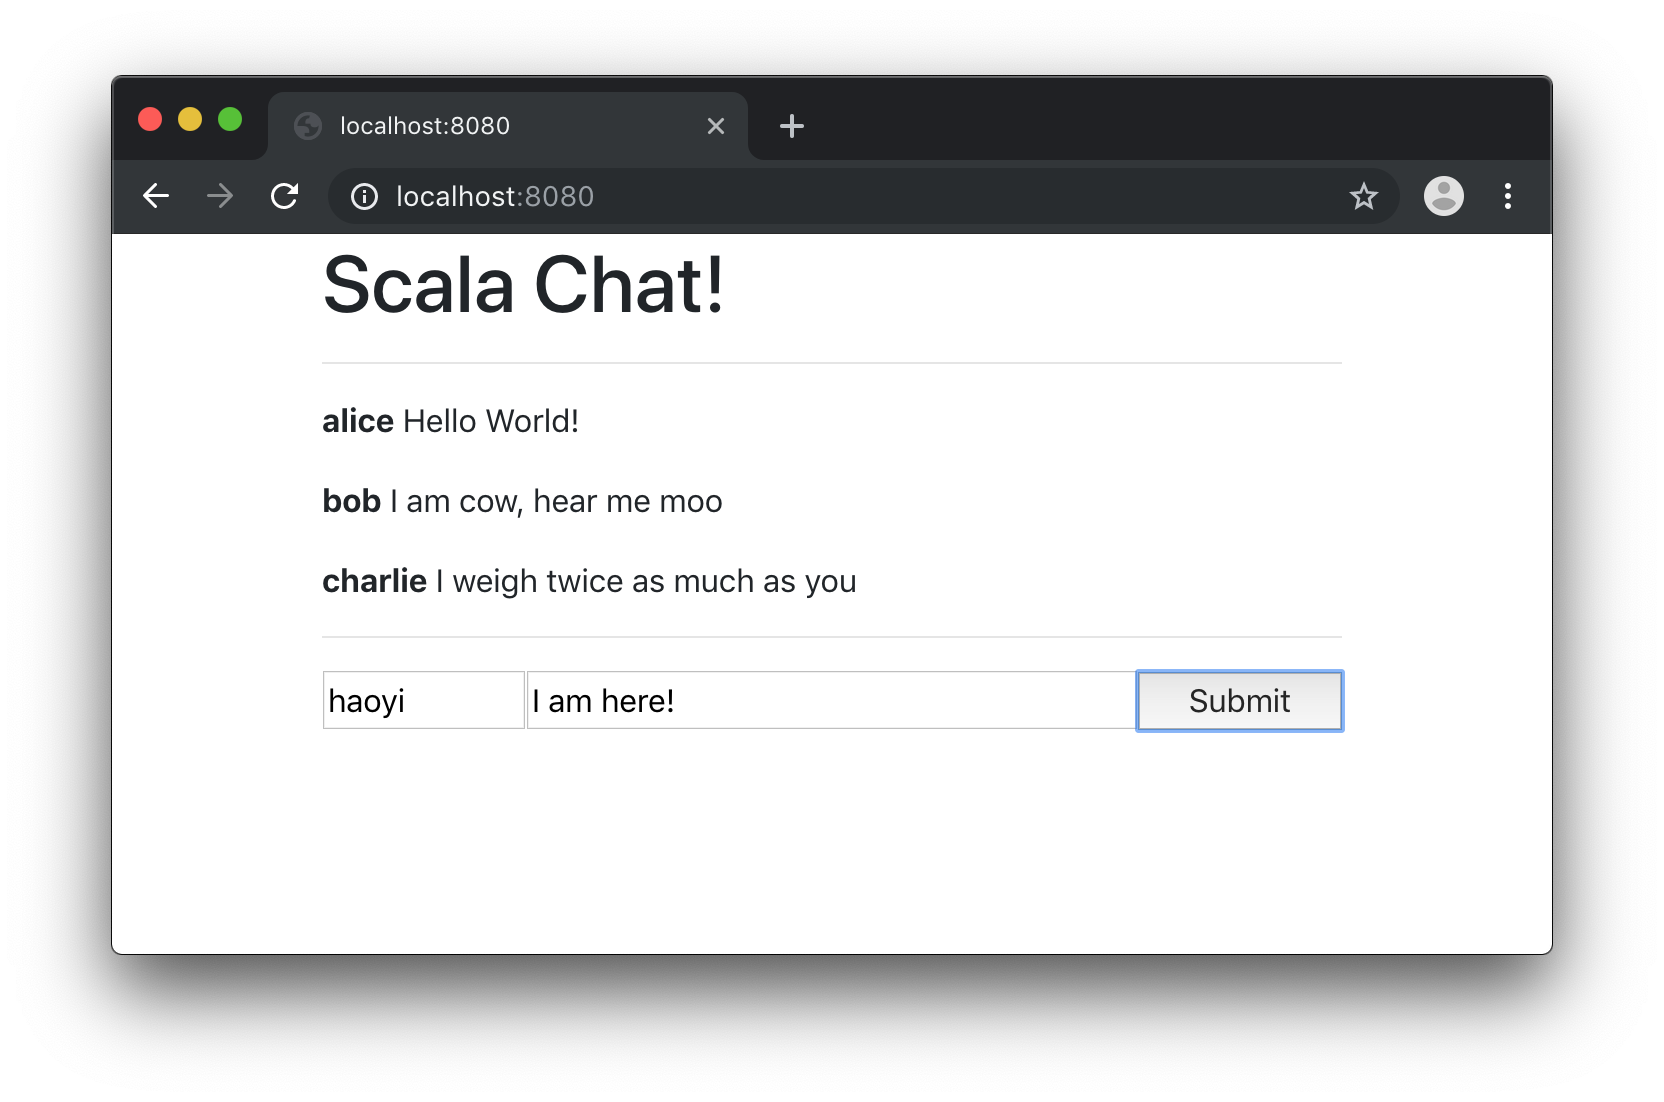
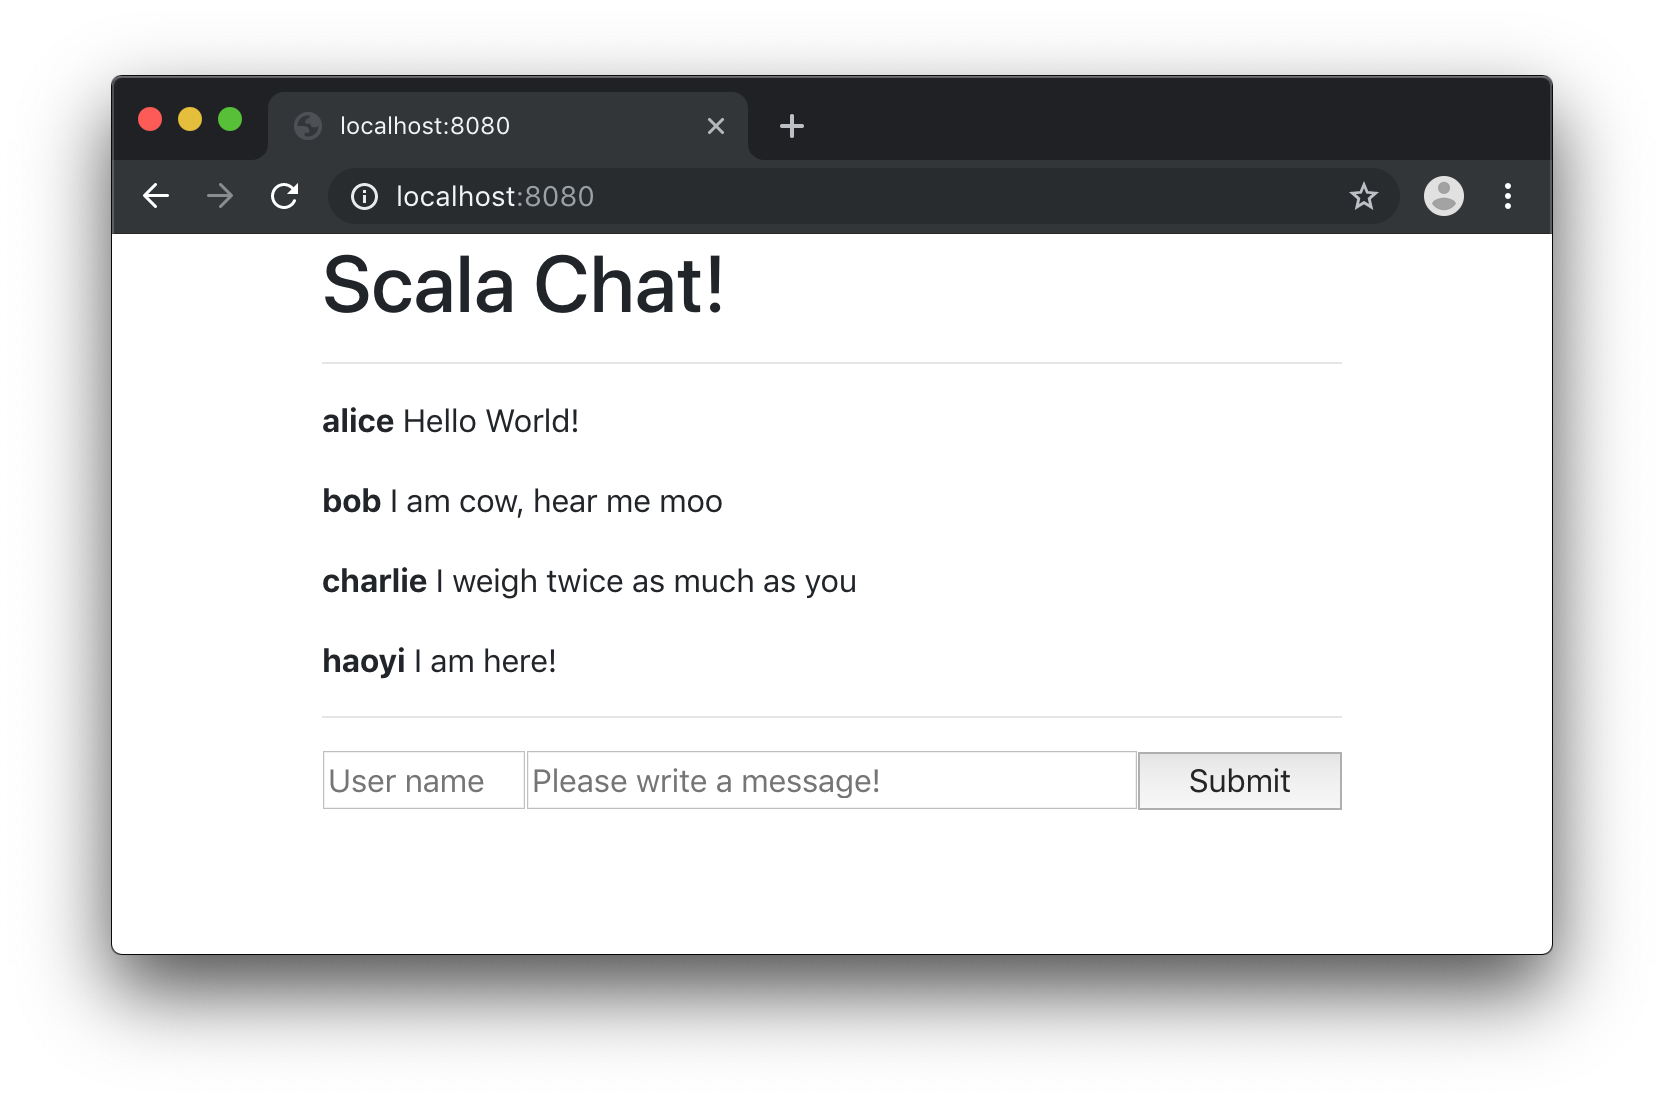
Currently, we allow users to post arbitrary comments with arbitrary names. However, not all comments and names are valid: at the bare minimum we want to ensure the comment and name fields are not empty, and we likely want to enforce maximum lengths on both.
We can trivially do this via:
   @cask.postForm("/")
   def postHello(name: String, msg: String) = {
-    messages = messages :+ (name -> msg)
+    if (name != "" && name.length < 10 && msg != "" && msg.length < 160){
+      messages = messages :+ (name -> msg)
+    }
     hello()
   }
This blocks users from entering invalid names and msgs, but has another issue: a user with an invalid name or message will submit it, have it disappear, and have no feedback what went wrong. We can solve this by rendering an optional error message in the hello() page, and using that to indicate to the user what problems exist:
   @cask.postForm("/")
   def postHello(name: String, msg: String) = {
-    if (name != "" && name.length < 10 && msg != "" && msg.length < 160){
-      messages = messages :+ (name -> msg)
-    }
-     hello()
+    if (name == "") hello(Some("Name cannot be empty"))
+    else if (name.length >= 10) hello(Some("Name cannot be longer than 10 characters"))
+    else if (msg == "") hello(Some("Message cannot be empty"))
+    else if (msg.length >= 160) hello(Some("Message cannot be longer than 160 characters"))
+    else {
+      messages = messages :+ (name -> msg)
+      hello()
+    }
   }
   @cask.get("/")
-  def hello() = {
+  def hello(errorOpt: Option[String] = None) = {
     html(
           hr,
+          for(error <- errorOpt)
+          yield i(color.red)(error),
           form(action := "/", method := "post")(
This correctly shows up an error message when the name or message are invalid:
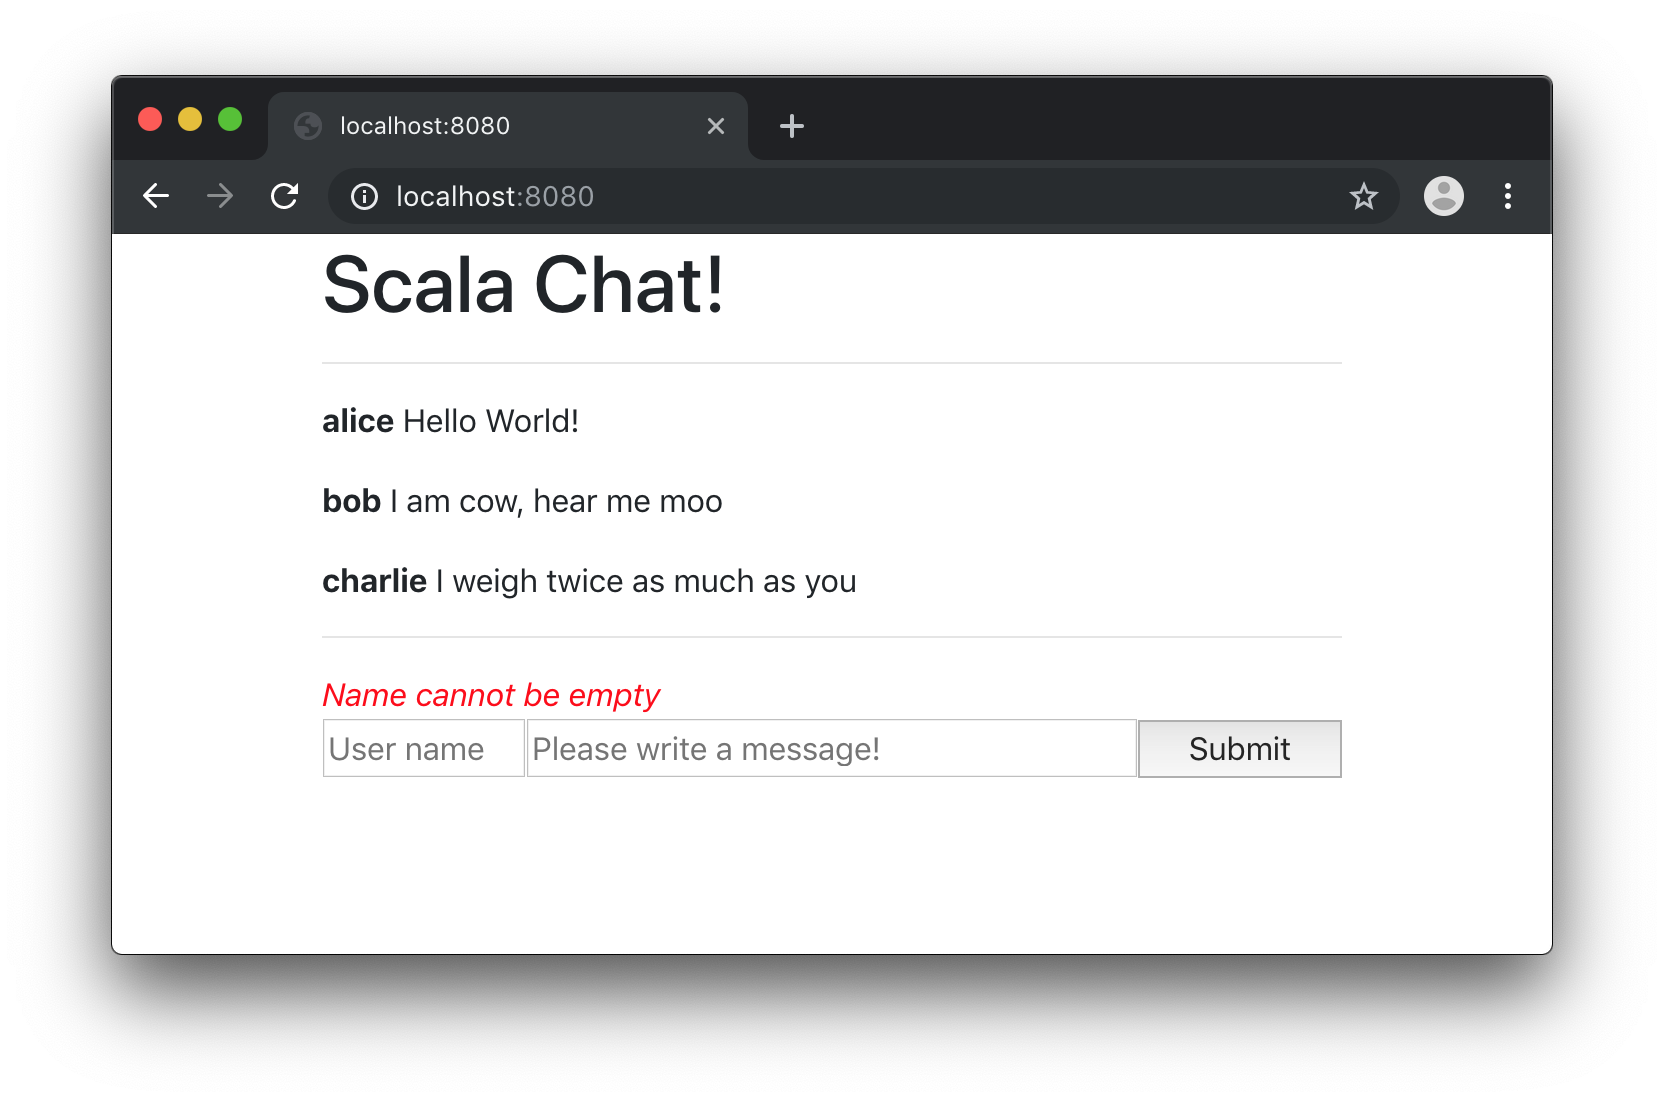
And the error message goes away on the next successful action.
One annoyance so far is that every time you post a message to the chat room, you need to re-enter your user name. Also, if your user name or message are invalid, it gets deleted and you have to type it out all over again to re-submit it. We can fix that by letting the hello page handler optionally fill in these fields for you:
   @cask.get("/")
-  def hello(errorOpt: Option[String] = None) = {
+  def hello(errorOpt: Option[String] = None,
+            userName: Option[String] = None,
+            msg: Option[String] = None) = {
     html(
           form(action := "/", method := "post")(
-            input(`type` := "text", name := "name", placeholder := "User name", width := "20%", userName.map(value := _)),
-            input(`type` := "text", name := "msg", placeholder := "Please write a message!", width := "60%"),
+            input(
+              `type` := "text",
+              name := "name",
+              placeholder := "User name",
+              width := "20%",
+              userName.map(value := _)
+            ),
+            input(
+              `type` := "text",
+              name := "msg",
+              placeholder := "Please write a message!",
+              width := "60%",
+              msg.map(value := _)
+            ),
             input(`type` := "submit", width := "20%")
Here, we are using the optional userName and msg query parameters, and if they are present we include them as the default value of the HTML input tags.
Next, in the postHello handler, we fill in the userName and msg when rendering the page back to the user:
   def postHello(name: String, msg: String) = {
-    if (name == "") hello(Some("Name cannot be empty"))
-    else if (name.length >= 10) hello(Some("Name cannot be longer than 10 characters"))
-    else if (msg == "") hello(Some("Message cannot be empty"))
-    else if (msg.length >= 160) hello(Some("Message cannot be longer than 160 characters"))
+    if (name == "") hello(Some("Name cannot be empty"), Some(name), Some(msg))
+    else if (name.length >= 10) hello(Some("Name cannot be longer than 10 characters"), Some(name), Some(msg))
+    else if (msg == "") hello(Some("Message cannot be empty"), Some(name), Some(msg))
+    else if (msg.length >= 160) hello(Some("Message cannot be longer than 160 characters"), Some(name), Some(msg))
     else {
       messages = messages :+ (name -> msg)
-      hello()
+      hello(None, Some(name), None)
     }
Note how in all cases we preserve the name, but we only preserve the msg if there was an error. This makes sense since we only expect the user to need to edit or re-submit the message if there was a failure.
The complete code for MinimalApplication.scala is now as follows:
package app
import scalatags.Text.all._
object MinimalApplication extends cask.MainRoutes{
  var messages = Vector(
    ("alice", "Hello World!"),
    ("bob", "I am cow, hear me moo"),
    ("charlie", "I weigh twice as you"),
  )

  @cask.postForm("/")
  def postHello(name: String, msg: String) = {
    if (name == "") hello(Some("Name cannot be empty"), Some(name), Some(msg))
    else if (name.length >= 10) hello(Some("Name cannot be longer than 10 characters"), Some(name), Some(msg))
    else if (msg == "") hello(Some("Message cannot be empty"), Some(name), Some(msg))
    else if (msg.length >= 160) hello(Some("Message cannot be longer than 160 characters"), Some(name), Some(msg))
    else {
      messages = messages :+ (name -> msg)
      hello(None, Some(name), None)
    }
  }

  @cask.get("/")
  def hello(errorOpt: Option[String] = None,
            userName: Option[String] = None,
            msg: Option[String] = None) = {
    html(
      head(
        link(
          rel := "stylesheet",
          href := "https://stackpath.bootstrapcdn.com/bootstrap/4.3.1/css/bootstrap.min.css"
        )
      ),
      body(
        div(cls := "container")(
          h1("Scala Chat!"),
          hr,
          div(
            for((name, msg) <- messages)
            yield p(b(name), " ", msg)
          ),
          hr,
          for(error <- errorOpt)
          yield i(color.red)(error),
          form(action := "/", method := "post")(
            input(
              `type` := "text",
              name := "name",
              placeholder := "User name",
              width := "20%",
              userName.map(value := _)
            ),
            input(
              `type` := "text",
              name := "msg",
              placeholder := "Please write a message!",
              width := "60%",
              msg.map(value := _)
            ),
            input(`type` := "submit", width := "20%")
          )
        )
      )
    ).render
  }

  initialize()
}
We now have a simple form-based chat website, where users can post messages and other viewers who load the page can see the messages that were posted. The next step is to make the website dynamic, so users can post messages and see updates without needing to refresh the page.
To do this, we need to do two things:
Allow the HTTP server to serve partial web pages, e.g. receiving messages and rendering the message list without rendering the entire page
Add a small amount of Javascript to submit the form data manually.
To render just the part of the page that needs to be updated, we can refactor our code to extract a messageList() helper function from the main hello page handler:
   )
+
+  def messageList() = {
+    frag(
+      for((name, msg) <- messages)
+      yield p(b(name), " ", msg)
+    )
+  }
+
   @cask.postForm("/")
           hr,
-          div(
-            for((name, msg) <- messages)
-            yield p(b(name), " ", msg)
+          div(id := "messageList")(
+            messageList()
           ),
Next, we can modify the postHello handler so that instead of re-rendering the entire page, it only re-renders the messageList that might have changed:
-  @cask.postForm("/")
-   def postHello(name: String, msg: String) = {
-    if (name == "") hello(Some("Name cannot be empty"), Some(name), Some(msg))
-    else if (name.length >= 10) hello(Some("Name cannot be longer than 10 characters"), Some(name), Some(msg))
-    else if (msg == "") hello(Some("Message cannot be empty"), Some(name), Some(msg))
-    else if (msg.length >= 160) hello(Some("Message cannot be longer than 160 characters"), Some(name), Some(msg))
-    else {
-      messages = messages :+ (name -> msg)
-      hello(None, Some(name), None)
+  @cask.postJson("/")
+  def postHello(name: String, msg: String) = {
+    if (name == "") ujson.Obj("success" -> false, "txt" -> "Name cannot be empty")
+    else if (name.length >= 10) ujson.Obj("success" -> false, "txt" -> "Name cannot be longer than 10 characters")
+    else if (msg == "") ujson.Obj("success" -> false, "txt" -> "Message cannot be empty")
+    else if (msg.length >= 160) ujson.Obj("success" -> false, "txt" -> "Message cannot be longer than 160 characters")
+    else {
+      messages = messages :+ (name -> msg)
+      ujson.Obj("success" -> true, "txt" -> messageList().render)
     }
   }
Note how we are replacing the old @cask.postForm endpoint with a @cask.postJson, and instead of calling hello() to re-render the entire page, we only return a small JSON structure ujson.Obj that the browser can then use to update the HTML page. The ujson.Obj data type is provided by the uJson library.
Now that we have the server side of things settled, let's wire up the relevant client-side code in order to receive the JSON response from the server and use it to update the HTML interface.
To handle this client-side logic, we are going to give IDs to some of our key HTML elements so we can reference them in the Javascript:
           hr,
-          for(error <- errorOpt)
-          yield i(color.red)(error),
+          div(id := "errorDiv", color.red),
           form(action := "/", method := "post")(
             input(
               `type` := "text",
-              name := "name",
+              id := "nameInput",
               placeholder := "User name",
               width := "20%"
             ),
             input(
               `type` := "text",
-              name := "msg",
+              id := "msgInput",
               placeholder := "Please write a message!",
               width := "60%"
             ),
Next, we'll include a bunch of Javascript in the head of the page:
       head(
         link(
           rel := "stylesheet",
           href := "https://stackpath.bootstrapcdn.com/bootstrap/4.3.1/css/bootstrap.min.css"
-        ),
+        )
+        script(raw("""
+          function submitForm(){
+            fetch(
+              "/",
+              {
+                method: "POST",
+                body: JSON.stringify({name: nameInput.value, msg: msgInput.value})
+              }
+            ).then(response => response.json())
+             .then(json => {
+              if (json.success) {
+                messageList.innerHTML = json.txt
+                msgInput.value = ""
+                errorDiv.innerText = ""
+              } else {
+                errorDiv.innerText = json.txt
+              }
+            })
+          }
+        """))
       ),
And trigger this Javascript function from the form's onsubmit handler:
-          form(action := "/", method := "post")(
+          form(onsubmit := "submitForm(); return false")(
And we're done. You can now add comments to the chat website, have them become immediately visible on your page, and then someone loading the page after will see them as well.
The final code now looks like this:
package app
import scalatags.Text.all._
object MinimalApplication extends cask.MainRoutes{
  var messages = Vector(
    ("alice", "Hello World!"),
    ("bob", "I am cow, hear me moo"),
    ("charlie", "I weigh twice as you"),
  )

  def messageList() = {
    frag(
      for((name, msg) <- messages)
      yield p(b(name), " ", msg)
    )
  }

  @cask.postJson("/")
  def postHello(name: String, msg: String) = {
    if (name == "") ujson.Obj("success" -> false, "txt" -> "Name cannot be empty")
    else if (name.length >= 10) ujson.Obj("success" -> false, "txt" -> "Name cannot be longer than 10 characters")
    else if (msg == "") ujson.Obj("success" -> false, "txt" -> "Message cannot be empty")
    else if (msg.length >= 160) ujson.Obj("success" -> false, "txt" -> "Message cannot be longer than 160 characters")
    else {
      messages = messages :+ (name -> msg)
      ujson.Obj("success" -> true, "txt" -> messageList().render)
    }
  }

  @cask.get("/")
  def hello() = {
    html(
      head(
        link(
          rel := "stylesheet",
          href := "https://stackpath.bootstrapcdn.com/bootstrap/4.3.1/css/bootstrap.min.css"
        ),
        script(raw("""
          function submitForm(){
            fetch(
              "/",
              {
                method: "POST",
                body: JSON.stringify({name: nameInput.value, msg: msgInput.value})
              }
            ).then(response => response.json())
             .then(json => {
              if (json.success) {
                messageList.innerHTML = json.txt
                msgInput.value = ""
                errorDiv.innerText = ""
              } else {
                errorDiv.innerText = json.txt
              }
            })
          }
        """))
      ),
      body(
        div(cls := "container")(
          h1("Scala Chat!"),
          hr,
          div(id := "messageList")(
            messageList()
          ),
          hr,
          div(id := "errorDiv", color.red),
          form(onsubmit := "submitForm(); return false")(
            input(
              `type` := "text",
              id := "nameInput",
              placeholder := "User name",
              width := "20%"
            ),
            input(
              `type` := "text",
              id := "msgInput",
              placeholder := "Please write a message!",
              width := "60%"
            ),
            input(`type` := "submit", width := "20%")
          )
        )
      )
    ).render
  }

  initialize()
}
Note that although the messages you leave are immediately visible to you, they are not visible to other people on the chat website unless they either refresh the page or leave their own comment to force their messageList to be reloaded. Making your messages immediately visible to everyone, without any manual refreshing, will be the last section of this tutorial.
The concept of push updates is simple: every time a new message is submitted, we "push" it to every browser that is listening, rather than waiting for the browser to refresh and "pull" the updated data. There are many techniques we can use to accomplish this goal. For this tutorial, we will be using one called Websockets.
Websockets allow the browser and the server to send messages to each other, outside the normal request-response flow of a HTTP request. Once a connection is established, either side can send messages any time, each of which contains an arbitrary payload string or bytes.
The workflow we will implement is as follows:
When the website loads, the browser will make a websocket connection to the server
Once the connection is established, the browser will send a message "0" message to the server, to indicate it is ready to receive updates
The server will respond with an initial txt containing the list of rendered messages, and an index representing the current message count
On receiving this message, the browser will send the last-seen index back to the server, which will then wait until a new message is seen before responding as in step (3.)
The key to implementing this on the server is to keep a set of open connections:
var openConnections = Set.empty[cask.WsChannelActor]
This will contain the list of browsers currently waiting for an update. When a new message appears, we will broadcast it to this list.
Next, we define a @cask.websocket handler, to receive the incoming websocket connections and handle them:
  @cask.websocket("/subscribe")
  def subscribe() = {
    cask.WsHandler { connection =>
      cask.WsActor {
        case cask.Ws.Text(msg) =>
          if (msg.toInt < messages.length){
            connection.send(
              cask.Ws.Text(
                ujson.Obj("index" -> messages.length, "txt" -> messageList().render).render()
              )
            )
          }else{
            openConnections += connection
          }
        case cask.Ws.Close(_, _) => openConnections -= connection
      }
    }
  }
This handler receives an incoming msg from a browser, and checks the contents to decide whether it should respond immediately, or whether it should register the connection with openConnections to respond later.
We need to make a similar change in the postHello handler:
       messages = messages :+ (name -> msg)
+      val notification = cask.Ws.Text(
+        ujson.Obj("index" -> messages.length, "txt" -> messageList().render).render()
+      )
+      for(conn <- openConnections) conn.send(notification)
+      openConnections = Set.empty
       ujson.Obj("success" -> true, "txt" -> messageList().render)
Such that whenever a new chat message is posted, we send a message to all the open connections to notify them.
Lastly, we need to add a small amount of Javascript code to the browser's script tag, in order to open up the Websocket connection and handle this exchange of messages:
var socket = new WebSocket("ws://" + location.host + "/subscribe");
var eventIndex = 0
socket.onopen = function(ev){ socket.send("" + eventIndex) }
socket.onmessage = function(ev){
  var json = JSON.parse(ev.data)
  eventIndex = json.index
  socket.send("" + eventIndex)
  messageList.innerHTML = json.txt
}
Here we open a connection, send the first "0" message to kick off the process, and then every time a new update is received we render the json.txt in the messageList and then send the json.index back to the server to subscribe for the next update.
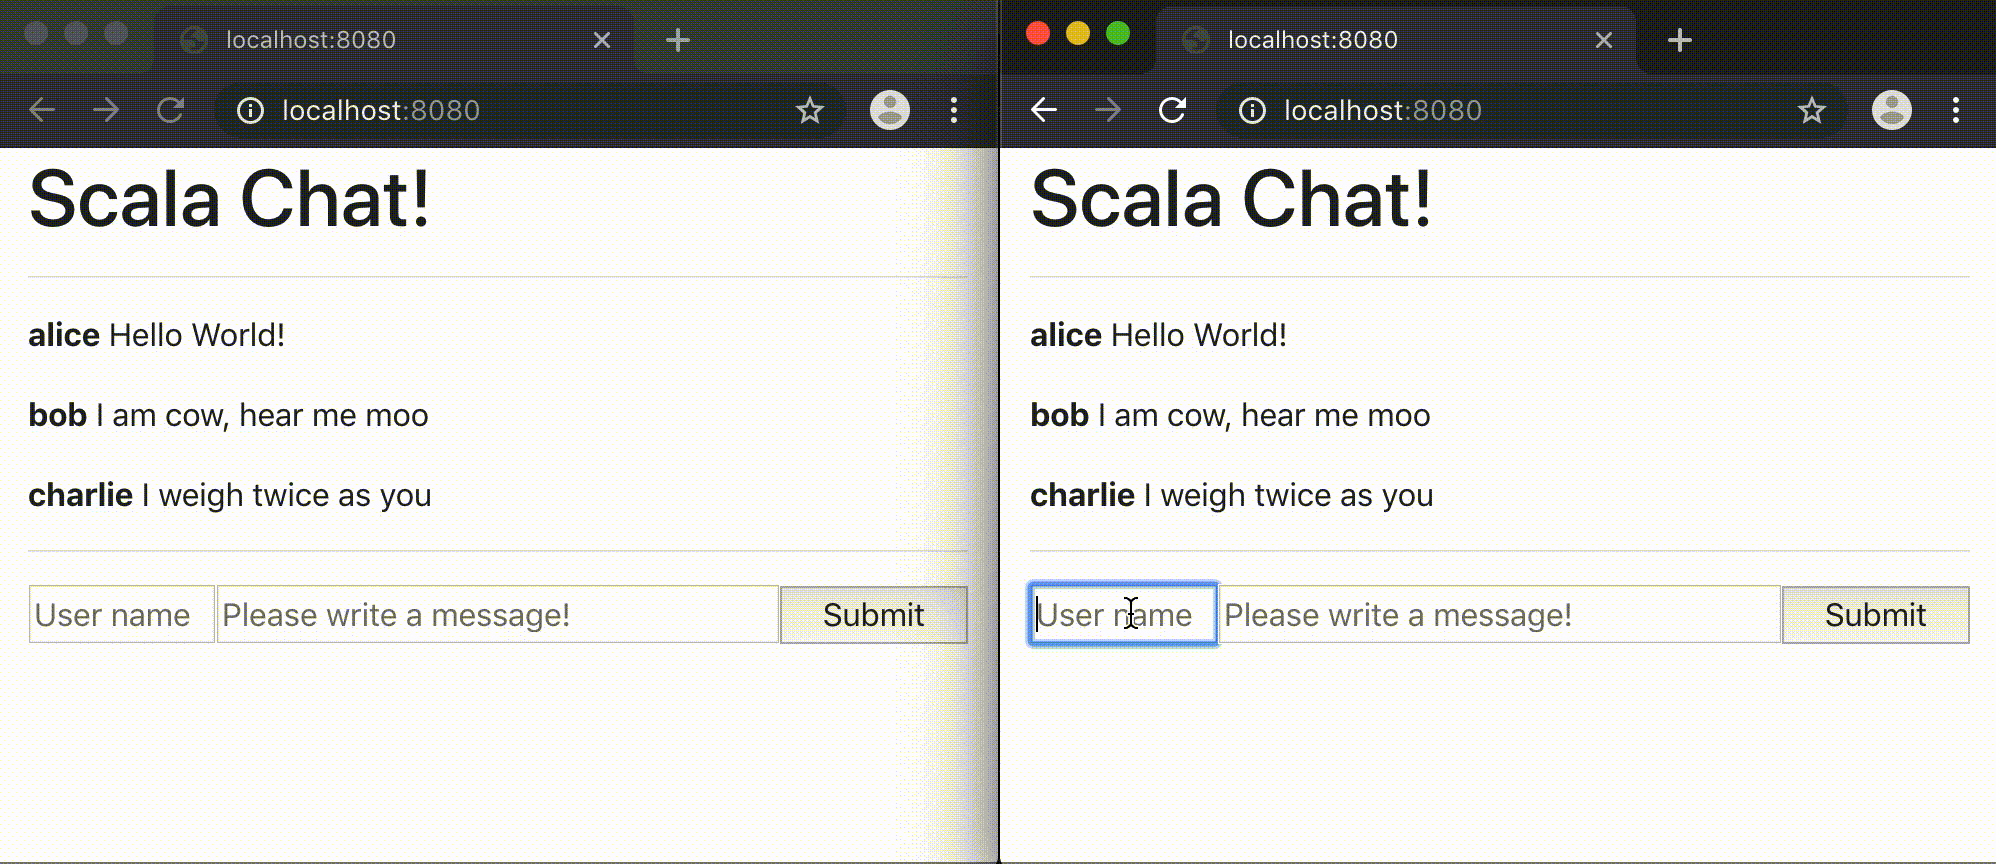
Now, when we open up two browsers side by side, we can see the chat messages we leave in one immediately be reflected in the other:
The complete code for this section is as follows:
package app

import scalatags.Text.all._

object MinimalApplication extends cask.MainRoutes{
  var messages = Vector(
    ("alice", "Hello World!"),
    ("bob", "I am cow, hear me moo"),
    ("charlie", "I weigh twice as you"),
  )

  var openConnections = Set.empty[cask.WsChannelActor]

  def messageList() = {
    frag(
      for((name, msg) <- messages)
      yield p(b(name), " ", msg)
    )
  }

  @cask.postJson("/")
  def postHello(name: String, msg: String) = {
    if (name == "") ujson.Obj("success" -> false, "txt" -> "Name cannot be empty")
    else if (name.length >= 10) ujson.Obj("success" -> false, "txt" -> "Name cannot be longer than 10 characters")
    else if (msg == "") ujson.Obj("success" -> false, "txt" -> "Message cannot be empty")
    else if (msg.length >= 160) ujson.Obj("success" -> false, "txt" -> "Message cannot be longer than 160 characters")
    else {
      messages = messages :+ (name -> msg)
      val notification = cask.Ws.Text(
        ujson.Obj("index" -> messages.length, "txt" -> messageList().render).render()
      )
      for(conn <- openConnections) conn.send(notification)
      openConnections = Set.empty
      ujson.Obj("success" -> true, "txt" -> messageList().render)
    }
  }

  @cask.get("/")
  def hello() = {
    html(
      head(
        link(
          rel := "stylesheet",
          href := "https://stackpath.bootstrapcdn.com/bootstrap/4.3.1/css/bootstrap.min.css"
        ),
        script(raw("""
          function submitForm(){
            fetch(
              "/",
              {
                method: "POST",
                body: JSON.stringify({name: nameInput.value, msg: msgInput.value})
              }
            ).then(response => response.json())
             .then(json => {
              if (json.success) {
                messageList.innerHTML = json.txt
                msgInput.value = ""
                errorDiv.innerText = ""
              } else {
                errorDiv.innerText = json.txt
              }
            })
          }

          var socket = new WebSocket("ws://" + location.host + "/subscribe");
          socket.onopen = function(ev){ socket.send("0") }
          socket.onmessage = function(ev){
            var json = JSON.parse(ev.data)
            messageList.innerHTML = json.txt
            socket.send("" + json.index)
          }
        """))
      ),
      body(
        div(cls := "container")(
          h1("Scala Chat!"),
          hr,
          div(id := "messageList")(
            messageList()
          ),
          hr,
          div(id := "errorDiv", color.red),
          form(onsubmit := "submitForm(); return false")(
            input(
              `type` := "text",
              id := "nameInput",
              placeholder := "User name",
              width := "20%"
            ),
            input(
              `type` := "text",
              id := "msgInput",
              placeholder := "Please write a message!",
              width := "60%"
            ),
            input(`type` := "submit", width := "20%")
          )
        )
      )
    ).render
  }

  @cask.websocket("/subscribe")
  def subscribe() = {
    cask.WsHandler { connection =>
      cask.WsActor {
        case cask.Ws.Text(msg) =>
          if (msg.toInt < messages.length){
            connection.send(
              cask.Ws.Text(
                ujson.Obj("index" -> messages.length, "txt" -> messageList().render).render()
              )
            )
          }else{
            openConnections += connection
          }
        case cask.Ws.Close(_, _) => openConnections -= connection
      }
    }
  }

  initialize()
}
In this tutorial, we have seen how to use Scala to implement a real-time chat website and API server. We started off with a static mock of a website, added form-based interactions, dynamic page updates with Ajax against a JSON API, and finally push notifications using websockets. We have done this using the Cask web framework, Scalatags HTML library, and uJson serialization library, in about 125 lines of straightforward code.
The chat website presented here is deliberately simplified: we intentionally leave out saving messages to a persistent database, authentication, user accounts, multiple rooms, rate limiting, and a host of other features. Our simple in-memory messages list and openConnections set are't thread-safe in the presence of concurrent updates. Nevertheless, hopefully this has given you an intuition for how to make simple websites and API servers using Scala, which you can build upon for larger and more ambitious applications.
About the Author: Haoyi is a software engineer, and the author of many open-source Scala tools such as the Ammonite REPL and the Mill Build Tool. If you enjoyed the contents on this blog, you may also enjoy Haoyi's book Hands-on Scala Programming