
Table of Contents
Everyone is used to programs printing out output in a terminal that scrolls as new text appears, but that's not all your can do: your program can color your text, move the cursor up, down, left or right, or clear portions of the screen if you are going to re-print them later. This is what lets programs like Git implement its dynamic progress indicators, and Vim or Bash implement their editors that let you modify already-displayed text without scrolling the terminal.
There are libraries like Readline, JLine, or the Python Prompt Toolkit that help you do this in various programming languages, but you can also do it yourself. This post will explore the basics of how you can control the terminal from any command-line program, with examples in Python, and how your own code can directly make use of all the special features the terminal has to offer.
About the Author: Haoyi is a software engineer, and the author of many open-source Scala tools such as the Ammonite REPL and the Mill Build Tool. If you enjoyed the contents on this blog, you may also enjoy Haoyi's book Hands-on Scala Programming
The way that most programs interact with the Unix terminal is through ANSI escape codes. These are special codes that your program can print in order to give the terminal instructions. Various terminals support different subsets of these codes, and it's difficult to find a "authoritative" list of what every code does. Wikipedia has a reasonable listing of them, as do many other sites.
Nevertheless, it's possible to write programs that make use of ANSI escape codes, and at least will work on common Unix systems like Ubuntu or OS-X (though not Windows, which I won't cover here and is its own adventure!). This post will explore the basics of what Ansi escape codes exist, and demonstrate how to use them to write your own interactive command-line from first principles:
To begin with, let's start off with a plain-old vanilla Python prompt:
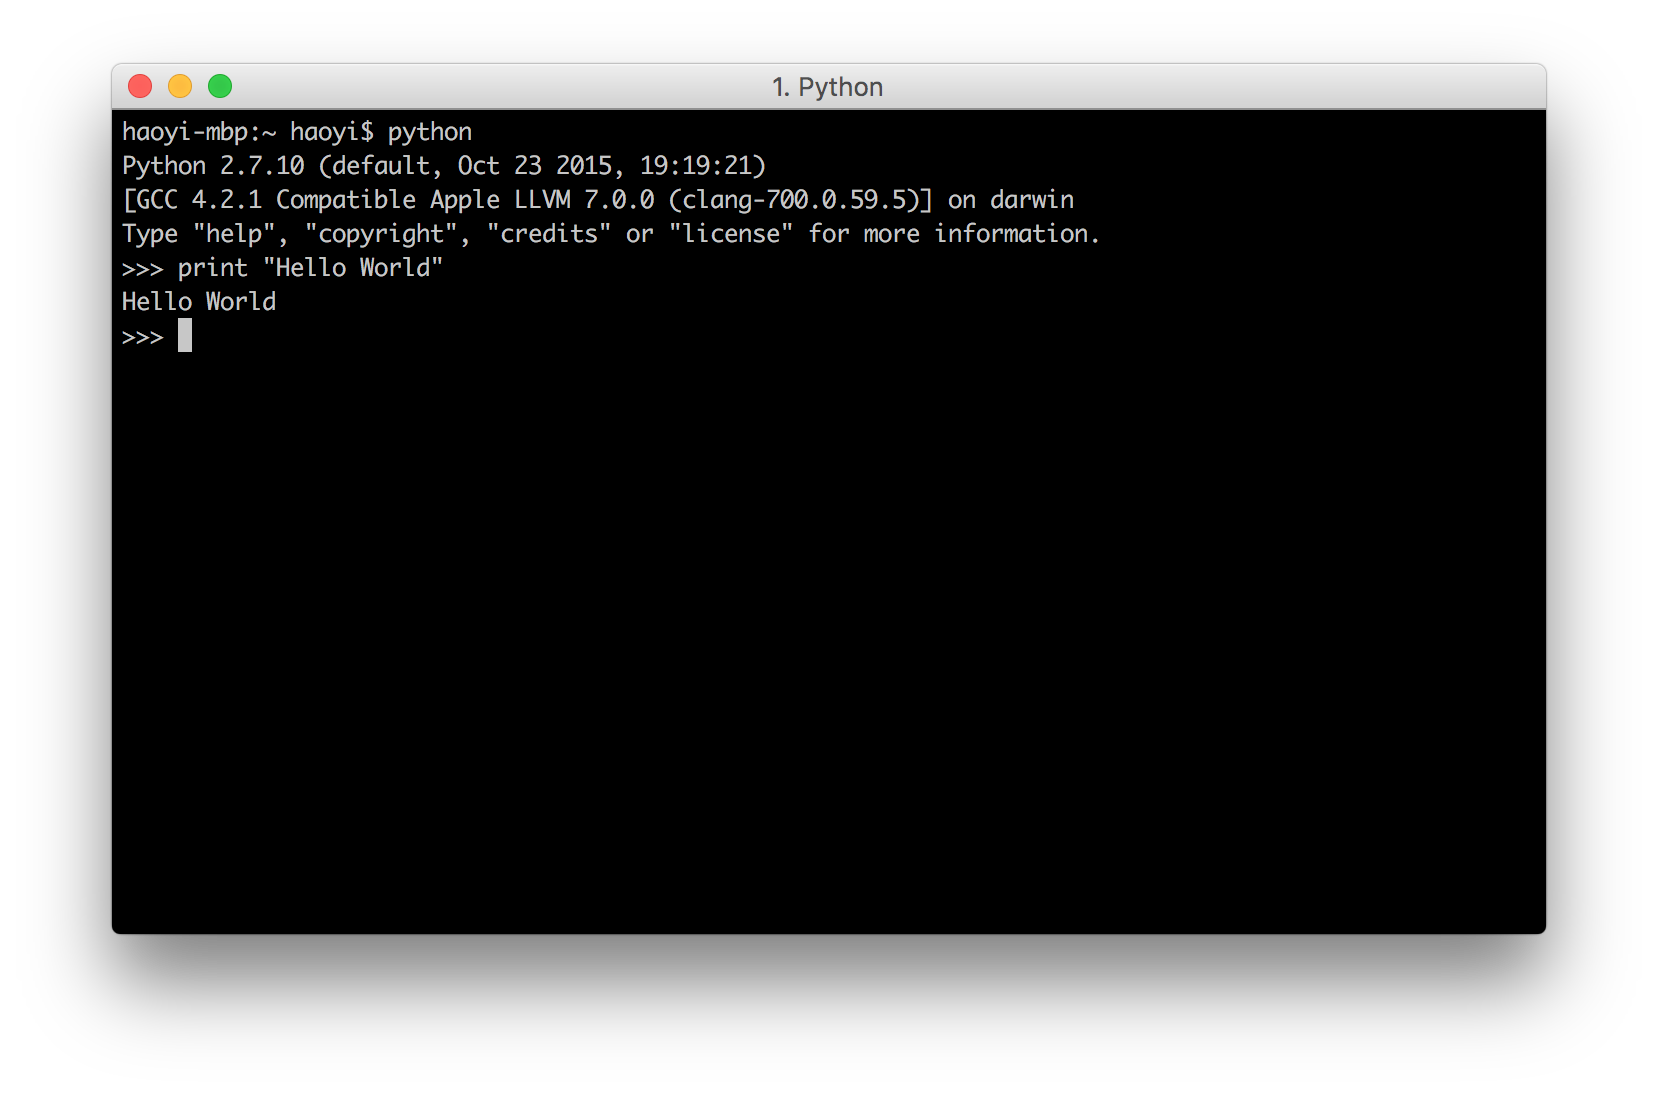
And get started!
The most basic Ansi escape codes are those involved in rendering text. These let you add decorations like Colors, Background Colors or other Decorations to your printed text, but don't do anything fancy. The text you print will still end up at the bottom of the terminal, and still make your terminal scroll, just now it will be colored text instead of the default black/white color scheme your terminal has.
The most basic thing you can do to your text is to color it. The Ansi colors all look like
\u001b[31m\u001b[0mThis \u001b character is the special character that starts off most Ansi escapes; most languages allow this syntax for representing special characters, e.g. Java, Python and Javascript all allow the \u001b syntax.
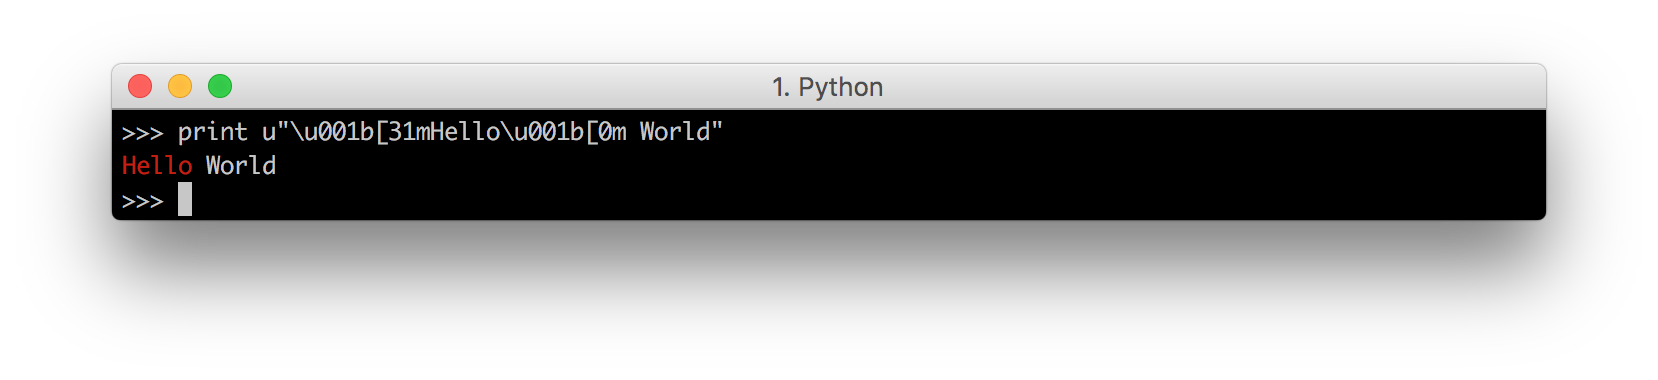
For example here is printing the string "Hello World", but red:
print u"\u001b[31mHelloWorld"
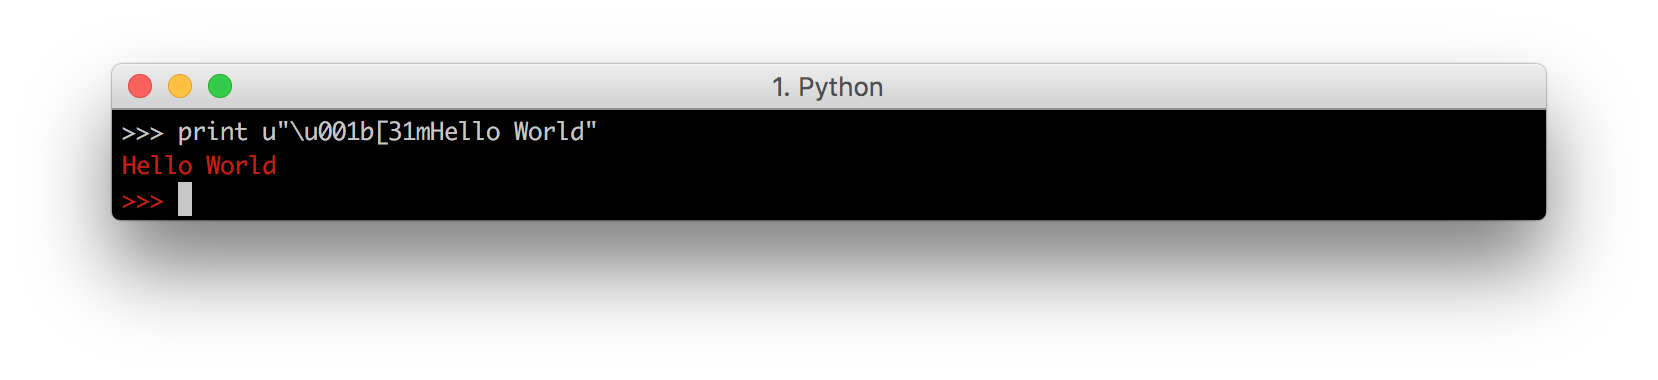
Note how we need to prefix the string with u i.e. u"..." in order for this to work in Python 2.7.10. This is not necessary in Python 3 or in other languages.
See how the red color, starting from the printed Hello World, ends up spilling into the >>> prompt. In fact, any code we type into this prompt will also be colored red, as will any subsequent output! That is how Ansi colors work: once you print out the special code enabling a color, the color persists forever until someone else prints out the code for a different color, or prints out the Reset code to disable it.
We can disable it by printing the Reset code above:
print u"\u001b[0m"
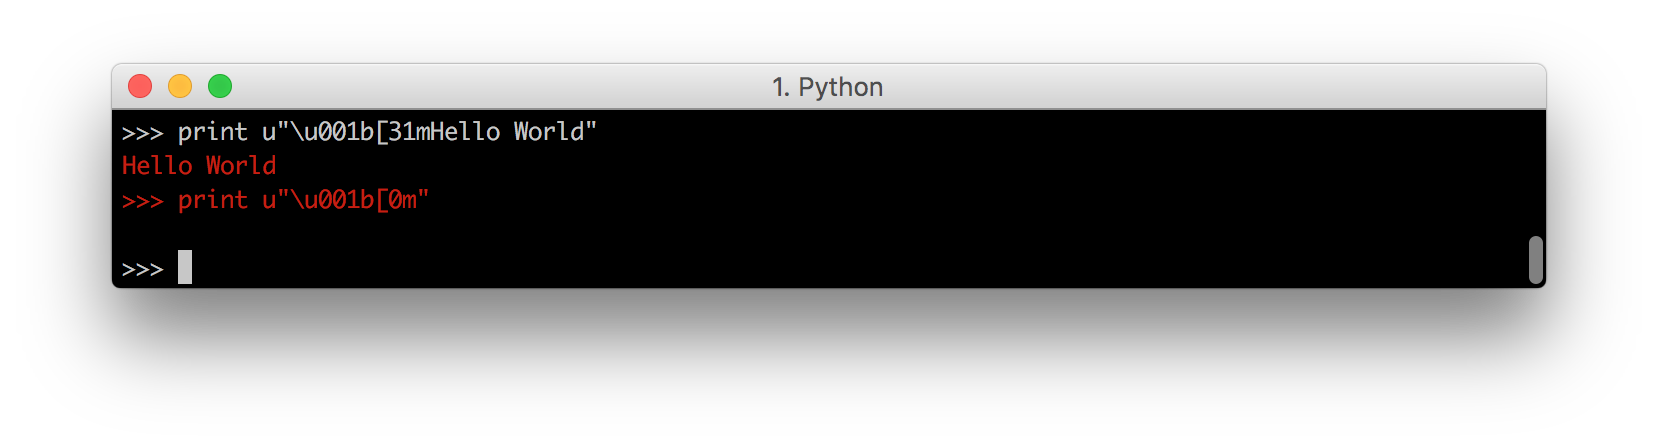
And we can see the prompt turns back white. In general, you should always remember to end any colored string you're printing with a Reset, to make sure you don't accidentally
To avoid this, we need to make sure we end our colored-string with the Reset code:
print u"\u001b[31mHelloWorld\u001b[0m"

Which propertly resets the color after the string has been printed. You can also Reset halfway through the string to make the second-half un-colored:
print u"\u001b[31mHello\u001b[0mWorld"
We have seen how Red and Reset work. The most basic terminals have a set of 8 different colors:
\u001b[30m\u001b[31m\u001b[32m\u001b[33m\u001b[34m\u001b[35m\u001b[36m\u001b[37mReset: \u001b[0m
Which we can demonstrate by printing one letter of each color, followed by a Reset:
print u"\u001b[30m A \u001b[31m B \u001b[32m C \u001b[33m D \u001b[0m"
print u"\u001b[34m E \u001b[35m F \u001b[36m G \u001b[37m H \u001b[0m"
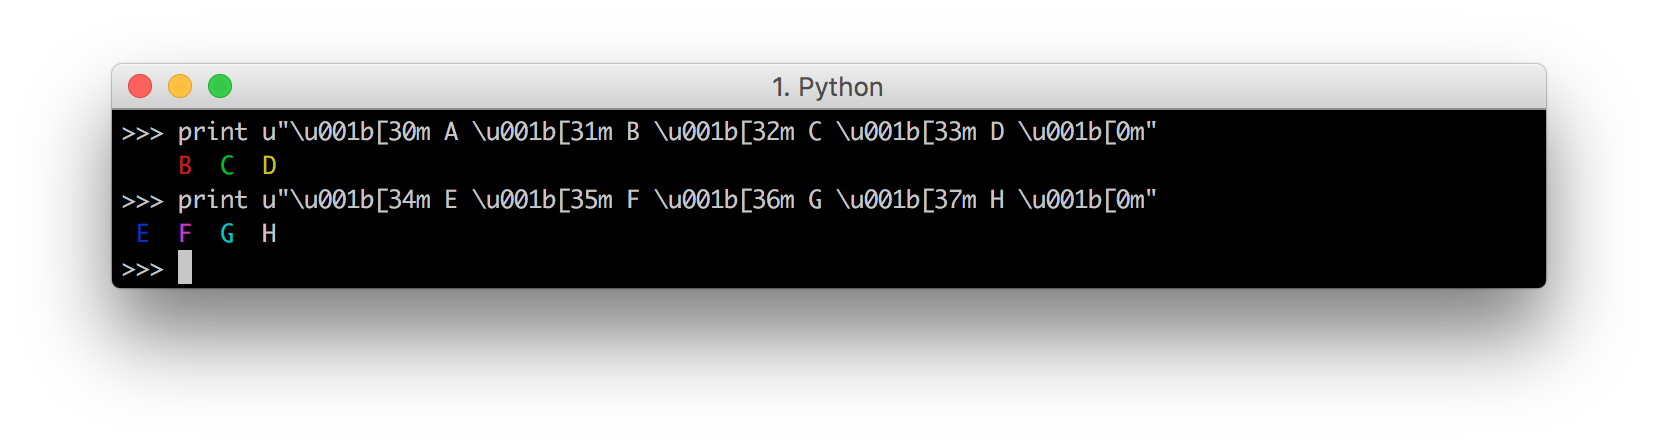
Note how the black A is totally invisible on the black terminal, while the white H looks the same as normal text. If we chose a different color-scheme for our terminal, it would be the opposite:
print u"\u001b[30;1m A \u001b[31;1m B \u001b[32;1m C \u001b[33;1m D \u001b[0m"
print u"\u001b[34;1m E \u001b[35;1m F \u001b[36;1m G \u001b[37;1m H \u001b[0m"
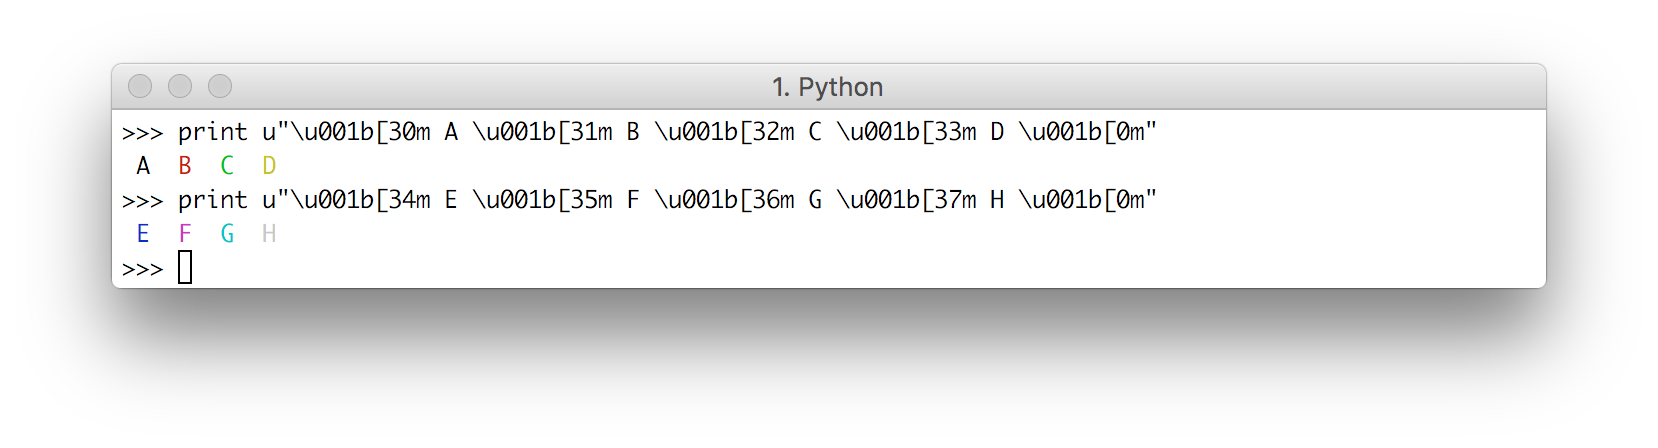
With the black A being obvious and the white H being hard to make out.
Most terminals, apart from the basic set of 8 colors, also support the "bright" or "bold" colors. These have their own set of codes, mirroring the normal colors, but with an additional ;1 in their codes:
\u001b[30;1m\u001b[31;1m\u001b[32;1m\u001b[33;1m\u001b[34;1m\u001b[35;1m\u001b[36;1m\u001b[37;1mReset: \u001b[0m
Note that Reset is the same: this is the reset code that resets all colors and text effects.
We can print out these bright colors and see their effects:
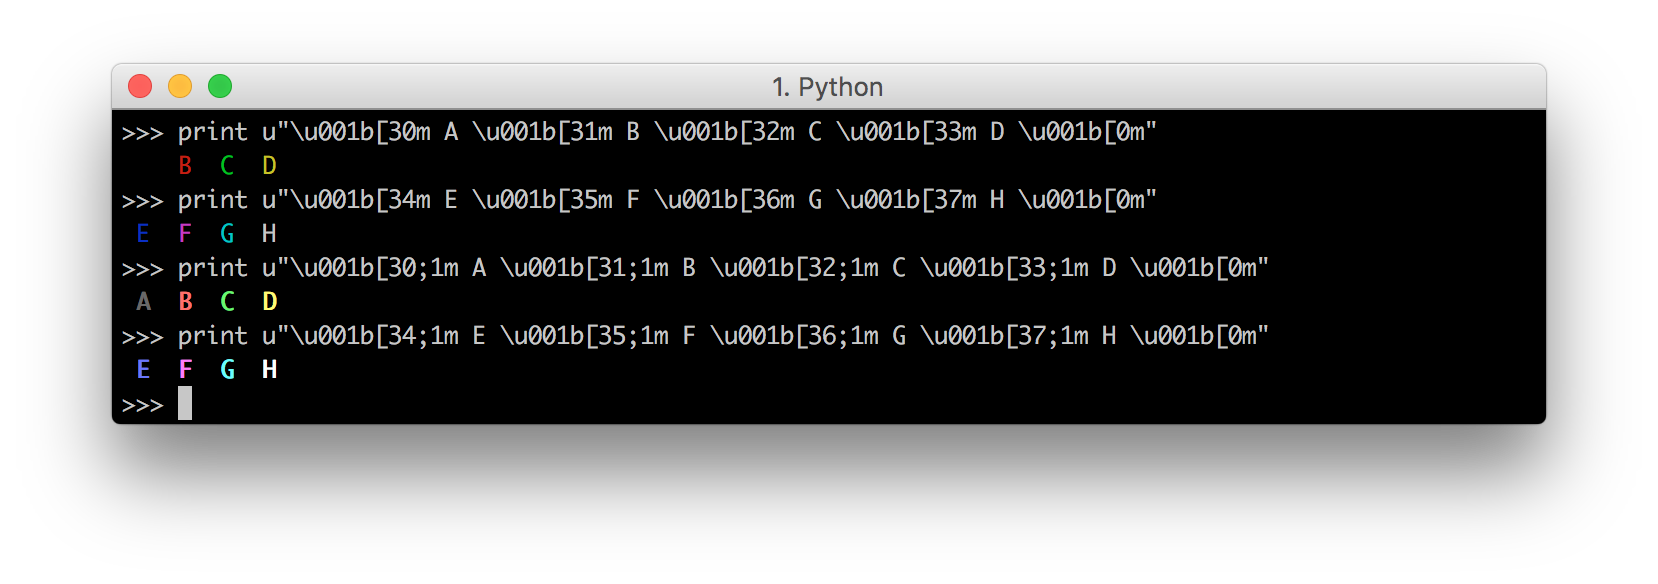
And see that they are, indeed, much brighter than the basic set of 8 colors. Even the black A is now bright enough to be a visible gray on the black background, and the white H is now even brighter than the default text color.
Lastly, after the 16 colors, some terminals support a 256-color extended color set.
These are of the form
\u001b[38;5;${ID}mimport sys
for i in range(0, 16):
for j in range(0, 16):
code = str(i * 16 + j)
sys.stdout.write(u"\u001b[38;5;" + code + "m " + code.ljust(4))
print u"\u001b[0m"
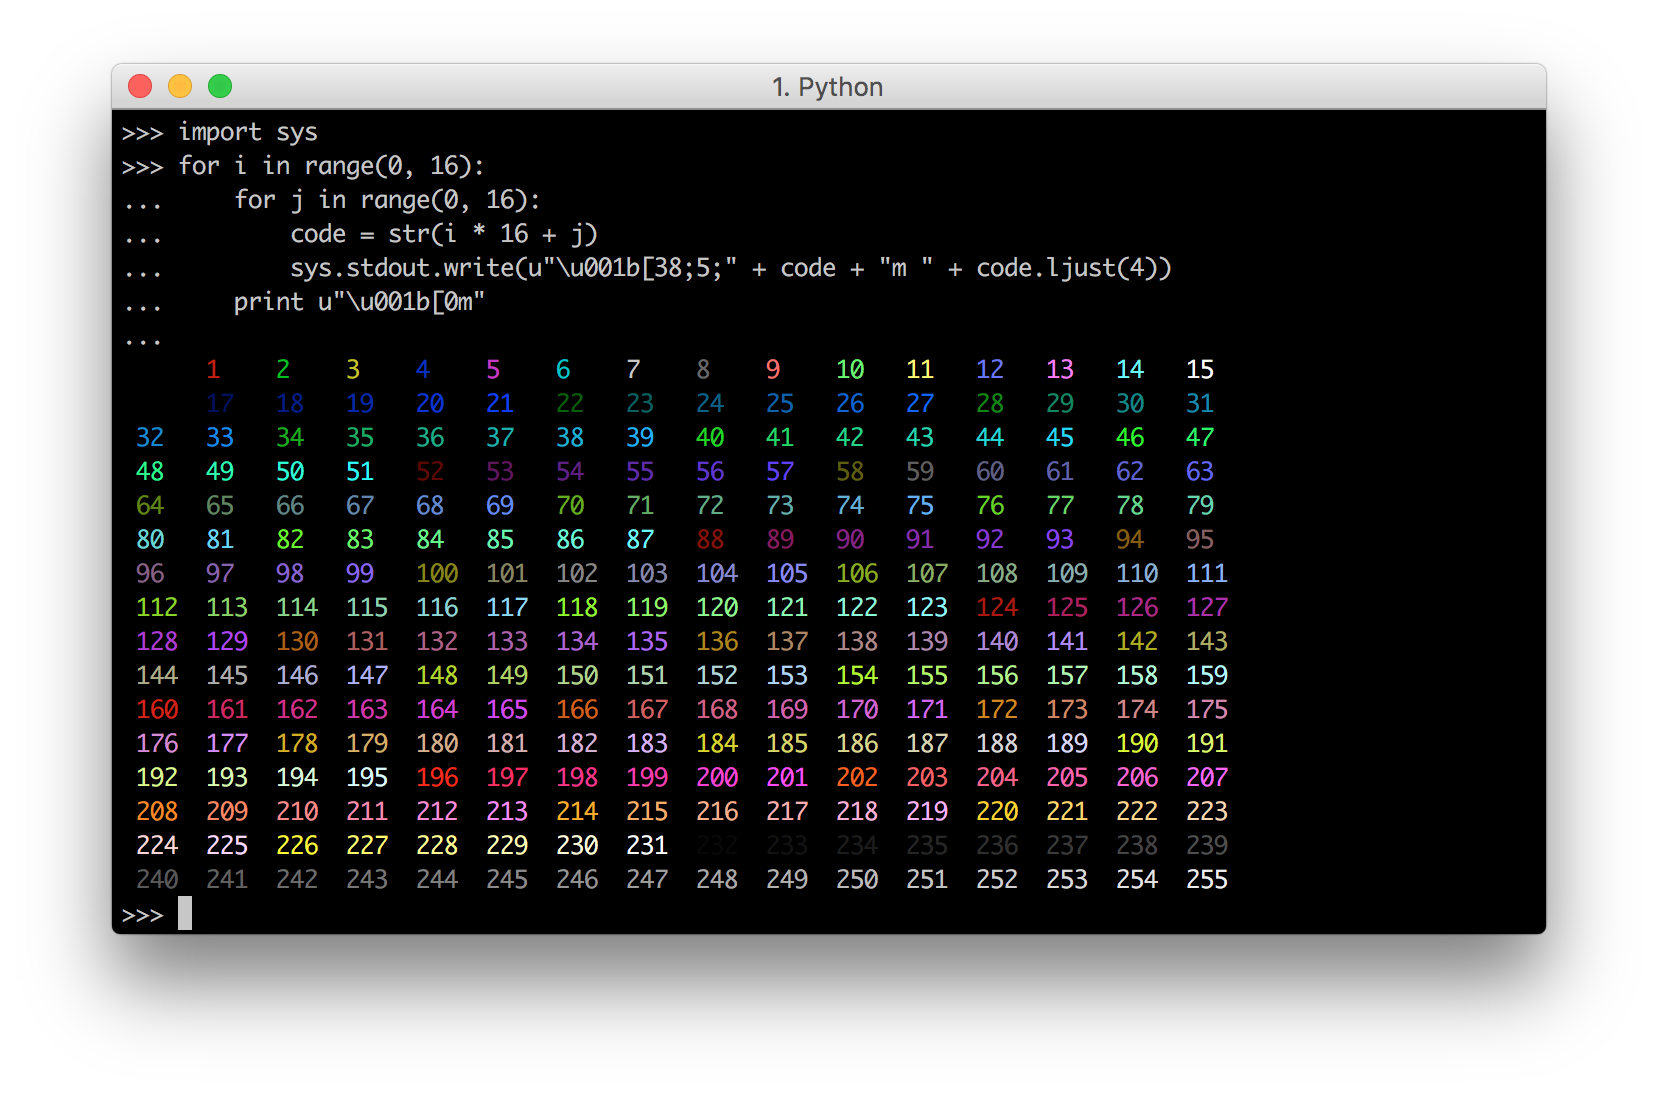
Here we use sys.stdout.write instead of print so we can print multiple items on the same line, but otherwise it's pretty self-explanatory. Each code from 0 to 255 corresponds to a particular color.
The Ansi escape codes let you set the color of the text-background the same way it lets you set the color of the foregrond. For example, the 8 background colors correspond to the codes:
\u001b[40m\u001b[41m\u001b[42m\u001b[43m\u001b[44m\u001b[45m\u001b[46m\u001b[47mWith the bright versions being:
\u001b[40;1m\u001b[41;1m\u001b[42;1m\u001b[43;1m\u001b[44;1m\u001b[45;1m\u001b[46;1m\u001b[47;1mAnd reset is the same:
\u001b[0mWe can print them out and see them work
print u"\u001b[40m A \u001b[41m B \u001b[42m C \u001b[43m D \u001b[0m"
print u"\u001b[44m A \u001b[45m B \u001b[46m C \u001b[47m D \u001b[0m"
print u"\u001b[40;1m A \u001b[41;1m B \u001b[42;1m C \u001b[43;1m D \u001b[0m"
print u"\u001b[44;1m A \u001b[45;1m B \u001b[46;1m C \u001b[47;1m D \u001b[0m"
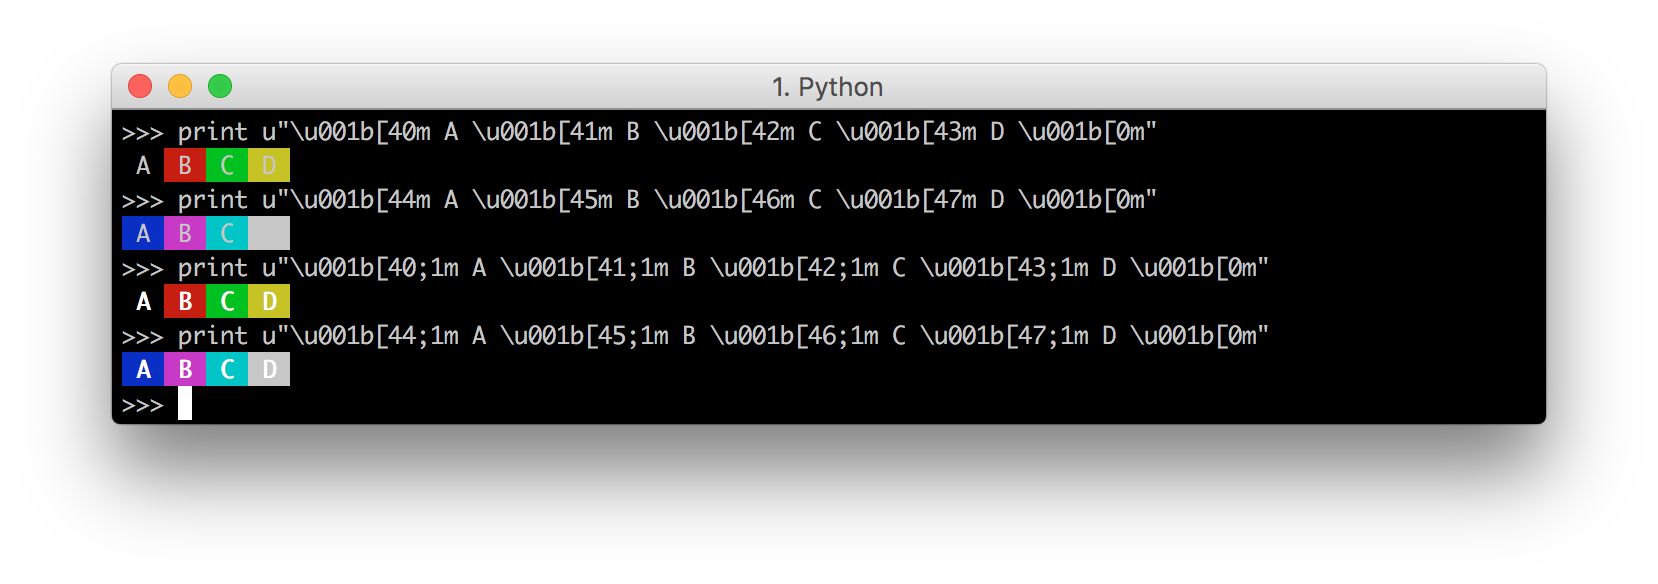
Note that the bright versions of the background colors do not change the background, but rather make the foreground text brighter. This is unintuitive but that's just the way it works.
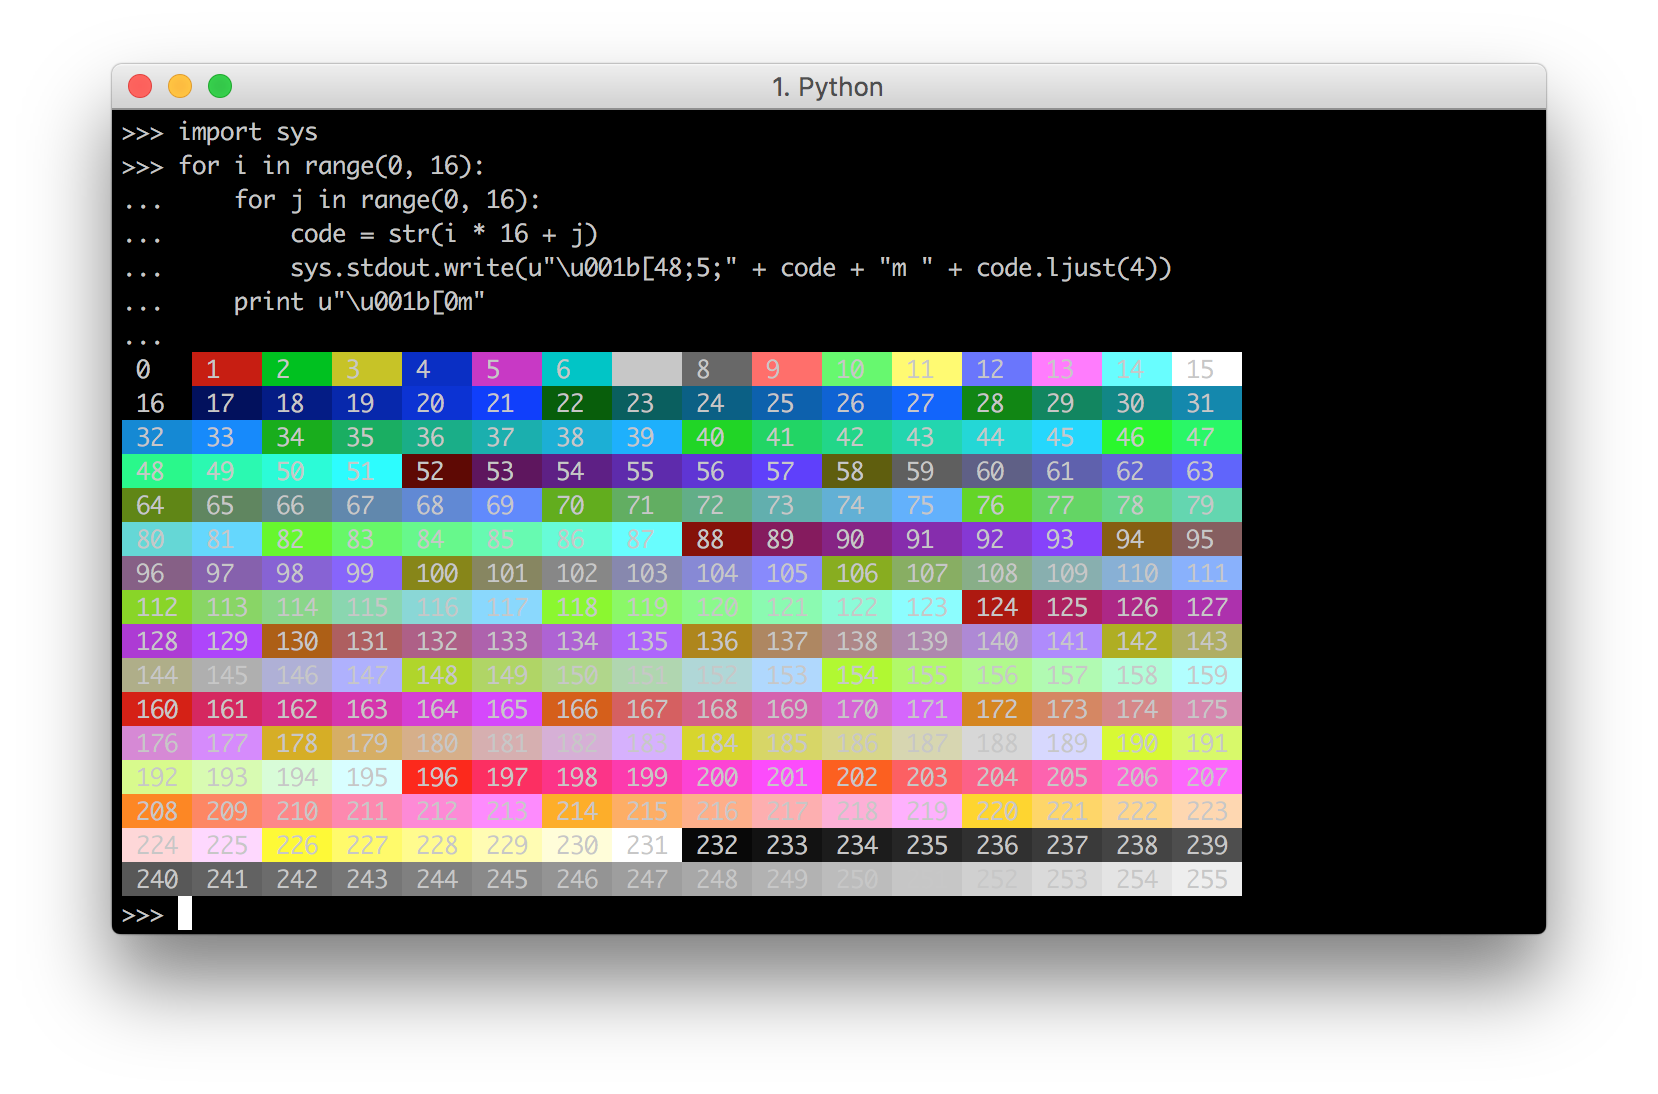
256-colored backgrounds work too:
import sys
for i in range(0, 16):
    for j in range(0, 16):
        code = str(i * 16 + j)
        sys.stdout.write(u"\u001b[48;5;" + code + "m " + code.ljust(4))
    print u"\u001b[0m"
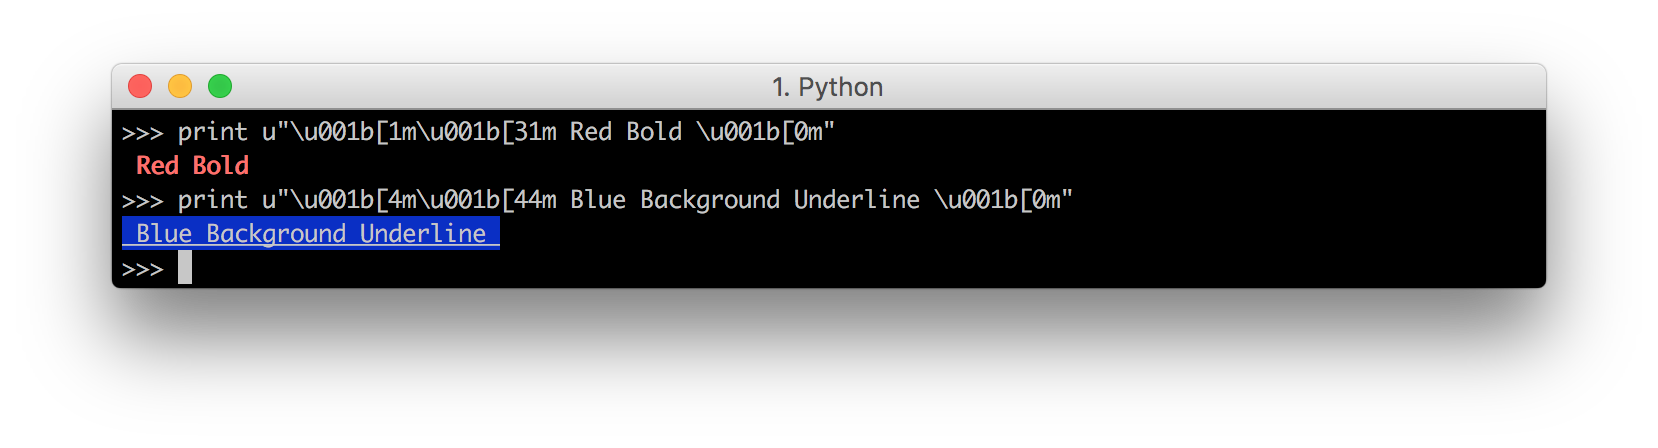
Apart from colors, and background-colors, Ansi escape codes also allow decorations on the text:
\u001b[1m\u001b[4m\u001b[7mWhich can be used individually:
print u"\u001b[1m BOLD \u001b[0m\u001b[4m Underline \u001b[0m\u001b[7m Reversed \u001b[0m"

Or together
print u"\u001b[1m\u001b[4m\u001b[7m BOLD Underline Reversed \u001b[0m"

And can be used together with foreground and background colors:
print u"\u001b[1m\u001b[31m Red Bold \u001b[0m"
print u"\u001b[4m\u001b[44m Blue Background Underline \u001b[0m"
The next set of Ansi escape codes are more complex: they allow you to move the cursor around the terminal window, or erase parts of it. These are the Ansi escape codes that programs like Bash use to let you move your cursor left and right across your input command in response to arrow-keys.
The most basic of these moves your cursor up, down, left or right:
\u001b[{n}A\u001b[{n}B\u001b[{n}C\u001b[{n}DTo make use of these, first let's establish a baseline of what the "normal" Python prompt does.
Here, we add a time.sleep(10) just so we can see it in action. We can see that if we print something, first it prints the output and moves our cursor onto the next line:
import time
print "Hello I Am A Cow"; time.sleep(10)
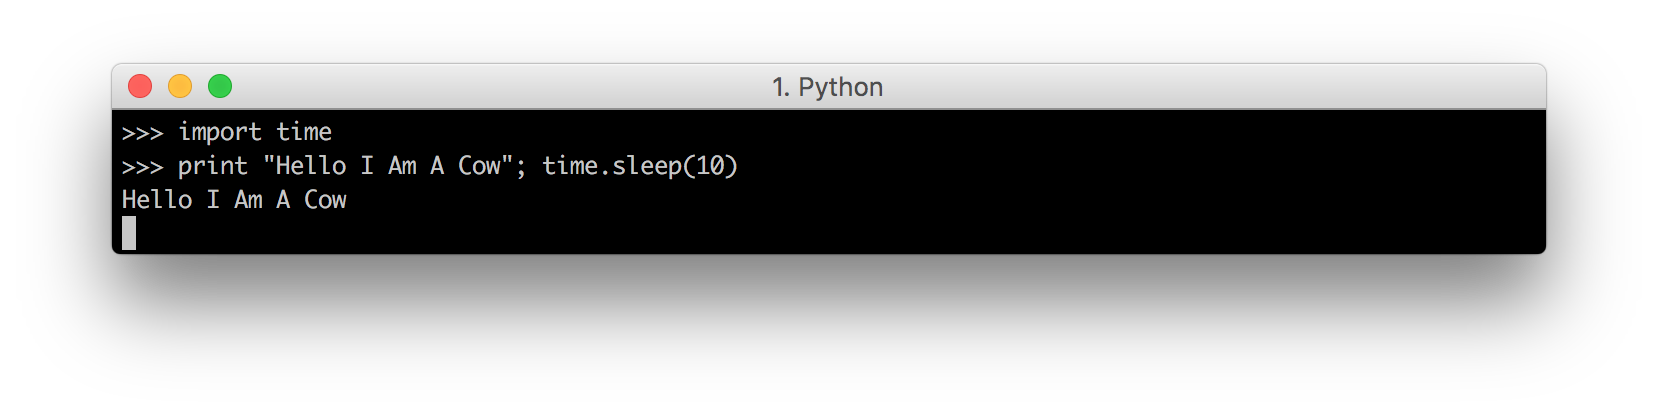
Then it prints the next prompt and moves our cursor to the right of it.
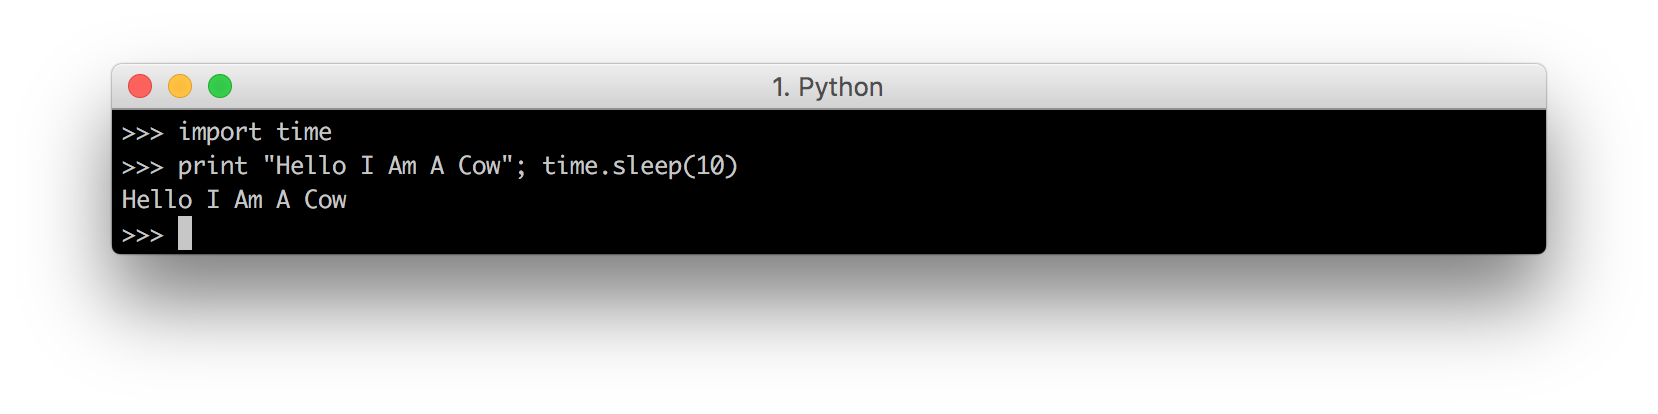
So that's the baseline of where the cursor already goes. What can we do with this?
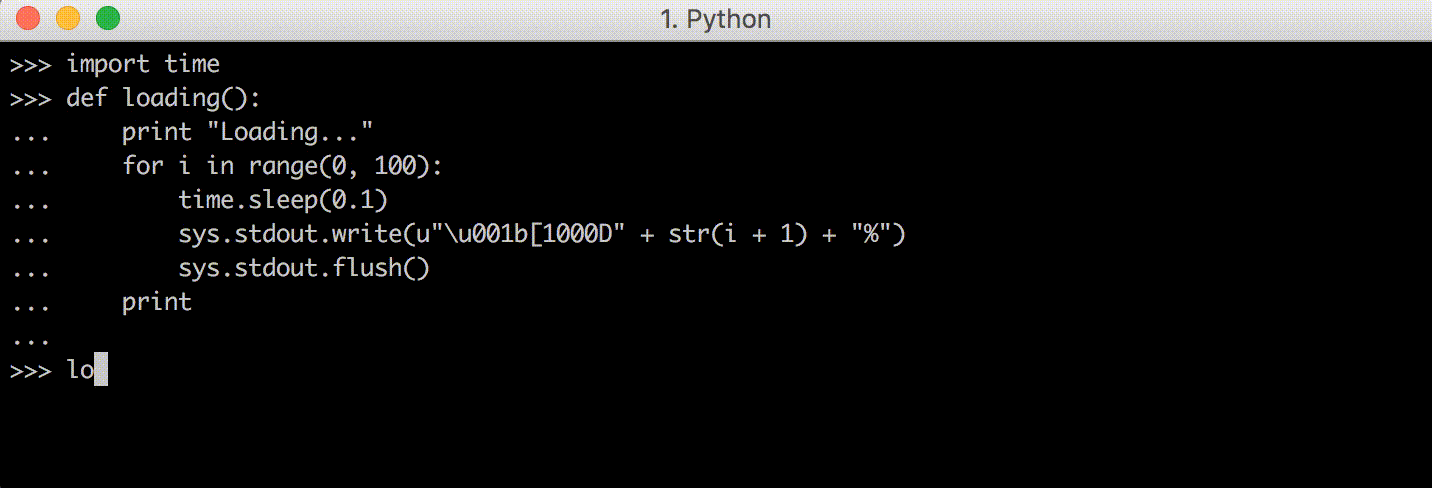
The easiest thing we can do with our cursor-navigation Ansi escape codes is to make a loading prompt:
import time, sys
def loading():
    print "Loading..."
    for i in range(0, 100):
        time.sleep(0.1)
        sys.stdout.write(u"\u001b[1000D" + str(i + 1) + "%")
        sys.stdout.flush()
    print

loading()
This prints the text from 1% to 100%, all on the same line since it uses stdout.write rather than print. However, before printing each percentage it first prints \u001b[1000D, which means "move cursor left by 1000 characters). This should move it all the way to the left of the screen, thus letting the new percentage that gets printed over-write the old one. Hence we see the loading percentage seamlessly changing from 1% to 100% before the function returns:
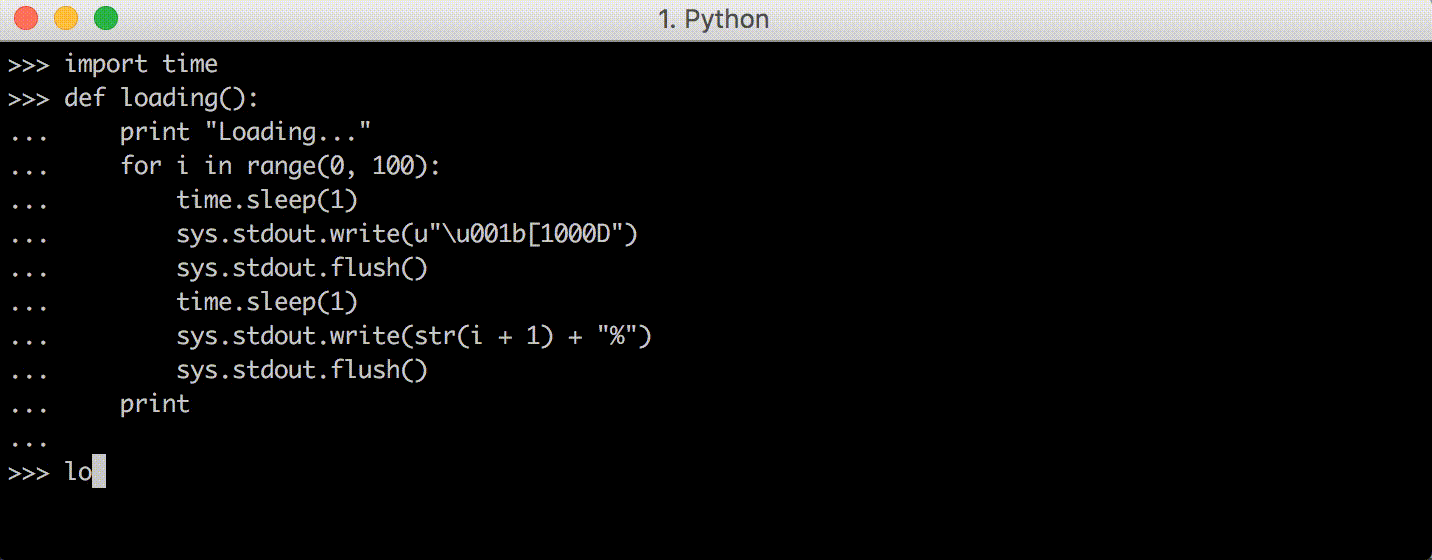
It might be a bit hard to visualize in your head where the cursor is moving, but we can easily slow it down and add more sleeps to make the code show us:
import time, sys
def loading():
    print "Loading..."
    for i in range(0, 100):
        time.sleep(1)
        sys.stdout.write(u"\u001b[1000D")
        sys.stdout.flush()
        time.sleep(1)
        sys.stdout.write(str(i + 1) + "%")
        sys.stdout.flush()
    print

loading()
Here, we split up the write that writes the "move left" escape code, from the write that writes the percentage progress indicator. We also added a 1 second sleep between them, to give us a chance to see the cursors "in between" states rather than just the end result:
Now, we can see the cursor moving left to the edge of the screen, before the new printed percentage over-writes the old one.
Now that we know how to make a self-updating progress bar using Ansi escape codes to control the terminal, it becomes relatively easy to modify it to be fancier, e.g. having a ASCII bar that goes across the screen:
import time, sys
def loading():
    print "Loading..."
    for i in range(0, 100):
        time.sleep(0.1)
        width = (i + 1) / 4
        bar = "[" + "#" * width + " " * (25 - width) + "]"
        sys.stdout.write(u"\u001b[1000D" +  bar)
        sys.stdout.flush()
    print

loading()
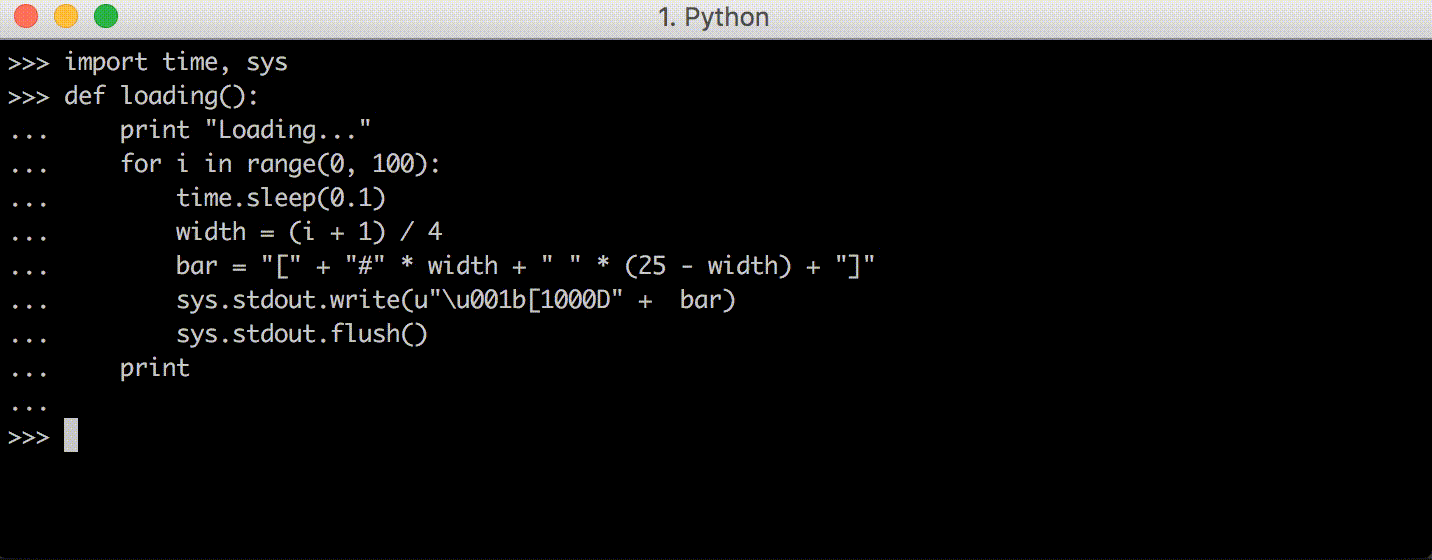
This works as you would expect: every iteration of the loop, the entire row is erased and a new version of the ASCII bar is drawn.
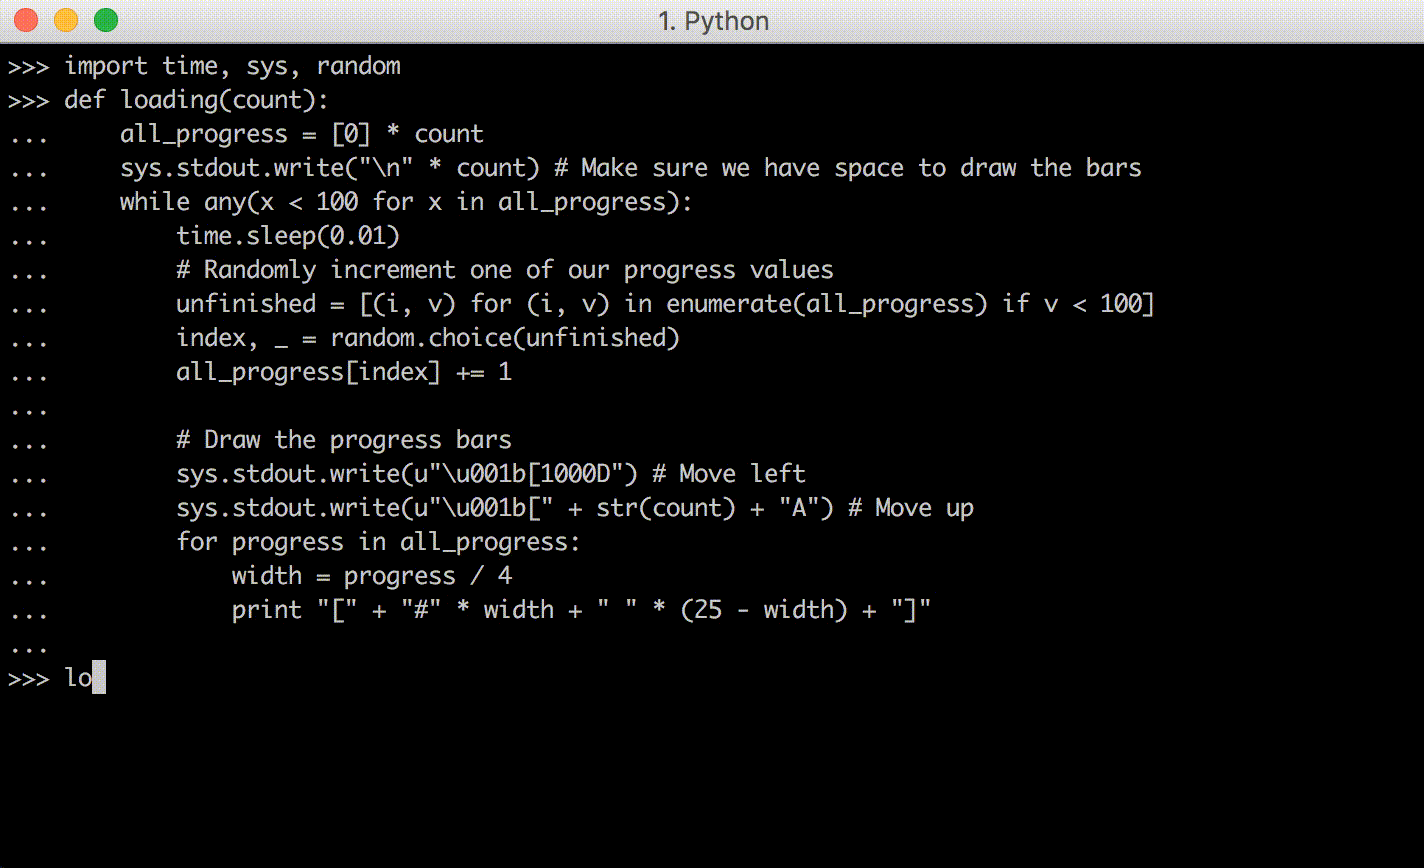
We could even use the Up and Down cursor movements to let us draw multiple progress bars at once:
import time, sys, random
def loading(count):
    all_progress = [0] * count
    sys.stdout.write("\n" * count) # Make sure we have space to draw the bars
    while any(x < 100 for x in all_progress):
        time.sleep(0.01)
        # Randomly increment one of our progress values
        unfinished = [(i, v) for (i, v) in enumerate(all_progress) if v < 100]
        index, _ = random.choice(unfinished)
        all_progress[index] += 1

        # Draw the progress bars
        sys.stdout.write(u"\u001b[1000D") # Move left
        sys.stdout.write(u"\u001b[" + str(count) + "A") # Move up
        for progress in all_progress:
            width = progress / 4
            print "[" + "#" * width + " " * (25 - width) + "]"

loading()
In this snippet, we have to do several things we did not do earlier:
Make sure we have enough space to draw the progress bars! This is done by writing "\n" * count when the function starts. This creates a series of newlines that makes the terminal scroll, ensuring that there are exactly count blank lines at the bottom of the terminal for the progress bars to be rendered on
Simulated multiple things in progress with the all_progress array, and having the various slots in that array fill up randomly
Used the Up ansi code to move the cursor count lines up each time, so we can then print the count progress bars one per linee
And it works!
Perhaps next time you are writing a command line application that's downloading lots of files in parallel, or doing some similar kind of parallel task, you could write a similar Ansi-escape-code-based progress bar so the user can see how their command is progressing.
Of course, all these progress prompts so far are fake: they're not really monitoring the progress of any task. Nevertheless, they demonstrate how you can use Ansi escape codes to put a dynamic progress indicator in any command-line program you write, so when you do have something whose progress you can monitor, you now have the ability to put fancy live-updating progress bars on it.
One of the more fancy things you might do with Ansi escape codes is to implement a command-line. Bash, Python, Ruby, all have their own in-built command line that lets you type out a command and edit its text before submitting it for execution. While it may seem special, in reality this command line is just another program that interacts with the terminal via Ansi escape codes! Since we know how to use Ansi escape codes, we can do it too and write our own command line.
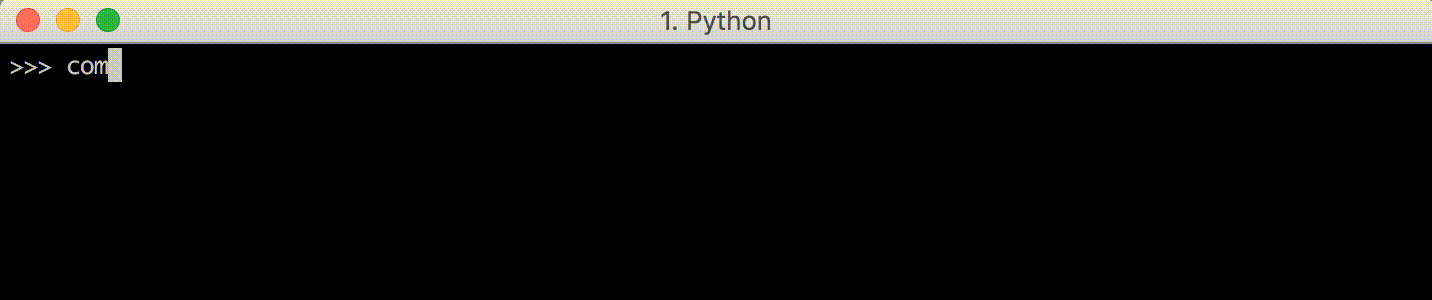
The first thing we have to do with a command-line, which we haven't done so far, is to take user input. This can be done with the following code:
import sys, tty
def command_line():
    tty.setraw(sys.stdin)
    while True:
        char = sys.stdin.read(1)
        if ord(char) == 3: # CTRL-C
            break;
        print ord(char)
        sys.stdout.write(u"\u001b[1000D") # Move all the way left
In effect, we use setraw to make sure our raw character input goes straight into our process (without echoing or buffering or anything), and then reading and echoing the character-codes we see until 3 appears (which is CTRL-C, the common command for existing a REPL). Since we've turned on tty.setraw print doesn't reset the cursor to the left anymore, so we need to manually move left with \u001b[1000D after each print.
If you run this in the Python prompt (CTRL-C to exit) and try hitting some characters, you will see that:
A to Z are 65 to 90, a to z are 97 to 12232 to 126 represents a Printable Character27 91 68, 27 91 67, 27 91 65, 27 91 66). This might vary based on your terminal and operating system.13 or 10 (it varies between computers), Backspace is 127Thus, we can try making our first primitive command line that simply echoes whatever the user typed:
This is obviously greatly simplified; we haven't even covered all the different kinds of ASCII characters that exist, nevermind all the Unicode stuff! Nevertheless it will be sufficient for a simple proof-of-concept.
To begin with, let's first implement the first two features:
No Backspace, no keyboard navigation, none of that. That can come later.
The code for that comes out looking something like this:
import sys, tty

def command_line():
    tty.setraw(sys.stdin)
    while True: # loop for each line
    # Define data-model for an input-string with a cursor
        input = ""
        while True: # loop for each character
            char = ord(sys.stdin.read(1)) # read one char and get char code

            # Manage internal data-model
            if char == 3: # CTRL-C
                return
            elif 32 <= char <= 126:
                input = input + chr(char)
            elif char in {10, 13}:
                sys.stdout.write(u"\u001b[1000D")
                print "\nechoing... ", input
                input = ""

            # Print current input-string
            sys.stdout.write(u"\u001b[1000D")  # Move all the way left
            sys.stdout.write(input)
            sys.stdout.flush()
Note how we
And you can see it working:
As we'd expect, arrow keys don't work and result in odd [D [A [C [B characters being printed, which correspond to the arrow key codes we saw above. We will get that working next. Nevertheless, we can enter text and then submit it with Enter.
Paste this into your own Python prompt to try it out!
The next step would be to let the user move the cursor around using arrow-keys. This is provided by default for Bash, Python, and other command-lines, but as we are implementing our own command line here we have to do it ourselves. We know that the arrow keys Left and Right correspond to the sequences of character-codes 27 91 68, 27 91 67, so we can put in code to check for those and appropiately move the cursor index variable
import sys, tty

def command_line():
    tty.setraw(sys.stdin)
    while True: # loop for each line
    # Define data-model for an input-string with a cursor
        input = ""
        index = 0
        while True: # loop for each character
            char = ord(sys.stdin.read(1)) # read one char and get char code

            # Manage internal data-model
            if char == 3: # CTRL-C
                return
            elif 32 <= char <= 126:
                input = input[:index] + chr(char) + input[index:]
                index += 1
            elif char in {10, 13}:
                sys.stdout.write(u"\u001b[1000D")
                print "\nechoing... ", input
                input = ""
                index = 0
            elif char == 27:
                next1, next2 = ord(sys.stdin.read(1)), ord(sys.stdin.read(1))
                if next1 == 91:
                    if next2 == 68: # Left
                        index = max(0, index - 1)
                    elif next2 == 67: # Right
                        index = min(len(input), index + 1)

            # Print current input-string
            sys.stdout.write(u"\u001b[1000D") # Move all the way left
            sys.stdout.write(input)
            sys.stdout.write(u"\u001b[1000D") # Move all the way left again
            if index > 0:
                sys.stdout.write(u"\u001b[" + str(index) + "C") # Move cursor too index
            sys.stdout.flush()
The three main changes are:
We now maintain an index variable. Previously, the cursor was always at the right-end of the input, since you couldn't use arrow keys to move it left, and new input was always appended at the right-end. Now, we need to keep a separate index which is not necessarily at the end of the input, and when a user enters a character we splice it into the input in the correct location.
We check for char == 27, and then also check for the next two characters to identify the Left and **Right* arrow keys, and increment/decrement the index of our cursor (making sure to keep it within the input string.
After writing the input, we now have to manually move the cursor all the way to the left and move it rightward the correct number of characters corresponding to our cursor index. Previously the cursor was always at the right-most point of our input because arrow keys didn't work, but now the cursor could be anywhere.
As you can see, it works:
It would take more effort to make Home and End (or Fn-Left and Fn-Right) work, as well as Bash-like shortcuts like Esc-f and Esc-B, but there's nothing in principle difficult about those: you just need to write down the code-sequences they produce the same way we did at the start of this section, and make them change our cursor index appropriately.
The last thing on our feature list to implement is deletion: using Backspace should cause one character before the cursor to disappear, and move the cursor left by 1. This can be done naively by inserting an
+ elif char == 127:
+     input = input[:index-1] + input[index:]
+     index -= 1
Into our conditional. This works, somewhat, but not entirely as expected:
As you can see, the deletion works, in that after I delete the characters, they are no longer echoed back at me when I press Enter to submit. However, the characters are still sitting their on screen even as I delete them! At least until they are over-written with new characters, as can be seen in the third line in the above example.
The problem is that so far, we have never actually cleared the entire line: we've always just written the new characters over the old characters, assuming that the string of new characters would be longer and over-write them. This is no longer true once we can delete characters.
A fix is to use the Clear Line Ansi escape code \u001b[0K, one of a set of Ansi escape codes which lets you clear various portions of the terminal:
\u001b[{n}J clears the screen
n=0 clears from cursor until end of screen,n=1 clears from cursor to beginning of screenn=2 clears entire screen\u001b[{n}K clears the current line
n=0 clears from cursor to end of linen=1 clears from cursor to start of linen=2 clears entire lineThis particular code:
+ sys.stdout.write(u"\u001b[0K")
Clears all characters from the cursor to the end of the line. That lets us make sure that when we delete and re-print a shorter input after that, any "leftover" text that we're not over-writing still gets properly cleared from the screen.
The final code looks like:
import sys, tty

def command_line():
    tty.setraw(sys.stdin)
    while True: # loop for each line
    # Define data-model for an input-string with a cursor
        input = ""
        index = 0
        while True: # loop for each character
            char = ord(sys.stdin.read(1)) # read one char and get char code

            # Manage internal data-model
            if char == 3: # CTRL-C
                return
            elif 32 <= char <= 126:
                input = input[:index] + chr(char) + input[index:]
                index += 1
            elif char in {10, 13}:
                sys.stdout.write(u"\u001b[1000D")
                print "\nechoing... ", input
                input = ""
                index = 0
            elif char == 27:
                next1, next2 = ord(sys.stdin.read(1)), ord(sys.stdin.read(1))
                if next1 == 91:
                    if next2 == 68: # Left
                        index = max(0, index - 1)
                    elif next2 == 67: # Right
                        index = min(len(input), index + 1)
            elif char == 127:
                input = input[:index-1] + input[index:]
                index -= 1
            # Print current input-string
            sys.stdout.write(u"\u001b[1000D") # Move all the way left
            sys.stdout.write(u"\u001b[0K")    # Clear the line
            sys.stdout.write(input)
            sys.stdout.write(u"\u001b[1000D") # Move all the way left again
            if index > 0:
                sys.stdout.write(u"\u001b[" + str(index) + "C") # Move cursor too index
            sys.stdout.flush()
And i you paste this into the command-line, it works!
At this point, it's worth putting some sys.stdout.flush(); time.sleep(0.2);s into the code, after every sys.stdout.write, just to see it working. If you do that, you will see something like this:
Where it is plainly obvious each time you enter a character,
sys.stdout.write(u"\u001b[1000D")sys.stdout.write(u"\u001b[0K")sys.stdout.write(input)sys.stdout.write(u"\u001b[1000D")sys.stdout.write(u"\u001b[" + str(index) + "C")Normally, when you are using this code, it all happens instantly when .flush() is called. However, it is still valuable to see what is actually going on, so that you can understand it when it works and debug it when it misbehaves!
We now have a minimal command-line, implemented ourselves using sys.stdin.read and sys.stdout.write, using ANSI escape codes to control the terminal. It is missing out a lot of functionality and hotkeys that "standard" command-lines provide, things like:
Alt-f to move one word rightAlt-b to move one word leftAlt-Backspace to delete one word on the leftAnd currently isn't robust enough to work with e.g. multi-line input strings, single-line input strings that are long enough to wrap, or display a customizable prompt to the user.
Nevertheless, implementing support for those hotkeys and robustness for various edge-case inputs is just more of the same: picking a use case that doesn't work, and figuring out the right combination of internal logic and ANSI escape codes to make the terminal behave as we'd expect.
There are other terminal commands that would come in useful; Wikipedia's table of escape codes is a good listing (the CSI in that table corresponds to the \u001b in our code) but here are some useful ones:
\u001b[{n}A moves cursor up by n\u001b[{n}B moves cursor down by n\u001b[{n}C moves cursor right by n\u001b[{n}D moves cursor left by n\u001b[{n}E moves cursor to beginning of line n lines down\u001b[{n}F moves cursor to beginning of line n lines down\u001b[{n}G moves cursor to column n\u001b[{n};{m}H moves cursor to row n column m\u001b[{n}J clears the screen
n=0 clears from cursor until end of screen,n=1 clears from cursor to beginning of screenn=2 clears entire screen\u001b[{n}K clears the current line
n=0 clears from cursor to end of linen=1 clears from cursor to start of linen=2 clears entire line\u001b[{s} saves the current cursor position\u001b[{u} restores the cursor to the last saved positionThese are some of the tools you have available when trying to control the cursor and terminal, and can be used for all sorts of things: implementing terminal games, command-lines, text-editors like Vim or Emacs, and other things. Although it is sometimes confusing what exactly the control codes are doing, adding time.sleeps after each control code. So for now, let's call this "done"...
If you've reached this far, you've worked through colorizing your output, writing various dynamic progress indicators, and finally writing a small, bare-bones command line using Ansi escape codes that echoes user input back at them. You may think these three tasks are in descending order of usefulness: colored input is cool, but who needs to implement their own command-line when every programming language already has one? And there are plenty of libraries like Readline or JLine that do it for you?
It turns out, that in 2016, there still are valid use cases for re-implementing your own command-line. Many of the existing command-line libraries aren't very flexible, and can't support basic use cases like syntax-highlighting your input. If you want interfaces common in web/desktop programs, like drop-down menus or Shift-Left and Shift-Right to highlight and select parts of your input, most existing implementations will leave you out of luck.
However, now that we have our own from-scratch implementation, syntax highlighting is as simple as calling a syntax_highlight function on our input string to add the necessary color-codes before printing it::
+            sys.stdout.write(syntax_highlight(input))
-            sys.stdout.write(input)
To demonstrate I'm just going to use a dummy syntax highlighter that highlights trailing whitespace; something many programmers hate.
That's as simple as:
def syntax_highlight(input):
   stripped = input.rstrip()
   return stripped + u"\u001b[41m" + " " *  (len(input) - len(stripped)) + u"\u001b[0m"
And there you have it!
Again, this is a minimal example, but you could imagine swapping out this syntax_highlight implementation for something like Pygments, which can perform real syntax highlighting on almost any programming language you will be writing a command-line for. Just like that, we've added customizable syntax highlighting in just a few lines of Python code. Not bad!
The complete code below, if you want to copy-paste it to try it out yourself:
import sys, tty
def syntax_highlight(input):
    stripped = input.rstrip()
    return stripped + u"\u001b[41m" + " " *  (len(input) - len(stripped)) + u"\u001b[0m"

def command_line():
    tty.setraw(sys.stdin)
    while True: # loop for each line
        # Define data-model for an input-string with a cursor
        input = ""
        index = 0
        while True: # loop for each character
            char = ord(sys.stdin.read(1)) # read one char and get char code

            # Manage internal data-model
            if char == 3: # CTRL-C
                return
            elif 32 <= char <= 126:
                input = input[:index] + chr(char) + input[index:]
                index += 1
            elif char in {10, 13}:
                sys.stdout.write(u"\u001b[1000D")
                print "\nechoing... ", input
                input = ""
                index = 0
            elif char == 27:
                next1, next2 = ord(sys.stdin.read(1)), ord(sys.stdin.read(1))
                if next1 == 91:
                    if next2 == 68: # Left
                        index = max(0, index - 1)
                    elif next2 == 67: # Right
                        index = min(len(input), index + 1)
            elif char == 127:
                input = input[:index-1] + input[index:]
                index -= 1
            # Print current input-string
            sys.stdout.write(u"\u001b[1000D")
            sys.stdout.write(u"\u001b[0K")
            sys.stdout.write(syntax_highlight(input))
            sys.stdout.write(u"\u001b[1000D")
            if index > 0:
                sys.stdout.write(u"\u001b[" + str(index) + "C")
            sys.stdout.flush()
Apart from syntax-highlighting, now that we have our own relatively-simple DIY-command-line, a whole space of possibilities opens up: creating drop-down menus is just a matter of navigating the cursor into the right place and printing the right things. ImplementingShift-Left and Shift-Right to highlight and select text is just a matter of recognizing the correct input codes (27 91 49 59 50 68 and 27 91 49 59 50 67 on Mac-OSX/iTerm) and applying some background color or reversing the colors for that snippet before printing.
It may be tedious to implement, but it's all straightforward: once you're familiar with the basic Ansi codes you can use to interact with the terminal, any feature you want is just a matter of writing the code to make it happen.
This sort of "rich" interaction to your command-line programs is something that most traditional command-line programs and libraries lack. Adding syntax highlighting to Readline would definitely take more than four lines of code! But with your own implementation, everything is possible.
More recently, there are a new wave of command-line libraries like the Python Prompt Toolkit, the Fish Shell and the Ammonite Scala REPL (My own project) that provide a richer command-line experience than traditional Readline/JLine based command-lines, with features like syntax-highlighted input and multi-line editing:
And desktop-style Shift-Left/Shift-Right selection, and IDE-style block-indenting or de-denting with Tab and Shift-Tab:
To build tools like that, you yourself need to understand the various ways you can directly interface with the terminal. While the minimal command-line we implemented above is obviously incomplete and not robust, it is straightforward (if tedious) to flesh out the few-dozen features most people expect a command-line to have. After that, you're on par with what's out there, and you are free to implement more features and rich interactions beyond what existing libraries like Readline/Jline provide.
Perhaps you want to implement a new REPL for a language that doesn't have one? Perhaps you want to write a better REPL to replace an existing one, with richer features and interactions? Perhaps you like what the Python Prompt Toolkit provides for writing rich command-lines in Python, and want the same functionality in Javascript? Or perhaps you've decided to implement your own command-line text editor like Vim or Emacs, but better?
It turns out, learning enough about Ansi escape codes to implement your own rich terminal interface is not nearly as hard as it may seem initially. With a relatively small number of control commands, you can implement your own rich command-line interfaces, and bring progress to what has been a relatively backward field in the world of software engineering.
Have you ever found yourself needing to use these Ansi escape codes as part of your command-line programs? What for? Let us know in the comments below!
About the Author: Haoyi is a software engineer, and the author of many open-source Scala tools such as the Ammonite REPL and the Mill Build Tool. If you enjoyed the contents on this blog, you may also enjoy Haoyi's book Hands-on Scala Programming