var x = 0.0
type Graph = (String, Double => Double)
val graphs = Seq[Graph](
  ("red", sin),
  ("green", x => abs(x % 4 - 2) - 1),
  ("blue", x => sin(x/12) * sin(x))
).zipWithIndex
dom.window.setInterval(() => {
  x = (x + 1) % w; if (x == 0) clear()
  for (((color, f), i) <- graphs) {
    val offset = h / 3 * (i + 0.5)
    val y = f(x / w * 75) * h / 30
    brush.fillStyle = color
    brush.fillRect(x, y + offset, 3, 3)
  }
}, 20)
Scala.js is a compiler that compiles Scala source code to equivalent Javascript code. That lets you write Scala code that you can run in a web browser, or other environments (Chrome plugins, Node.js, etc.) where Javascript is supported. This book is an introduction to Scala.js, which aims to get you from knowing-nothing about it to being relatively proficient.
This book contains something for all levels of experience with Scala.js: absolute beginners can get started with the Intro to Scala.js and Hands On tutorial, people who have used it before can skip ahead to the later parts of the tutorial: Making a Canvas App or Interactive Web Pages. Intermediate users will find interest in the chapters on Cross Publishing Libraries with Scala.js or Integrating Client-Server, and even experienced users will find the In Depth documention useful. Feel free to explore the navigation bar on the left to find chapters of interest.
Even if we do not require any familiarity of Scala.js, this book nonetheless assumes a good amount of background knowledge: of Scala, of Javascript, and of web development as a whole. In general, you will not need deep knowledge of any of these subjects, though if you are coming in entirely without knowledge of any one of them, you'll have to be willing to spend time Google-ing things and picking things up as we go along. Someone who comes in without previous web-dev experience may miss or not-notice many of the nice touches and benefits that Scala.js brings to the table, having never done web-dev any other way,
Many of the code samples are taken from examples available on the book's Github Page; for those code samples (e.g. the animation above), there is a link in the top-right corner of the snippet that you can click on to go to the original code. These come in handy if you find you need additional context around the snippet, e.g. what imports you need for the code to work, or what the complete executable example looks like.
This book is roughly divided into two sections:
- Hands On is a set of tutorials that walks you through getting started with Scala.js. You'll build a range of small projects, from Making a Canvas App to Interactive Web Pages to Integrating Client-Server, and in the process will get a good overview of both Scala.js's use cases as well as the development experience
- In Depth is a set of detailed expositions on various parts of the Scala.js platform. Nothing in here is necessary for you to make your first demos, but as you dig deeper into the platform, you will likely need or want to care about these things so you can properly understand what's going on "under the hood"
Feel free to jump ahead to either of them if you have some prior exposure to Scala.js. If not, it is best to start with the introduction...
Scala.js compiles Scala code to equivalent, executable Javascript. Here's the compilation of a trivial hello-world example:
object Main extends js.JSApp{
  def main() = {
    var x = 0
    while(x < 10) x += 3
    println(x)
    // 12
  }
}
ScalaJS.c.LMain$.prototype.main__V = (function() {
  var x = 0;
  while ((x < 10)) {
    x = ((x + 3) | 0)
  };
  ScalaJS.m.s_Predef$()
           .println__O__V(x)
  // 12
});
As you can see, both of the above programs do identical things: they'll count the variable x from 0, 3, 9, and 12 before finally printing it out. It's just that the first is written in Scala and the second is in Javascript.
Traditionally, Scala has been a language which runs on the JVM. This eliminates it from consideration in many cases, e.g. when you need to build interactive web apps, the browser-client only runs Javascript. Even if your back-end is all written in Scala, you need to fall back to Javascript to run your client-side code, at a great loss in terms of toolability and maintainability. Scala.js lets you to develop web applications with the safety and toolability that comes with a statically typed language:
- Typo-safety due to its compiler which catches many silly errors before the code is run
- In-editor support for autocomplete, error-highlighting, refactors, and intelligent navigation
- Moderate sized compiled executables, in the 100-400kb range
- Source-maps for ease of debugging
The value proposition is that due to the superior language and tooling, writing a web application in Scala.js will result in a codebase that is more flexible and robust than an equivalent application written in Javascript. The hope is that the benefits of using Scala.js will outweigh the additional (non-trivial) messiness of adding a whole new toolchain, as compared to directly writing raw Javascript.
I won't spend time on a detailed discussion on why Scala is good or why Javascript is bad; people's opinions on both sides can be found on the internet. The assumption is, going in, that you either already know and like Scala, or you are familiar with Javascript and are willing to try something new.
Javascript is the language supported by web browsers, and is the only language available if you wish to write interactive web applications. As more and more activity moves online, the importance of web apps will only increase over time. Adobe Flash, Java Applets and Silverlight (which have historically allowed browser-client development in other languages) are all but dead: historically they have been the source of security vulnerabilities, none of them are available on the mobile browsers of Android or iOS or Windows8+. That leaves Javascript.
Javascript-the-language
Javascript is an OK language to do small-scale development: an animation here, an on-click transition there. There are a number of warts in the language, e.g. its verbosity, and a large amount of surprising behavior, but while your code-base doesn't extend past a few hundred lines of code, you often will not mind or care.
However, Javascript is not an easy language to work in at scale: when your code-base extends to thousands, tens or hundreds of thousands of lines of code. The un-typed nature of the language, which is fine for small applications, becomes an issue when you are mainly working with code that you did not write.
In a large code-base, finding out what methods or properties a variable has is often a long chase through dozens of files to see how it ended up being passed to the current function. Refactorings, which are OK when you can just test the code to see if it works, become dangerous when your code base is large enough that "just test all the code" would take hours. Language-warts which are slightly annoying in small programs become a minefield in large ones: it's only a matter of time before you hit one, often in code you did-not/cannot test, resulting in breakages in production.
Apart from the inherent danger of the language, Javascript has another major problem: the language has left many things unspecified, yet at the same time provides the ability to emulate these things in a variety of ways. This means that rather than having a single way of e.g. defining a class and instantiating an object, there is a decade-long debate between a dozen different and equally-bad, hand-crafted alternatives. Large code-bases use third-party libraries, and most are guaranteed (purely due to how stastistics work) to do these basic things differently from your own code, making understanding these disparate code-bases (e.g. when something goes wrong) very difficult.
To work in Javascript, you need the discipline to limit yourself to the sane subset of the language, avoiding all the pitfalls along the way:
Even if you manage to do so, what constitutes a pitfall and what constitutes a clever-language-feature changes yearly, making it difficult to maintain cohesiveness over time. This is compounded by the fact that refactoring is difficult, and so removing "unwanted" patterns from a large code-base a difficult (often multi-year) process.
Javascript-the-platform
However, even though Javascript-the-language is pretty bad, Javascript-the-platform has some very nice properties that make it a good target for application developers:
- Zero-install distribution: just go to a URL and have the application downloaded and ready to use.
- Hyperlinks: being able to link to a particular page or item within a web app is a feature other platforms lack, and makes it much easier to cross-reference between different systems
- Sandboxed security: web applications are secure by default. No matter how sketchy the websites you visit, you can be sure that once you close the page, they're gone
These features are all very nice to have, and together have made the web platform the success it is today. When you compare it to traditional applications, you can see the draw:
- Installing traditional desktop applications is usually a several-minute-long process. If something goes wrong in the installation, that often leaves a botched half-install on your computer which makes installing, uninstalling, or running the program impossible without manual surgery to excise the broken files.
- Desktop applications generally do not talk to each other at all. While on the web you can easily link a page to someone, trying to get someone to a particular screen in desktop software often involves a chain of screenshots with detailed instructions of which buttons to click at each stage.
- Desktop application security is non-existent. Install one rogue application and it can take over your computer, steal your credit card number, use your email for sending spam, and all sorts of other nasty things. Removing these for-good sometimes involves re-installing your entire operating system. Hence people are much more wary about only installing desktop software from people they "trust".
In many ways, mobile App platforms like Android and iOS have closed the gap between "native" and "web" applications. Installing a new App may take 30 seconds, you can often deep-link to certain pages within an App, and Apps have a much tighter security model than desktop software does. Nevertheless, 30 seconds is still much longer than the 0.5 seconds it takes to open a web page, deep-linking in apps is not very prevalent, and the security model still often leaves space for rogue Apps to misbehave and steal data.
Despite the problems with Javascript (and other tools like HTML an CSS, which have their own problems) the Web platform got a lot of things right, and the Desktop and Mobile platforms have a lot of catching up to do. If only we could improve upon the parts that aren't so great. This is where Scala.js comes in.
With Scala.js, you can cross compile your Scala code to a Javascript executable that can run on all major web browsers. You get all the benefits of the web platform in terms of deployability, security, and hyperlinking, with none of the problems of writing your software in Javascript. Scala.js provides a better language to do your work in, but also provides some other goodies that have in-so-far never been seen in mainstream web development: shared-code and client-server integration.
The Language
At a first approximation, Scala.js provides you a sane language to do development in the web browser. This saves you from an endless stream of Javascript warts like this one:
javascript> ["10", "10", "10", "10"].map(parseInt)
[10, NaN, 2, 3] // WTF
scala> List("10", "10", "10", "10").map(parseInt)
List(10, 10, 10, 10) // Yay!
Not only do you have an expressive language with static types, you also have great tooling with IDEs like IntelliJ and Eclipse, a rich library of standard collections, and many other modern conveniences that we take for granted but are curiously missing when working in the wild west of web development: the browser! You get all of the upside of developing for the web platform.
While not useful for small applications, where most of the logic is gluing together external APIs, this comes in very useful in large applications where a lot of the complexity and room-for-error is entirely internal. With larger apps, you can no longer blame browser vendors for confusing APIs that make your code terrible: these confusing APIs only lurk in the peripherals around a larger, complex application. One thing you learn working in large-ish web client-side code-bases is that the bulk of the confusion and complexity is no-one's fault but your own, as a team.
At this point, all of Google, Facebook, and Microsoft have all announced work on a typed variant of Javascript. These are not academic exercises: Dart/AtScript/Flow/Typescript are all problems that solve a real need, that these large companies have all faced once they've grown beyond a certain size. Clearly, Javascript isn't cutting it anymore, and the convenience and "native-ness" of the language is more than made up for in the constant barrage of self-inflicted problems. Scala.js takes this idea and runs with it!
Sharing Code
Shared code is one of the holy-grails of web development. Traditionally the client-side code and server-side code has been written in separate languages: PHP or Perl or Python or Ruby or Java on the server, with only Javascript on the client. This means that algorithms were often implemented twice, constants copied-&-pasted, or awkward Ajax calls are made in an attempt to centralize the logic in one place (the server). With the advent of Node.js in the last few years, you can finally re-use the same code on the server as you can on the client, but with the cost of having all the previously client-only problems with Javascript now inflicted upon your server code base. Node.js expanded your range-of-options for writing shared client/server logic from "Write everything twice" to "Write everything twice, or write everything in Javascript". More options is always good, but it's not clear which of the two choices is more painful!
Scala.js provides an alternative to this dilemma. With Scala.js, you can utilize the same libraries you use writing your Scala servers when writing your Scala web clients! On one end, you are sharing your templating language with Scalatags or sharing your serialization logic with uPickle. At the other, you are sharing large, abstract libraries like Scalaz or Shapeless.
Sharing code means several things:
- Not having to find two libraries to do a particular common task
- Not having to re-learn two different ways of doing the exact same thing
- Not needing to implement the same algorithms twice, for the times you can't find a good library to do what you want
- Not having to debug problems caused by subtle differences in the two implementations
- Not having to resort to awkward Ajax-calls or pre-computation to avoid duplicating logic between the client and server
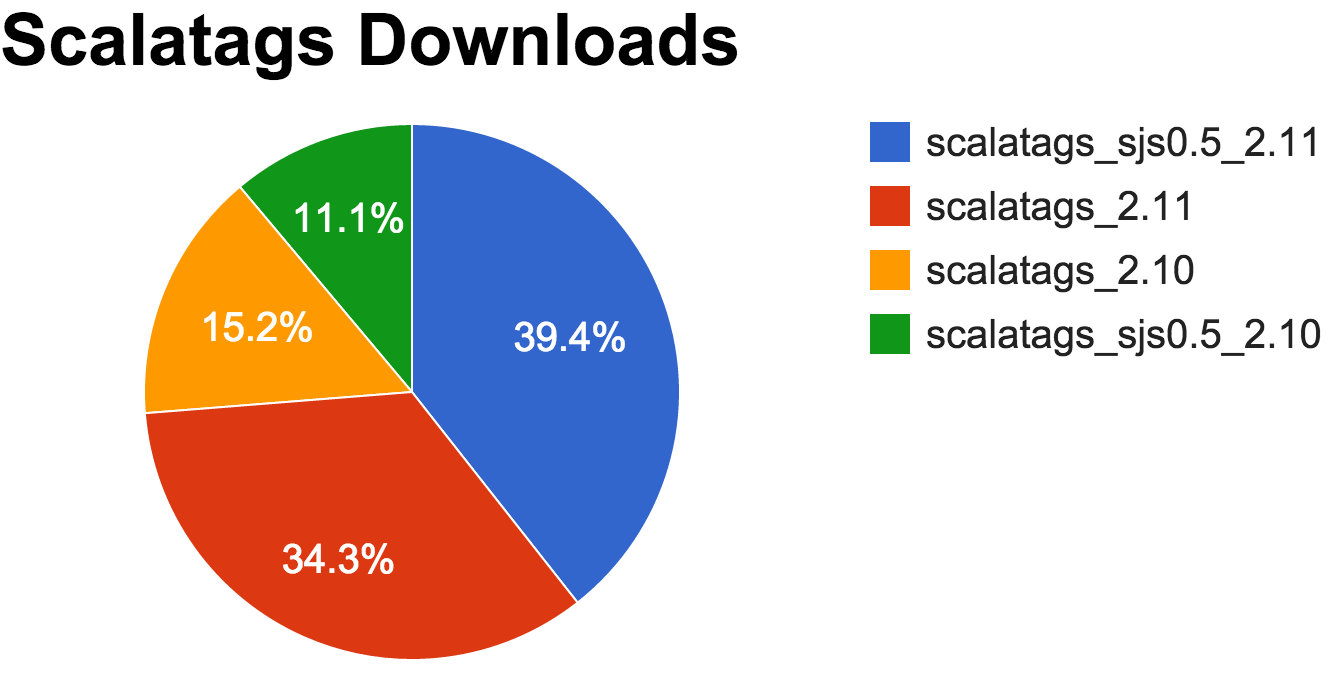
Shared code doesn't just mean sharing pre-made libraries between the client and server. You can easily publish your own libraries that can be used on both Scala-JVM and Scala.js. This means that as a library author, you can at once target two completely different platforms, and (with some work) take advantage of the intricacies of each platform to optimize your library for each one. Take Scalatags as an example: as the first client-server Scala.js-ScalaJVM shared libraries, it enjoys a roughly even split of downloads from people using it on both platforms:
Shared code means that if you, as an application writer, want some logic to be available on both the client and server, you simply put it in a shared/ folder, and that's the end of the discussion. No architectural patterns to follow, no clever techniques need to be involved. Shared logic, whether that means constants, functions, data structures, all the way to algorithms and entire libraries, can simply be placed in shared/ and be instantly accessible from both your client-side web code and your server.
Shared code has long been the holy-grail of web development. Even now, people speak of shared code as if it were a myth. With Scala.js, shared code is the simple, boring reality. And all this while, just as importantly, you don't need to re-write your large enterprise back-end systems in a language that doesn't scale well beyond 100s of lines of code.
Client-Server Integration
There is an endless supply of new platforms which have promised to change-the-way-we-do-web-development-forever. From old-timers like Ur-Web, to GWT, to Asana's LunaScript, to more recently things like Meteor.js.
One common theme in all these platforms is that their main selling point is their tight, seamless client-server integration, to the point where you can just make method calls across the client-server boundary and the platform/language/compiler figures out what to do.
With Scala.js and Scala-JVM, such conveniences like making method calls across the client-server boundary is the boring reality. Not only are the calls transparent, they are also statically checked, so any mistake in the route name or the parameters it expects, or the result type it returns to you, will be caught by the compiler long before even manual testing. It becomes impossible to make a malformed Ajax call.
There's a lot to be said for automating things using a computer. The entire field of software engineering is basically about automating tasks that were previously done manually: accounting, banking, making travel arrangements, and all that. However, in the world of web-development, there has always been one set of tasks that has traditionally be done manually: the task of ensuring the web-clients are properly synchronized with the web-servers. Communication between the two has always been a manual, tedious, error-prone process, and mistakes often end un-noticed until something breaks in production.
With Scala.js, like the other experimental platforms that have come before us, we attempt to provide a way forward from this manual-tedium.
In many ways, Scala.js all-at-once provides many of the traditional holy-grails of web development: People have always dreamed about doing web development in a sane, best-of-breed language that compiles to both client and server. Of not having to worry too hard about whether code goes on the client or on the server, and being able to move or share it if necessary. Of having a compiler that will verify and check that your entire system is correct.
Scala.js provides all these things, and much more. If you're interested enough to want to make use of Scala.js, read on!
This half of the book is a set of tutorials that walks you through getting started with Scala.js. You'll build a range of small projects, from Making a Canvas App to Interactive Web Pages to Integrating Client-Server, and in the process will get a good overview of both Scala.js's use cases as well as the development experience
To get started with Scala.js, you will need to prepare a few things:
- sbt: SBT is the most common build-tool in the Scala community, and is what we will use for building our Scala.js application. Their home page has a link to download and install it. (If you are already using Typesafe Activator, that is effectively sbt.)
- An editor for Scala: IntelliJ Scala and Eclipse ScalaIDE are the most popular choices and work on all platforms, though there are others.
- Git: This is a version-control system that we will use to download and manage our Scala.js projects.
- A terminal: on OSX you have Terminal.app already installed, in Linux you have Terminal, and on Windows you have PowerShell.
- Your favorite web browser: Chrome and Firefox are the most popular.
If you've worked with Scala before, you probably already have most of these installed. Otherwise, take a moment to download them before we get to work.
The quickest way to get started with Scala.js is to git clone workbench-example-app, go into the repository root, and run sbt ~fastOptJS
git clone https://github.com/lihaoyi/workbench-example-app
cd workbench-example-app
sbt ~fastOptJS
This should result in a bunch of spam to the console, and may take a few minutes the first time as SBT resolves and downloads all necessary dependencies. A successful run looks like this
  haoyi-mbp:Workspace haoyi$ git clone https://github.com/lihaoyi/workbench-example-app
  Cloning into 'workbench-example-app'...
  remote: Counting objects: 876, done.
  remote: Total 876 (delta 0), reused 0 (delta 0)
  Receiving objects: 100% (876/876), 676.59 KiB | 317.00 KiB/s, done.
  Resolving deltas: 100% (308/308), done.
  Checking connectivity... done.
  haoyi-mbp:Workspace haoyi$ cd workbench-example-app/
  haoyi-mbp:workbench-example-app haoyi$ sbt ~fastOptJS
  [info] Loading global plugins from /Users/haoyi/.sbt/0.13/plugins
  [info] Updating {file:/Users/haoyi/.sbt/0.13/plugins/}global-plugins...
  [info] Resolving org.fusesource.jansi#jansi;1.4 ...
  [info] Done updating.
  [info] Loading project definition from /Users/haoyi/Dropbox (Personal)/Workspace/workbench-example-app/project
  [info] Updating {file:/Users/haoyi/Dropbox%20(Personal)/Workspace/workbench-example-app/project/}workbench-example-app-build...
  [info] Resolving org.fusesource.jansi#jansi;1.4 ...
  [info] Done updating.
  [info] Set current project to Example (in build file:/Users/haoyi/Dropbox%20(Personal)/Workspace/workbench-example-app/)
  [INFO] [10/26/2014 15:42:09.791] [SystemLol-akka.actor.default-dispatcher-2] [akka://SystemLol/user/IO-HTTP/listener-0] Bound to localhost/127.0.0.1:12345
  [info] Updating {file:/Users/haoyi/Dropbox%20(Personal)/Workspace/workbench-example-app/}workbench-example-app...
  [info] Resolving jline#jline;2.12 ...
  [info] Done updating.
  [info] Compiling 1 Scala source to /Users/haoyi/Dropbox (Personal)/Workspace/workbench-example-app/target/scala-2.11/classes...
  [info] Fast optimizing /Users/haoyi/Dropbox (Personal)/Workspace/workbench-example-app/target/scala-2.11/example-fastopt.js
  [info] workbench: Checking example-fastopt.js
  [info] workbench: Refreshing http://localhost:12345/target/scala-2.11/example-fastopt.js
  [success] Total time: 11 s, completed Oct 26, 2014 3:42:21 PM
  1. Waiting for source changes... (press enter to interrupt)
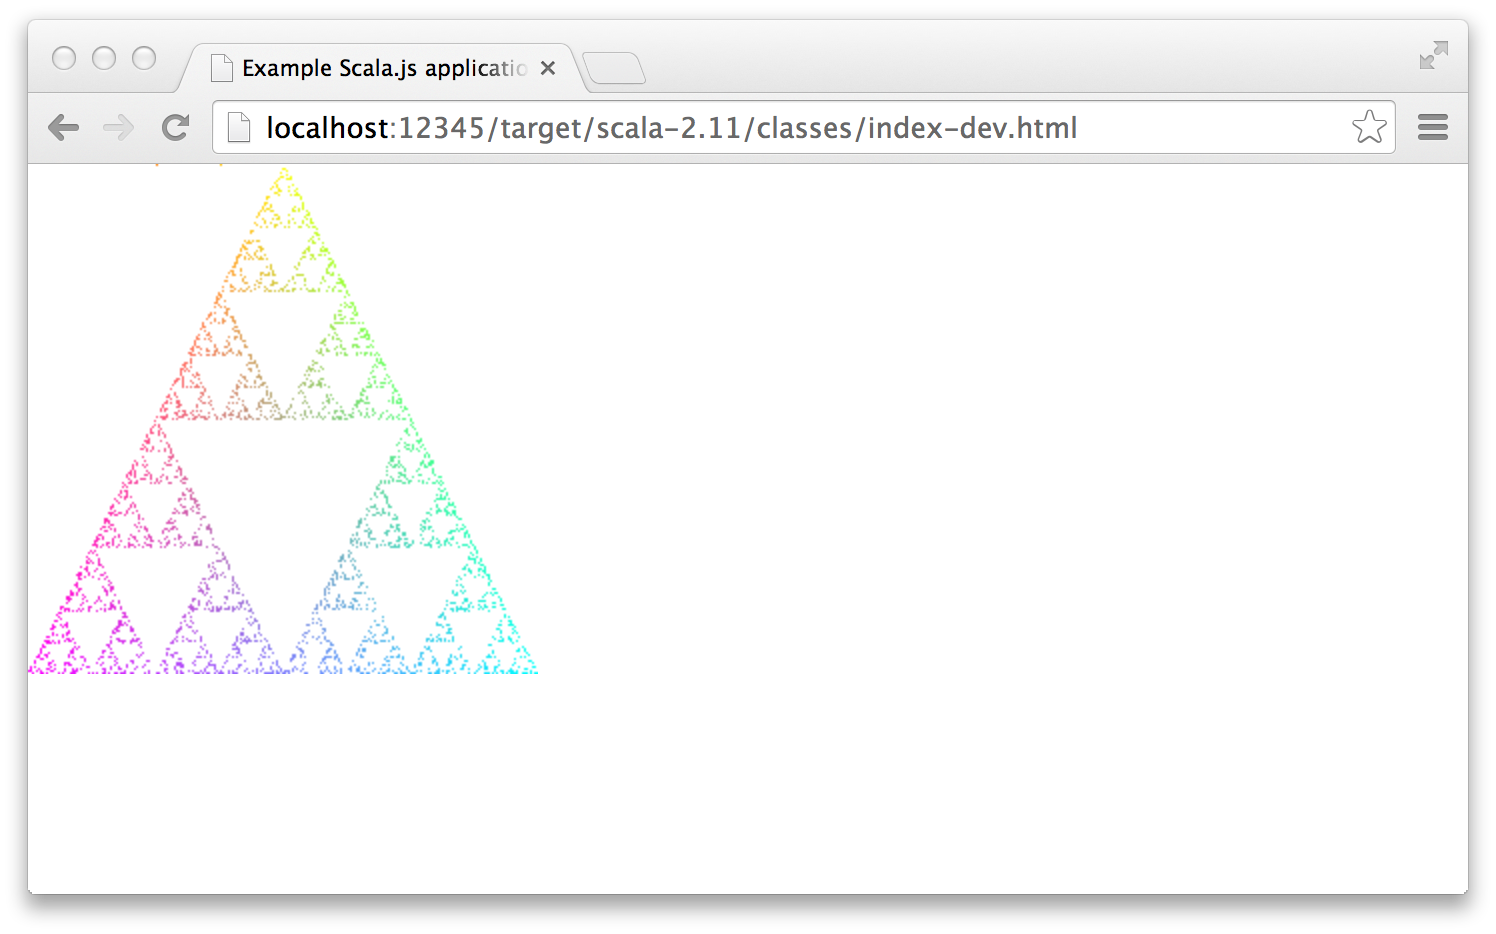
The line Waiting for source changes... is telling you that your Scala.js program is ready! Now, when you go to the web URL http://localhost:12345/target/scala-2.11/classes/index-dev.html in your browser, you should see the following:
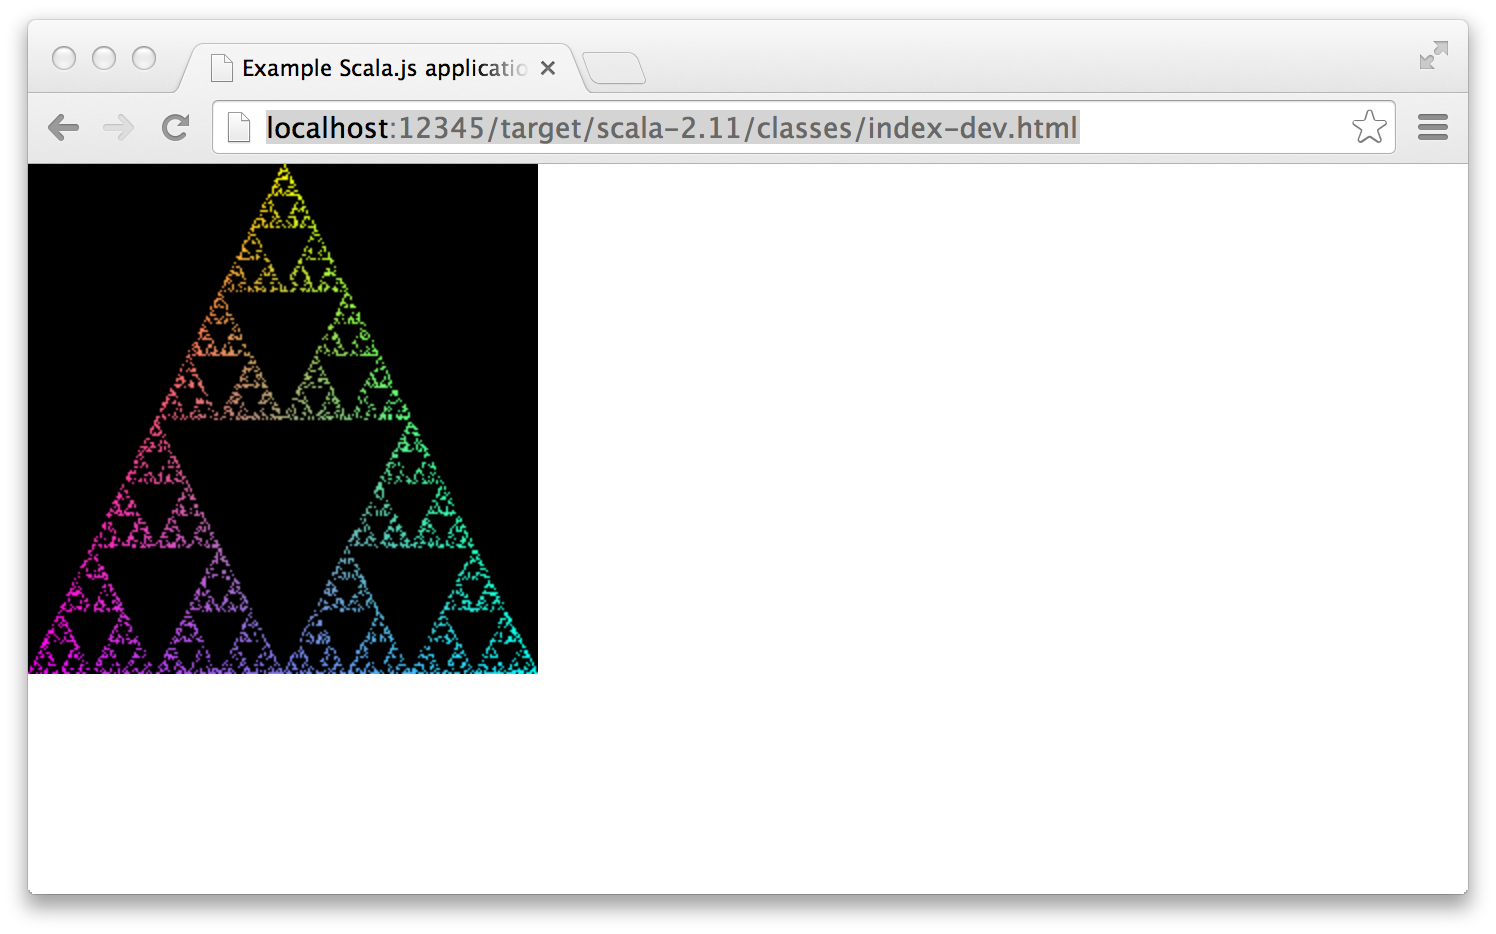
Congratulations, you just built and ran your first Scala.js application! If something here does not happen as expected, it means that one of the steps did not complete successfully. Make sure you can get this working before you proceed onward.
Opening up the Project
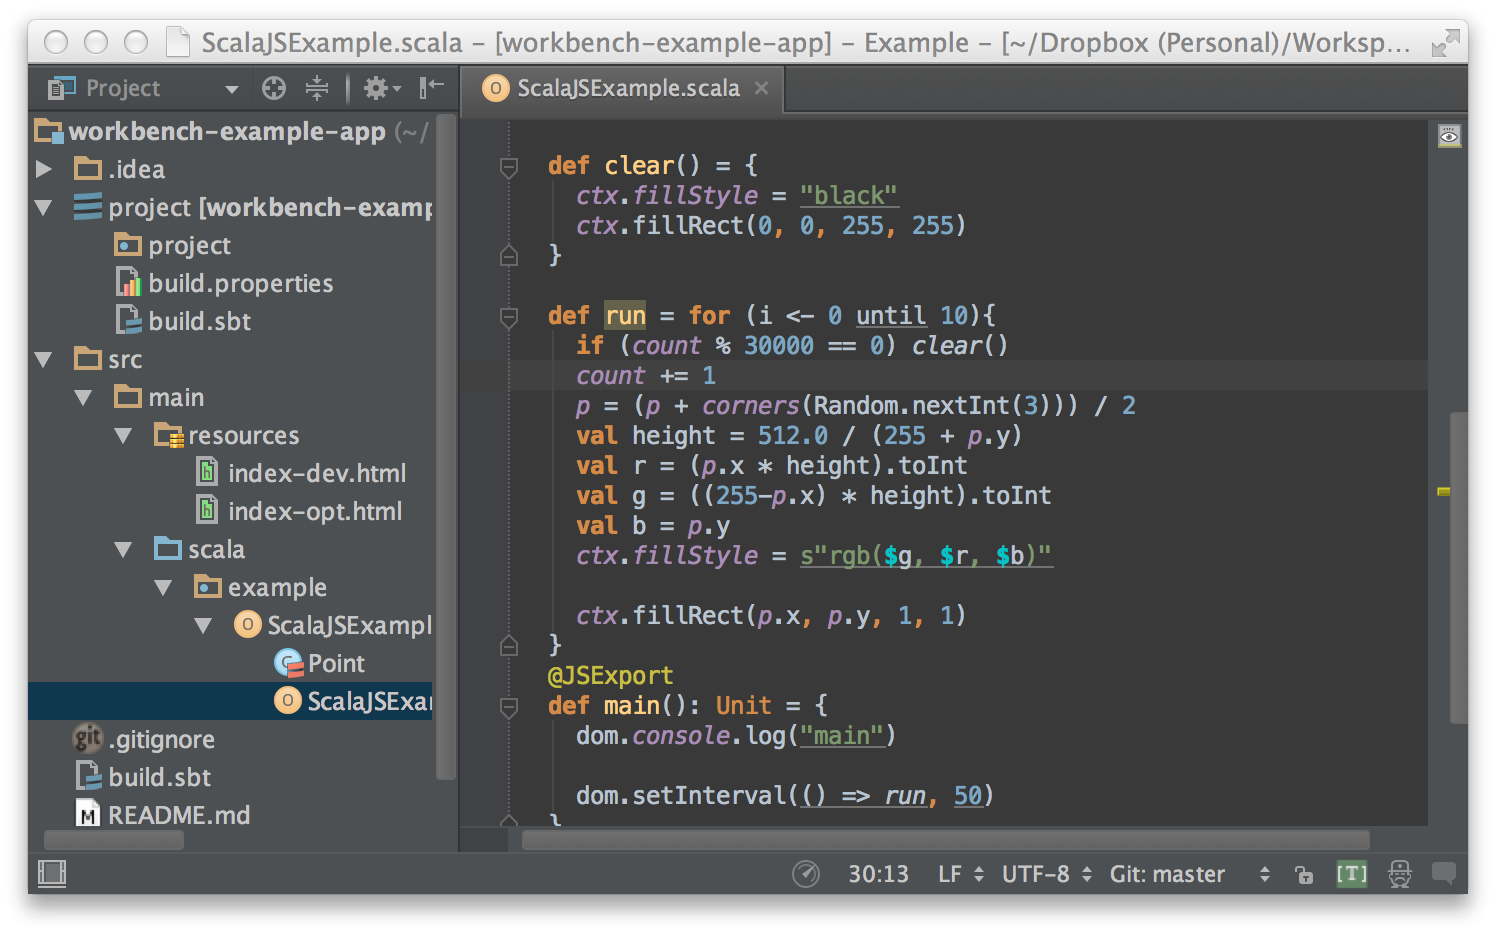
The next thing to do once you have the project built and running in your browser is to load it into your editor. Both IntelliJ and Eclipse should let you import the Scala.js project without any hassle. Opening it and navigating to ScalaJSExample.scala would look like this:
Let's try changing one line to change the background fill from black to white:
- ctx.fillStyle = "black"
+ ctx.fillStyle = "white"
Because we started sbt ~fastOptJS with the ~ prefix earlier, it should pick up the change and automatically recompile. The example project is set up to automatically refresh the page when recompilation is complete.
If you open up your browser's developer console, you'll see that the SBT log output is being mirrored there:
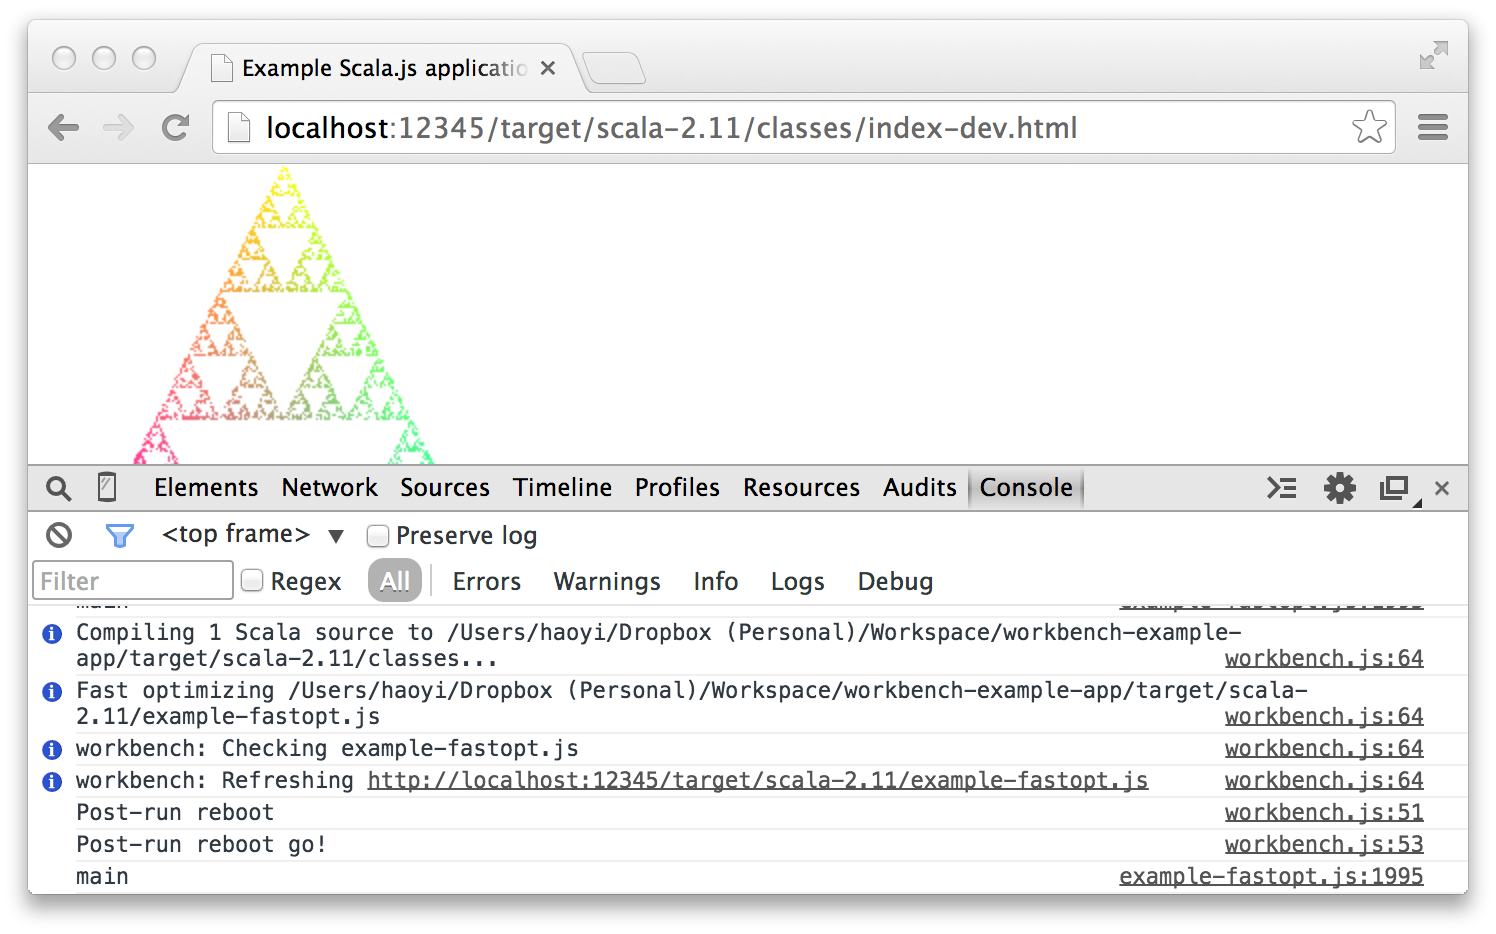
Apart from the SBT log output (which is handled by Workbench) any printlns in your Scala.js code will also end up in the browser console (the main you see in the console is printed inside the Scala.js application, see if you can find it!) and so will the stack traces for any thrown exceptions.
The Application Code
We've downloaded, compiled, ran, and made changes to our first Scala.js application. Let's now take a closer look at the code that we just ran:
package example
import scala.scalajs.js.annotation.JSExport
import org.scalajs.dom
import org.scalajs.dom.html
import scala.util.Random

case class Point(x: Int, y: Int){
  def +(p: Point) = Point(x + p.x, y + p.y)
  def /(d: Int) = Point(x / d, y / d)
}

@JSExport
object ScalaJSExample {
  @JSExport
  def main(canvas: html.Canvas): Unit = {
    val ctx = canvas.getContext("2d")
                    .asInstanceOf[dom.CanvasRenderingContext2D]

    var count = 0
    var p = Point(0, 0)
    val corners = Seq(Point(255, 255), Point(0, 255), Point(128, 0))

    def clear() = {
      ctx.fillStyle = "black"
      ctx.fillRect(0, 0, 255, 255)
    }

    def run = for (i <- 0 until 10){
      if (count % 3000 == 0) clear()
      count += 1
      p = (p + corners(Random.nextInt(3))) / 2

      val height = 512.0 / (255 + p.y)
      val r = (p.x * height).toInt
      val g = ((255-p.x) * height).toInt
      val b = p.y
      ctx.fillStyle = s"rgb($g, $r, $b)"

      ctx.fillRect(p.x, p.y, 1, 1)
    }

    dom.window.setInterval(() => run, 50)
  }
}
It's a good chunk of code, though not a huge amount. To someone who didn't know about Scala.js, they would just think it's normal Scala, albeit with this unusual dom library and a few weird annotations. Let's pick it apart starting from the top:
case class Point(x: Int, y: Int){
  def +(p: Point) = Point(x + p.x, y + p.y)
  def /(d: Int) = Point(x / d, y / d)
}
Here we are defining a Point case class which represents a X/Y position, with some basic operators defined on it. This is done mostly for convenience later on, when we want to manipulate these two-dimensional points. Scala.js is Scala, and supports the entirety of the Scala language. Point here behaves identically as it would if you had run Scala on the JVM.
@JSExport
object ScalaJSExample {
  @JSExport
  def main(canvas: html.Canvas): Unit = {
This @JSExport annotation is used to tell Scala.js that you want this method to be visible and callable from Javascript. By default, Scala.js does dead code elimination and removes any methods or classes which are not used. This is done to keep the compiled executables a reasonable size, since most projects use only a small fraction of e.g. the standard library. @JSExport is used to tell Scala.js that the ScalaJSExample object and its def main method are entry points to the program. Even if they aren't called anywhere internally, they are called externally by Javascript that the Scala.js compiler is not aware of, and should not be removed. In this case, we are going to call this method from Javascript to start the Scala.js program.
Apart from this annotation, ScalaJSExample is just a normal Scala object, and behaves like one in every way. Note that the main-method in this case takes a html.Canvas: your exported methods can have any signature, with arbitrary arity or types for parameters or the return value. This is in contrast to the main method on the JVM which always takes an Array[String] and returns Unit. In fact, there's nothing special about this method at all! It's like any other exported method, we just happen to attribute it the "main" entry point. It is entirely possible to define multiple exported classes and methods, and build a "library" using Scala.js of methods that are intended for external Javascript to use.
val ctx = canvas.getContext("2d")
                .asInstanceOf[dom.CanvasRenderingContext2D]
Here we are retrieving a handle to the canvas we will draw on using document.getElementById, and from it we can get a CanvasRenderingContext2D which we actually use to draw on it.
We need to perform the asInstanceOf call because depending on what you pass to getElementById and getContext, you could be returned elements and contexts of different types. Hence we need to tell the compiler explicitly that we're expecting a html.Canvas and CanvasRenderingContext2D back from these methods for the strings we passed in.
Note how the html.Canvas comes from the html namespace, while the CanvasRenderingContext2D comes from the dom namespace. Traditionally, these types are imported via their qualified names: e.g. html.Canvas rather than just Canvas.
In general, scala-js-dom provides org.scalajs.dom.html to access the HTML element types of the browser, an org.scalajs.dom to access other things. There are a number of other namespaces (dom.svg, dom.idb, etc.) accessible inside org.scalajs.dom: read the scala-js-dom docs to learn more.
This is the part of the Scala.js program which does the real work. It runs 10 iterations of a small algorithm that generates a Sierpinski Triangle point-by-point. The steps, as described by the linked article, are roughly:
- Pick a random corner of the large-triangle
-
Move your current-position
phalfway between its current location and that corner - Draw a dot
- Repeat
In this example, the triangle is hard-coded to be 255 pixels high by 255 pixels wide, and some math is done to pick a color for each dot which will give the triangle a pretty gradient.
package example
import scala.scalajs.js.annotation.JSExport
import org.scalajs.dom
import org.scalajs.dom.html
import scala.util.Random

case class Point(x: Int, y: Int){
  def +(p: Point) = Point(x + p.x, y + p.y)
  def /(d: Int) = Point(x / d, y / d)
}

@JSExport
object ScalaJSExample {
  @JSExport
  def main(canvas: html.Canvas): Unit = {
    val ctx = canvas.getContext("2d")
                    .asInstanceOf[dom.CanvasRenderingContext2D]

    var count = 0
    var p = Point(0, 0)
    val corners = Seq(Point(255, 255), Point(0, 255), Point(128, 0))

    def clear() = {
      ctx.fillStyle = "black"
      ctx.fillRect(0, 0, 255, 255)
    }

    def run = for (i <- 0 until 10){
      if (count % 3000 == 0) clear()
      count += 1
      p = (p + corners(Random.nextInt(3))) / 2

      val height = 512.0 / (255 + p.y)
      val r = (p.x * height).toInt
      val g = ((255-p.x) * height).toInt
      val b = p.y
      ctx.fillStyle = s"rgb($g, $r, $b)"

      ctx.fillRect(p.x, p.y, 1, 1)
    }

    dom.window.setInterval(() => run, 50)
  }
}
Now this is the call that actually does the useful work. All this method does is call dom.setInterval, which tells the browser to run the run method every 50 milliseconds. As mentioned earlier, the dom.* methods are simply facades to their native Javascript equivalents, and dom.setInterval is no different. Note how you can pass a Scala lambda to setInterval to have it called by the browser, where in Javascript you'd need to pass a Javascript function(){...}
The Project Code
We've already taken a look at the application code for a simple, self-contained Scala.js application, but this application is not entirely self contained. It's wrapped in a small SBT project that sets up the necessary dependencies and infrastructure for this application to work.
project/build.sbt
addSbtPlugin("org.scala-js" % "sbt-scalajs" % "0.6.13")

addSbtPlugin("com.lihaoyi" % "workbench" % "0.3.0")
This is the list of SBT plugins used by this small example application. There are two of them: the Scala.js plugin (which contains the Scala.js compiler and other things, e.g. tasks such as fastOptJS) and the Workbench plugin, which is used to provide the auto-reload-on-change behavior and the forwarding of SBT logspam to the browser console.
Of the two, only the Scala.js plugin is really necessary. The Workbench plugin is a convenience that makes development easier. Without it you'd need to keep a terminal open to view the SBT logspam, and manually refresh the page when compilation finished. Not the end of the world.
build.sbt
enablePlugins(ScalaJSPlugin, WorkbenchPlugin)

name := "Example"

version := "0.1-SNAPSHOT"

scalaVersion := "2.11.8"

libraryDependencies ++= Seq(
  "org.scala-js" %%% "scalajs-dom" % "0.9.1",
  "com.lihaoyi" %%% "scalatags" % "0.6.1"
)
The build.sbt project file for this application is similarly unremarkable: It includes the settings for the two SBT plugins we saw earlier, as well as boilerplate name/version/scalaVersion values common to all projects.
Of interest is the libraryDependencies. In Scala-JVM, this key is used to declare dependencies on libraries from Maven Central, so you can use them in your Scala-JVM projects. In Scala.js, the same key is used to declare dependencies on libraries so you can use them in your Scala.js projects! Re-usable libraries can be built and published with Scala.js just as you do on Scala-JVM, and here we make use of one which provides the typed facades with which we used to access the DOM in the application code.
Lastly, we have two Workbench related settings: bootSnippet basically tells Workbench how to restart your application when a new compilation run finishes, and updateBrowsers actually tells it to perform this application-restarting.
src/main/resources/index-dev.html
<!DOCTYPE html>
<html>
<head>
  <title>Example Scala.js application</title>
  <meta http-equiv="Content-Type" content="text/html; charset=UTF-8"/>
</head>
<body style="margin: 0px">

<div>
    <canvas style="display: block" id="canvas" width="255" height="255"/>
</div>

<script type="text/javascript" src="../example-fastopt.js"></script>
<script type="text/javascript" src="/workbench.js"></script>
<script>
    example.ScalaJSExample().main(document.getElementById('canvas'));
</script>
</body>
</html>
This is the HTML page which our toy app lives in, and the same page that we have so far been using to view the app in the browser. To anyone who has used HTML, most of it is probably familiar. Things of note are the <script> tags: "../example-fastopt.js" Is the executable blob spat out by the compiler, which we need to include in the HTML page for anything to happen. This is where the results of your compiled Scala code appear. "workbench.js" is the client for the Workbench plugin that connects to SBT, reloads the browser and forwards logspam to the browser console.
The example.ScalaJSExample().main() call is what kicks off the Scala.js application and starts its execution. Scala.js follows Scala semantics in that objects are evaluated lazily, with no top-level code allowed. This is in contrast to Javascript, where you can include top-level statements and object-literals in your code which execute immediately. In Scala.js, nothing happens when ../example-fastopt.js is imported! We have to call the main-method first. In this case, we're passing the canvas object (attained using getElementById) to it so it knows where to do its thing.
document.getElementById is the exact same API that's used in normal Javascript, as documented here. In fact, the entire org.scalajs.dom namespace (imported at the top of the file) comprises statically typed facades for the javascript APIs provided by the browser.
Lastly, only @JSExported objects and methods can be called from Javascript. Also, although this example only exports the main method which is called once, there is nothing stopping you from exporting any number of objects and methods and calling them whenever you need to. In this way, you can easily make a Scala.js "library" which is available to external Javascript as an API.
Publishing
The last thing that we'll do with our toy application is to publish it. If you look in the target/scala-2.11 folder, you'll see the output of everything we've done so far:
target/scala-2.11
├── classes
│   ├── JS_DEPENDENCIES
│   ├── example
│   │   ├── Point$.class
│   │   ├── Point$.sjsir
│   │   ├── Point.class
│   │   ├── Point.sjsir
│   │   ├── ScalaJSExample$$anonfun$main$1.class
│   │   ├── ScalaJSExample$$anonfun$run$1.class
│   │   ├── ScalaJSExample$.class
│   │   ├── ScalaJSExample$.sjsir
│   │   └── ScalaJSExample.class
│   ├── index-dev.html
│   └── index-opt.html
├── example-fastopt.js
└── example-fastopt.js.map
All the .class and .sjsir files are the direct output of the Scala.js compiler, and aren't necessary to actually run the application. The only two files necessary are index-dev.html and example-fastopt.js. You may recognize index-dev.html as the file that we were navigating to in the browser earlier.
These two files can be extracted and published as-is: you can put them on Github-Pages, Amazon Web Services, or a hundred other places. However, one thing of note is the fact that the generated Javascript file is quite large:
haoyi-mbp:temp haoyi$ du -h target/scala-2.11/example-fastopt.js
656K  target/scala-2.11/example-fastopt.js
656 Kilobytes for a hello world app! That is clearly too large. If you examine the contents of the file, you'll see that your code has been translated into something like this:
var v1 = i;
if (((count$1.elem$1 % 3000) === 0)) {
  ScalaJS.m.Lexample_ScalaJSExample$().example$ScalaJSExample$$clear$1__Lorg_scalajs_dom_CanvasRenderingContext2D__V(ctx$1)
};
count$1.elem$1 = ((1 + count$1.elem$1) | 0);
var jsx$1 = ScalaJS.as.Lexample_Point(p$1.elem$1);
var this$4 = ScalaJS.m.s_util_Random$();
p$1.elem$1 = jsx$1.$$plus__Lexample_Point__Lexample_Point(ScalaJS.as.Lexample_Point(corners$1.apply__I__O(this$4.self$1.nextInt__I__I(3)))).$$div__I__Lexample_Point(2);
var height = (512.0 / ((255 + ScalaJS.as.Lexample_Point(p$1.elem$1).y$1) | 0));
var r = ((ScalaJS.as.Lexample_Point(p$1.elem$1).x$1 * height) | 0);
var g = ((((255 - ScalaJS.as.Lexample_Point(p$1.elem$1).x$1) | 0) * height) | 0);
As you can see, this code is still very verbose, with lots of unnecessarily long identifiers such as Lexample_ScalaJSExample$ in it. This is because we've only performed the Fast Optimization on this file, to try and keep the time taken to edit -> compile while developing reasonably short.
Optimization
If we're planning on publishing the app for real, we can run the Full Optimization. This takes several seconds longer than the Fast Optimization, but results in a significantly smaller and leaner output file example-opt.js.
haoyi-mbp:temp haoyi$ du -h target/scala-2.11/example-opt.js
104K  target/scala-2.11/example-opt.js
104 Kilobytes! Better. Not great, though! In general, Scala.js does not produce tiny executables, although the output size of the compiled executables is dropping all the time. If you look inside that file, you'll see all of the long identifiers have been replaced by short ones by the Google Closure Compiler.
y=fb(gb((new F).Ya(["rgb(",", ",", ",")"])),(new F).Ya([(255-c.l.Db|0)*y|0,c.l.Db*y|0,c.l.Eb]));a.fillStyle=y;a.fillRect(c.l.Db,c.l.Eb,1,1);w=1+w|0}}}(a,b,c,e),50)}Xa.prototype.main=function(a){Ya(a)};Xa.prototype.a=new x({$g:0},!1,"example.ScalaJSExample$",B,{$g:1,b:1});var hb=void 0;function bb(){hb||(hb=(new Xa).c());return hb}ba.example=ba.example||{};ba.example.ScalaJSExample=bb;function Da(){this.Pb=null}Da.prototype=new A;
These files are basically unreadable, but nonetheless behave the same as the -fastopt versions. Try it out by opening the index-opt.html file in the target/scala-2.11/classes directory with your browser: you should see the thing as when opening index-dev, except it will be pulling in the fully-optmized version of your application.
This means you can develop and debug using fastOptJS, and only spend the extra time (and increased debugging-difficulty) on the fullOptJS version just as you're going to publish it, with the assurance that although the code is much more compact, its behavior will not change.
Blob Size
Even the fully-optimized version of our toy Scala.js app are pretty large. There are some factors that mitigate the large size of these executables:
- A large portion of this 104k is the Scala standard library, and so the size of the compiled blob does not grow that fast as your program grows. For example, while this ~50 line application is 104k, a much larger ~2000 line application is only 288k.
- This size is pre-gzip, and most webservers serve their contents compressed via gzip to reduce the download size. Gzip cuts the actual download size down to 28k, which is more acceptable.
- You will likely have other portions of the page that are of similar size: e.g. JQuery is extremely popular, and weights in at a comparable 32kb minified and gzipped, while React.js weighs in at a cool 150kb gzipped. Scala.js arguably provides more than either of these libraries.
Regardless, there is ongoing work to shrink the size of these executables. If you want to read more about this, check out the section on The Compilation Pipeline to learn about what we currently do to crunch the executables down.
In general, all the output of the Scala.js compiler is bundled up into the example-fastopt.js and example-opt.js files. As a first approximation, these files can be included directly on a HTML page (as we have here, with index-dev.html and index-opt.html) and published together as a working web app. Even zipping them up and emailing them to a friend is sufficient to give someone a working, live version of your hard work!
More advanced users would want to integrate them into their build process or serve them from a web server, all of which is entirely possible. You just need to run the Scala.js compiler and place the output .js file somewhere your web server can pick it up, e.g. in some static-resource folder. We cover an example setup of this with a Scala webserver in our chapter Integrating Client-Server.
Recap
If you've made it this far, you've downloaded, made modifications to, and published a toy Scala.js application. At the same time, we've gone over many of the key concepts in the Scala.js development process:
- Getting a Scala.js application
- Building it and seeing it work in the browser
- Made modifications to it to see it update
- Examined the source code to try and understand what it's doing
- Examined the output code, at two levels of optimization, to see how the Scala.js compiler works
- Packaged the application in a form that can be easily published online
Hopefully this gives a good sense of the workflow involved in developing a Scala.js application end-to-end, as well as a feel for the magic involved in the compilation process. Nevertheless, we have barely written any Scala.js code itself!
Since you have a working development environment set up, you should take this time to poke around what you can do with our small Sierpinski-Triangle drawing app. Possible exercises include:
- Javascript includes APIs for getting the size of the window and changing the size of a canvas. These Javascript APIs are available in Scala.js, and we've already used some of them in the course of this example. Try making the Canvas full-screen, and re-positioning the corners of the triangle to match.
- The CanvasRenderingContext2D has a bunch of methods on it that can be used to draw things. Here we only draw 1x1 rectangles to put points on the canvas; try modifying the code to make it draw something else.
-
We've looked at the
masterbranch ofworkbench-example-app, but this project also has several other branches showing off different facets of Scala.js: dodge-the-dots and space-invaders are both interesting branches worth playing with as a beginner. Check them out! -
Try publishing the output code somewhere. You only need
example-opt.jsandindex-opt.html; try putting them somewhere online where the world can see it.
When you're done poking around our toy web application, read on to the next chapter, where we will explore making something more meaty using the Scala.js toolchain!
By this point, you've already cloned and got your hands dirty fiddling around with the toy workbench-example-app. You have your editor set up, SBT installed, and have published the example application in a way you can host online for other people to see. Maybe you've even made some changes to the application to see what happens. Hopefully you're curious, and want to learn more.
In this section of the book, we will walk through making a small canvas application. This will expose you to important concepts like:
- Taking input with Javascript event handlers
- Writing your application logic in Scala
- Using a timer to drive periodic actions
In general, while the previous chapter was mostly set-up and exploring the Scala.js project, this chapter will walk you through actually writing a non-trivial, self-contained Scala.js application. Throughout this chapter, we will only be making modifications to ScalaJSExample.scala; the rest of the project will remain unchanged.
Making a Sketchpad using Mouse Input
To begin with, lets remove all the existing stuff in our .scala file and leave only the object and the main method. Let's start off with some necessary boilerplate:
/*setup*/
val renderer = canvas.getContext("2d")
                     .asInstanceOf[dom.CanvasRenderingContext2D]

canvas.width = canvas.parentElement.clientWidth
canvas.height = canvas.parentElement.clientHeight

renderer.fillStyle = "#f8f8f8"
renderer.fillRect(0, 0, canvas.width, canvas.height)
As described earlier, this code uses the document.getElementById function to fish out the canvas element that we interested in from the DOM. It then gets a rendering context from that canvas, and sets the height and width of the canvas to completely fill its containing element. Lastly, it fills out the canvas light-gray, so that we can see it on the page.
Next, let's set some event handlers on the canvas:
/*code*/
renderer.fillStyle = "black"
var down = false
canvas.onmousedown =
  (e: dom.MouseEvent) => down = true

canvas.onmouseup =
  (e: dom.MouseEvent) => down = false

canvas.onmousemove = {
  (e: dom.MouseEvent) =>
    val rect =
      canvas.getBoundingClientRect()
    if (down) renderer.fillRect(
      e.clientX - rect.left,
      e.clientY - rect.top,
      10, 10
    )
}
This code sets up the mousedown and mouseup events to keep track of whether or not the mouse has currently been clicked. It then draws black squares any time you move the mouse while the button is down. This lets you basically click-and-drag to draw pictures on the canvas. Try it out!
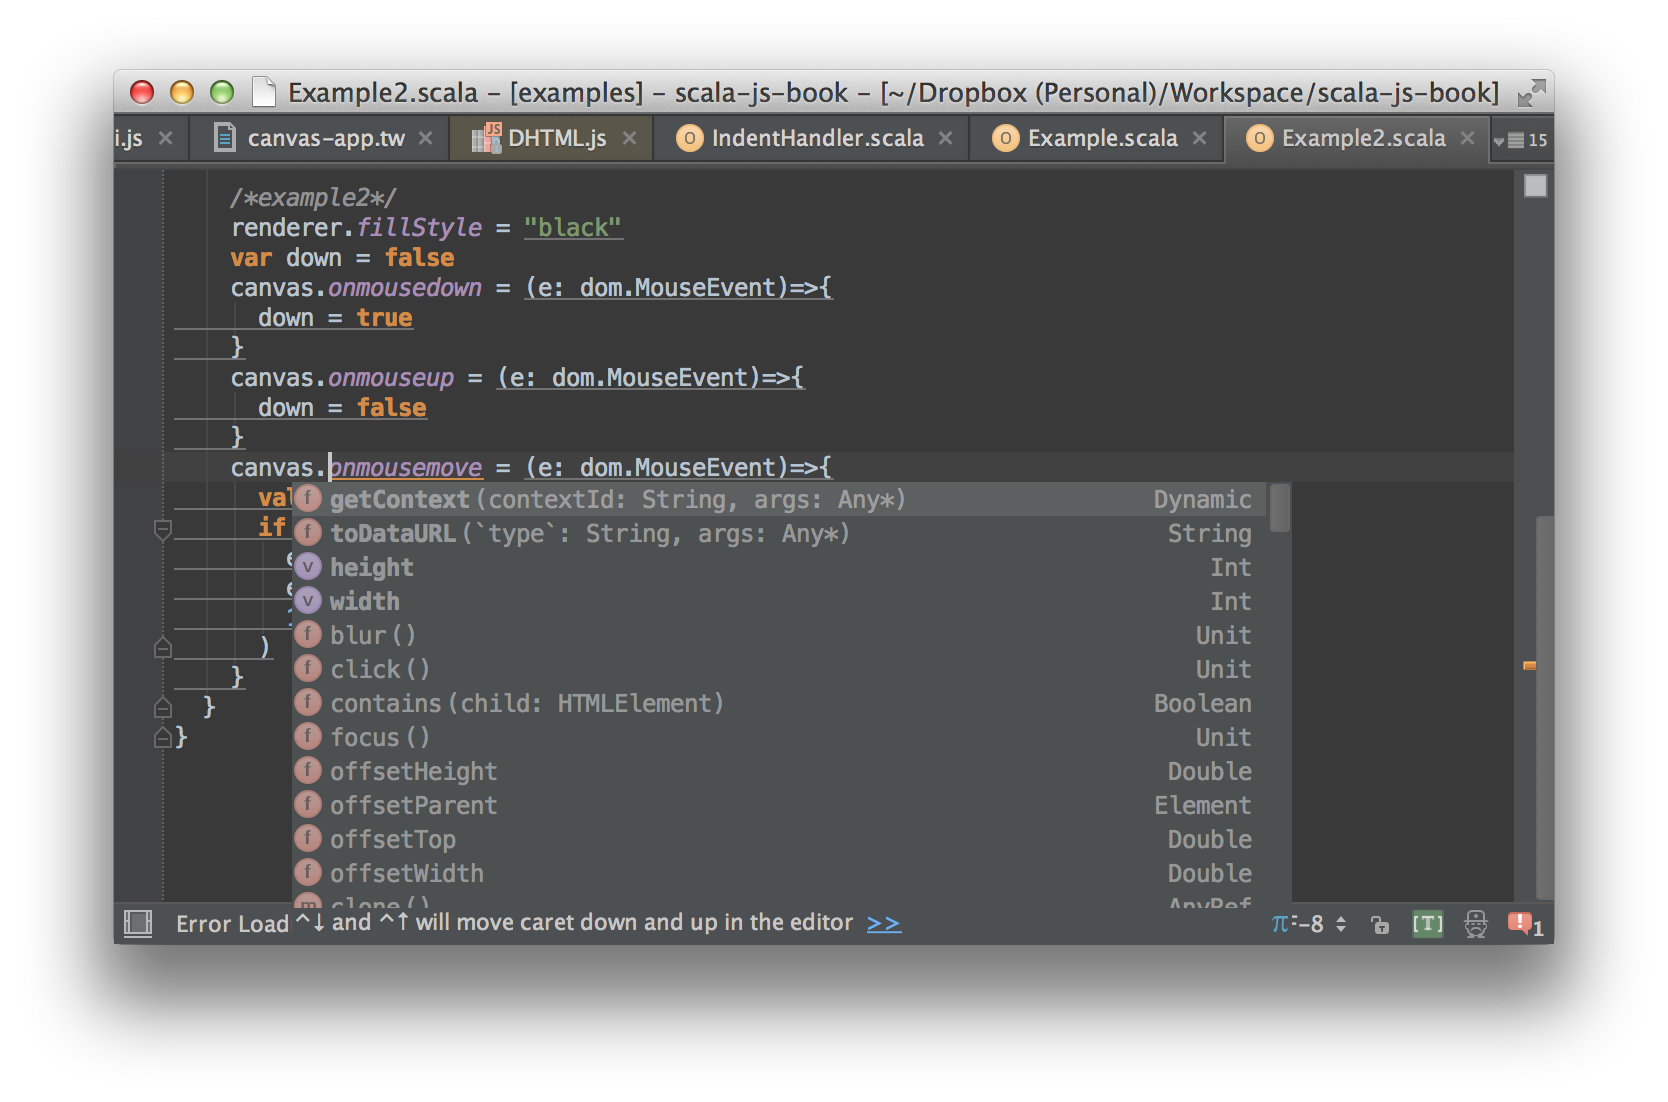
In general, you have access to all the DOM APIs through the dom package as well as through Javascript objects such as the html.Canvas. Setting the onmouseXXX callbacks is just one way of interacting with the DOM. With Scala.js, you also get a very handy autocomplete in the editor, which you can use to browse the various other APIs that are available for use:
Apart from mouse events, keyboard events, scroll events, input events, etc. are all usable from Scala.js as you'd expect. If you have problems getting this to work, feel free to click on the link icon below the code snippet to see what the full code for the example looks like
Making a Clock using setInterval
You've already seen this in the previous example, but WindowTimers.setInterval can be used to schedule recurring, periodic events in your program. Common use cases include running the event loop for a game, making smooth animations, and other tasks of that sort which require some work to happen over a period of time.
Again, we need roughly the same boilerplate as just now to set up the canvas:
/*setup*/
val renderer = canvas.getContext("2d")
                     .asInstanceOf[dom.CanvasRenderingContext2D]

canvas.width = canvas.parentElement.clientWidth
canvas.height = canvas.parentElement.clientHeight

val gradient = renderer.createLinearGradient(
  canvas.width / 2 - 100, 0, canvas.width/ 2 + 100, 0
)
gradient.addColorStop(0,"red")
gradient.addColorStop(0.5,"green")
gradient.addColorStop(1,"blue")
renderer.fillStyle = gradient
//renderer.fillStyle = "black"

renderer.textAlign = "center"
renderer.textBaseline = "middle"
The only thing unusual here is that I'm going to create a linearGradient in order to make the stopwatch look pretty. This is by no means necessary, and you could simply make the fillStyle "black" if you want to keep things simple.
Once that's done, it's only a few lines of code to set up a nice, live clock:
/*code*/
def render() = {
  val date = new js.Date()
  renderer.clearRect(
    0, 0, canvas.width, canvas.height
  )

  renderer.font = "75px sans-serif"
  renderer.fillText(
    Seq(
      date.getHours(),
      date.getMinutes(),
      date.getSeconds()
    ).mkString(":"),
    canvas.width / 2,
    canvas.height / 2
  )
}
dom.window.setInterval(render _, 1000)
As you can see, we're using more Canvas APIs, in this case dealing with rendering text on the canvas. Another thing we're using is the Javascript Date class, in Scala.js under the full name scala.scalajs.js.Date, here imported as js.Date. Again, click on the link icon to view the full-code if you're having trouble here.
Tying it together: Flappy Box
You've just seen two examples of how to use Scala.js, together with the Javascript DOM APIs, to make simple applications. However, we've only used the "Scala" in Scala.js in the most rudimentary fashion: setting a few primitives here and there, defining some methods, mainly just gluing together a few Javascript APIs
In this example we will make a spiritual clone of the popular Flappy Bird video game. This game involves a few simple rules
- Your character starts in the middle of the screen
- Gravity pulls your character down
- Clicking/tapping the screen makes your character jump up
- There are obstacles that approach your character from the right side of the screen, and you have to make sure you go through the hole in each obstacle to avoid hitting it
- Don't go out of bounds!
It's a relatively simple game, but there should be enough "business logic" in here that we won't be simply gluing together APIs. Let's start!
Setting Up the Canvas
/*setup*/
val renderer = canvas.getContext("2d")
                     .asInstanceOf[dom.CanvasRenderingContext2D]

canvas.width = canvas.parentElement.clientWidth
canvas.height = 400

renderer.font = "50px sans-serif"
renderer.textAlign = "center"
renderer.textBaseline = "middle"
This section of the code is peripherally necessary, but not core to the implementation or logic of Flappy Box. We see the same canvas/renderer logic we've seen in all our examples, along with some logic to make the canvas a reasonable size, and some configuration of how we will render text to the canvas.
In general, code like this will usually end up being necessary in a Scala.js program: the Javascript APIs that the browser provides to do things often ends up being somewhat roundabout and verbose. It's somewhat annoying to have to do for a small program such as this one, but in a larger application, the cost is both spread out over thousands of lines of code and also typically hidden away in helper functions, so the verbosity and non-idiomatic-scala-ness doesn't bother you much.
Defining our State
/*variables*/
val obstacleGap = 200 // Gap between the approaching obstacles
val holeSize = 50     // Size of the hole in each obstacle you must go through
val gravity = 0.1     // Y acceleration of the player

var playerY = canvas.height / 2.0 // Y position of the player; X is fixed
var playerV = 0.0                 // Y velocity of the player
// Whether the player is dead or not;
// 0 means alive, >0 is number of frames before respawning
var dead = 0
// What frame this is; used to keep track
// of where the obstacles should be positioned
var frame = -50
// List of each obstacle, storing only the Y position of the hole.
// The X position of the obstacle is calculated by its position in the
// queue and in the current frame.
val obstacles = collection.mutable.Queue.empty[Int]
This is where we start defining things that are relevant to Flappy Box. There are roughly two groups of values here: immutable constants in the top group, and mutable variables in the bottom. The rough meaning of each variable is documented in the comments, and we'll see exactly how we use them later.
One notable thing is that we're using a collection.mutable.Queue to store the list of obstacles. This is defined in the Scala standard library; in general, all the collections in the Scala standard library can be used without issue in Scala.js.
Game Logic
def runLive() = {
  frame += 2

  // Create new obstacles, or kill old ones as necessary
  if (frame >= 0 && frame % obstacleGap == 0)
    obstacles.enqueue(Random.nextInt(canvas.height - 2 * holeSize) + holeSize)
  if (obstacles.length > 7){
    obstacles.dequeue()
    frame -= obstacleGap
  }

  // Apply physics
  playerY = playerY + playerV
  playerV = playerV + gravity


  // Render obstacles, and check for collision
  renderer.fillStyle = "darkblue"
  for((holeY, i) <- obstacles.zipWithIndex){
    // Where each obstacle appears depends on what frame it is.
    // This is what keeps the obstacles moving to the left as time passes.
    val holeX = i * obstacleGap - frame + canvas.width
    renderer.fillRect(holeX, 0, 5, holeY - holeSize)
    renderer.fillRect(
      holeX, holeY + holeSize, 5, canvas.height - holeY - holeSize
    )

    // Kill the player if he hits some obstacle
    if (math.abs(holeX - canvas.width/2) < 5 &&
      math.abs(holeY - playerY) > holeSize){
      dead = 50
    }
  }

  // Render player
  renderer.fillStyle = "darkgreen"
  renderer.fillRect(canvas.width / 2 - 5, playerY - 5, 10, 10)

  // Check for out-of-bounds player
  if (playerY < 0 || playerY > canvas.height){
    dead = 50
  }
}
The runLive function is the meat of Flappy Box. In it, we
- Clear the canvas
- Generate new obstacles
- Apply velocity and acceleration to the player
- Check for collisions or out-of-bounds, killing the player if it happens
- Rendering everything, including the player as the namesake box
This function basically contains all the game logic, from motion, to collision-detection, to rendering, so it's pretty large. Not that large though! And entirely understandable, even if it takes a few moments to read through.
def runDead() = {
  playerY = canvas.height / 2
  playerV = 0
  frame = -50
  obstacles.clear()
  dead -= 1
  renderer.fillStyle = "darkred"
  renderer.fillText("Game Over", canvas.width / 2, canvas.height / 2)
}
This is the function that handles what happens when you're dead. Essentially, we reset all the mutable variables to their initial state, and just count down the dead counter until it reaches zero and we're considered alive again.
A Working Product
def run() = {
  renderer.clearRect(0, 0, canvas.width, canvas.height)
  if (dead > 0) runDead()
  else runLive()
}

dom.window.setInterval(run _, 20)

canvas.onclick = (e: dom.MouseEvent) => {
  playerV -= 5
}
And finally, this is the code that kicks everything off: we define the run function to swap between runLive and runDead, register an onclick handler to make the player jump by tweaking his velocity, and we call WindowTimers.setInterval to run the run function every 20 milliseconds.
At almost 100 lines of code, this is quite a meaty example! Nonetheless, when all is said and done, you will find that the example actually works! Try it out!
Canvas Recap
We've now gone through the workings of building a handful of toy applications using Scala.js. What have we learnt in the process?
Development Speed
We've by now written a good chunk of Scala.js code, and perhaps debugged some mysterious errors, and tried some new things. One thing you've probably noticed is the efficiency of the process: you make a change in your editor, the browser reloads itself, and life goes on. There is a compile cycle, but after a few runs the compiler warms up and the compilation cycle drops to less than a second.
Apart from the compilation/reload speed, you've probably noticed the benefit of tooling around Scala.js. Unlike Javascript editors, your existing Scala IDEs like IntelliJ or Eclipse can give very useful help when you're working with Scala.js. Autocomplete, error-highlighting, jump-to-definition, and a myriad other modern conveniences that are missing when working in dynamically-typed languages are present when working in Scala.js. This makes the code much less mysterious: you're no longer trying to guess what methods a value has, or what a method returns: it's all laid out in front of you in plain sight.
Full Scala
All of the examples so far have been very self-contained: they do not touch the HTML DOM, they do not make Ajax calls, or try to access web services. They don't push the limits of the browser's API.
Nevertheless, these examples have exercised a good amount of the Scala language. List comprehensions, collections, the math library, and more. In general, most of the Scala standard library works under Scala.js, as well as a large number of third-party libraries. Unlike many other compile-to-Javascript languages out there, this isn't a language-that-looks-like-Scala: it is Scala through and through, with a tiny number of semantic differences.
Seamless Javascript Interop
Even if we take some time to read through the code we've written, it is not immediately obvious which bits of code are Scala and which bits are Javascript! It all kind of meshes together, for example if we take the Flappy Box source code:
-
obstaclesis a Scala mutable.Queue, as we defined it earlier, and all the methods on it are Scala method calls -
rendereris a Javascript CanvasRenderingContext2D, and all the methods on it are Javascript method calls directly on the Javascript object -
frameis a ScalaInt, and obeys Scala semantics, though it is implemented as a JavascriptNumberunder the hood. -
playerYandplayerVare ScalaDoubles, implemented directly as JavascriptNumbers
This reveals something pretty interesting about Scala.js: even though Scala at-first-glance is a very different language from Javascript, the interoperation with Javascript is so seamless that you can't even tell from the code which values/methods are defined in Scala and which values/methods come from Javascript!
These two classes of values/methods are treated very differently by the compiler when it comes to emitting the executable Javascript blob, but the compiler does not need extra syntax telling it which things belong to Scala and which to Javascript: the types are sufficient. renderer, for example is of type CanvasRenderingContext2D which is a subtype of scalajs.js.Object, indicating to the compiler that it needs special treatment. Primitives like Doubles and Ints have similar treatment
Overall, this seamless mix of Scala and Javascript values/methods/functions is a common theme in Scala.js applications, so you should expect to see more of it in later chapters of the book.
You've now had some experience building small canvas applications in Scala.js. Why not try exercising your new-found skills? Here are some possibilities:
- Make more video games! I have a set of retro-games ported to Scala.js. Maybe re-make one of them without looking at the source, or maybe port some other game you're familiar with and enjoy playing. Even just drawing things on canvas, games can get pretty elaborate.
- Explore the APIs! We've touched on a small number of Javascript APIs here, mainly for dealign with the canvas, but modern browsers offer a whole zoo of functionality. Try making an application that uses localStorage to save state even when you close the tab, or an application that works with the HTML DOM.
- Draw something pretty! We have a working canvas, a nice programming language, and a way to easily publish the results online. Various fractals, or colorful visualizations are all possibilities.
By this point you've some experience building stand-alone, single-canvas Scala.js applications, which has hopefully given you a feel for how Scala.js works. The problem is that few web applications satisfy the criteria of being stand-alone single-page canvas applications! Most web applications need to deal with the DOM of the HTML page, need to fetch data from web services, and generally need to do a lot of other messy things. We'll go into that in the next chapter
Most web applications aren't neat little games which live on a single canvas: they are large, structured HTML pages, which involve displaying data (whether from the user or from the web) in multiple ways, while allowing the user to make changes to the data that can be saved back to whatever remote web-service/database it came from.
At this point, you are already competent at using Scala.js to make basic, self-contained canvas applications. In this chapter, we will cover how to use Scala.js to build the sort of interactive-web-pages that make up the bulk of the modern-day internet. We'll cover how to use powerful libraries that turn front-end development from the typical fragile-mess into a structured, robust piece of software.
Hello World: HTML
The most basic way of building interactive web pages using Scala.js is to use the Javascript APIs to blat HTML strings directly into some container <div> or <body>. This approach works, as the following code snippet demonstrates:
package webpage
import org.scalajs.dom
import dom.html
import scalajs.js.annotation.JSExport
@JSExport
object HelloWorld0 extends{
  @JSExport
  def main(target: html.Div) ={
    val (f, d) = ("fox", "dog")
    target.innerHTML = s"""
    <div>
      <h1>Hello World!</h1>
      <p>
        The quick brown <b>$f</b>
        jumps over the lazy <i>$d</b>
      </p>
    </div>
    """
  }
}
Remember that we're now requiring a html.Div instead of a html.Canvas to be passed in when the Javascript calls webpage.HelloWorld0().main(...). If you're coming to this point from the previous chapter, you'll need to update the on-page Javascript's document.getElementById to pick a <div> rather than the <canvas> we were using in the previous chapter.
This approach works, as the above example shows, but has a couple of disadvantages:
-
It is untyped: it is easy to accidentally mistype something, and result in malformed HTML. A typo such as
<dvi>would go un-noticed at build-time. Depending on where the typo happens, it could go un-noticed until the application is deployed, causing subtle bugs that only get resolved much later. -
It is insecure: Cross-site Scripting is a real thing, and it is easy to forget to escape the values you are putting into your HTML strings. Above they're constants like
"dog", but if they're user-defined, you may not notice there is a problem until something like"<script>...</script>"sneaks through and your users' accounts & data is compromised.
There are more, but we won't go deep into the intricacies of these problems. Suffice to say it makes mistakes easy to make and hard to catch, and we have something better...
Scalatags
Scalatags is a cross-platform Scala.js/Scala-JVM library that is designed to generate HTML. To use Scalatags, you need to add it as a dependency to your Scala.js SBT project, in the build.sbt file:
libraryDependencies += "com.lihaoyi" %%% "scalatags" % "0.6.2"With that, the above snippet of code re-written using Scalatags looks as follows:
package webpage
import org.scalajs.dom
import dom.html
import scalajs.js.annotation.JSExport
import scalatags.JsDom.all._
@JSExport
object HelloWorld1 extends{
  @JSExport
  def main(target: html.Div) = {
    val (animalA, animalB) = ("fox", "dog")
    target.appendChild(
      div(
        h1("Hello World!"),
        p(
          "The quick brown ", b(animalA),
          " jumps over the lazy ",
          i(animalB), "."
        )
      ).render
    )
  }
}
Scalatags has some nice advantages over plain HTML: it's type-safe, so typos like dvi get caught at compile-time. It's also secure, such that you don't need to worry about script-tags in strings or similar. The Scalatags Readme elaborates on these points and other advantages. As you can see, it takes just 1 import at the top of the file to bring it in scope, and then you can use all of Scalatags' functionality.
The Scalatags github page has comprehensive documentation on how to express all manner of HTML fragments using Scalatags, so anyone who's familiar with how HTML works can quickly get up to speed. Instead of a detailed listing, we'll walk through some interactive examples to show Scalatags in action!
User Input
val box = input(
  `type`:="text",
  placeholder:="Type here!"
).render

val output = span.render

box.onkeyup = (e: dom.Event) => {
  output.textContent =
    box.value.toUpperCase
}

target.appendChild(
  div(
    h1("Capital Box!"),
    p(
      "Type here and " +
      "have it capitalized!"
    ),
    div(box),
    div(output)
  ).render
)
In Scalatags, you build up fragments of type Frag using functions like div, h1, etc., and call .render on it to turn it into a real Element. Different fragments render to different things: e.g. input.render gives you a html.Input, span.render gives you a html.Span. You can then access the properties of these elements: adding callbacks, checking their value, anything you want.
In this example, we render and input element and a span, wire up the input to set the value of the span whenever you press a key in the input, and then stuff both of them into a larger HTML fragment that forms the contents of our target element.
Re-rendering
Let's look at a slightly longer example. While above we spliced small snippets of text into the DOM, here we are going to re-render entire sections of HTML! The goal of this little exercise is to make a filtering search-box: starting from a default list of items, narrow it down as the user enters text into the box.
To begin with, let's define our list of items: Fruits!
val listings = Seq(
  "Apple", "Apricot", "Banana", "Cherry",
  "Mango", "Mangosteen", "Mandarin",
  "Grape", "Grapefruit", "Guava"
)
Next, let's think about how we want to render these fruits. One natural way would be as a list, which in HTML is represented by a <ul> with <li>s inside of it if we wanted the list to be unordered. We'll make it a def, because we know up-front we're going to need to re-render this listing as the search query changes. Lastly, we know we want 1 list item for each fruit, but only if the fruit starts with the search query.
def renderListings = ul(
  for {
    fruit <- listings
    if fruit.toLowerCase.startsWith(
      box.value.toLowerCase
    )
  } yield li(fruit)
).render
Using a for-loop with a filter inside the Scalatags fragment is just normal Scala, since you can nest arbitrary Scala expressions inside a Scalatags snippet. In this case, we're converting both the fruit and the search query to lower case so we can compare them case-insensitively.
Lastly, we just need to define the input box and output-container (as we did earlier), set the onkeyup event handler, and place it in a larger fragment, and then into our target:
val output = div(renderListings).render

box.onkeyup = (e: dom.Event) => {
  output.innerHTML = ""
  output.appendChild(renderListings)
}

target.appendChild(
  div(
    h1("Search Box!"),
    p(
      "Type here to filter " +
      "the list of things below!"
    ),
    div(box),
    output
  ).render
)
And there you have it! A working search box. This is a relatively self-contained example: all the items its searching are available locally, no Ajax calls, and there's no fancy handling of the searched items. If we want to, for example, highlight the matched section of each fruit's name, we can modify the def renderListings call to do so:
def renderListings = ul(
  for {
    fruit <- listings
    if fruit.toLowerCase.startsWith(
      box.value.toLowerCase
    )
  } yield {
    val (first, last) = fruit.splitAt(
      box.value.length
    )
    li(
      span(
        backgroundColor:="yellow",
        first
      ),
      last
    )
  }
).render
Here, instead of sticking the name of the matched fruits directly into the li, we instead first split off the part which matches the query, and then highlght the first section yellow. Easy!
Hopefully this has given you a good overview of how to do things using Scala.js and Scalatags. I won't go too deep into the various ways you can use Scalatags: the documentation should cover most of it. Now that you've gone through this experience, it's worth re-iterating a few things you've probably already noticed about Scalatags
- It's safe! If you make a trivial syntactic mistake, the compiler will catch it, because Scalatags is plain Scala. Try it!
- It's composable! You can easily define fragments and assign them to variables, to be used later. You can break apart large Scalatags fragments the same way you break apart normal code, avoiding the huge monolithic HTML templates that are common in other templating systems.
-
It's Scala! You have the full power of the Scala language to write your fragments. No need to learn special syntax/cases for conditionals or repetitions: you can use plain-old-Scala
if-elses,for-loops, etc.
Now that you've gotten a quick overview of the kinds of things you can do with Scalatags, let's move on to the next section of our hands-on tutorial...
Using Web Services
One half of the web application faces forwards towards the user, managing and rendering HTML or Canvas for the user to view and interact with. Another half faces backwards, talking to various web-services or databases which turn the application from a standalone-widget into part of a greater whole. We've already seen how to make the front half, let's now talk about working with the back half.
Raw Javascript
val xhr = new dom.XMLHttpRequest()
xhr.open("GET",
  "http://api.openweathermap.org/" +
  "data/2.5/weather?q=Singapore"
)
xhr.onload = (e: dom.Event) => {
  if (xhr.status == 200) {
    target.appendChild(
      pre(xhr.responseText).render
    )
  }
}
xhr.send()
The above snippet of code uses the raw Javascript Ajax API in order to make a request to openweathermap.org, to get the weather data for the city of Singapore as a JSON blob. The part of the API that we'll be using is documented here, and if you're interested you can read all about the various options that they provide. For now, we're unceremoniously dumping it in a pre so you can see the raw response data.
As you can see, using the raw Javascript API to make the Ajax call looks almost identical to actually doing this in Javascript, shown below:
var xhr = new XMLHttpRequest()

xhr.open("GET",
    "http://api.openweathermap.org/data/" +
    "2.5/weather?q=Singapore"
);

xhr.onload = function (e) {
    if (xhr.status == 200) {
        var pre = document.createElement("pre");
        pre.textContent = xhr.responseText;
        target.appendChild(pre);
    }
};
xhr.send();
The primary syntactic differences are:
-
vals for immutable data v.s. mutablevars. -
=>v.s.functionto define the callback. -
Scalatags'
prev.s.document.createElement("pre")
Overall, they're pretty close, which is a common theme in Scala.js: using Javascript APIs in Scala.js is often as seamless and easy as using them in Javascript itself, and it often looks almost identical.
dom.extensions
Although the Javascript XMLHttpRequest API is workable, it's kind of awkward and clunky compared to what you're used to in Scala. We create a half-baked object, set some magic properties, and call a magic function, which all has to be done in the correct order or it won't work.
With Scala.js, we provide a simpler API that is more clearly functional. First, you need to import some things into scope:
import dom.html
@JSExport
object Weather1 extends{
  @JSExport
  def main(target: html.Div) = {
    import dom.ext._
    import scala.scalajs
                .concurrent
                .JSExecutionContext
                .Implicits
                .runNow
The first import brings in Scala adapters to several DOM APIs, which allow you to use them more idiomatically from Scala. The second brings in an implicit scala.concurrent.ExecutionContext that we'll need to run our asynchronous operations.
Then we need the code itself:
val url =
  "http://api.openweathermap.org/" +
  "data/2.5/weather?q=Singapore"

Ajax.get(url).onSuccess{ case xhr =>
  target.appendChild(
    pre(xhr.responseText).render
  )
}
A single call to Ajax.get(...), with the URL, and we receive a scala.concurrent.Future that we can use to get access to the result when ready. Here we're just using it's onSuccess, but we could use it in a for-comprehension, with Scala Async, or however else we can use normal Futures
Parsing the Data
We've taken the data-dump from OpenWeatherMap in three different ways, but there's still something missing: we need to actually parse the JSON data to make use of it! Most people don't use their JSON data as strings but as structured documents, querying and extracting only the bits we need.
First, let's make the call prettyprint the document, so at least we can see what it contains:
Ajax.get(url).onSuccess{ case xhr =>
  target.appendChild(
    pre(
      js.JSON.stringify(
        js.JSON.parse(xhr.responseText),
        space=4
      )
    ).render
  )
}
We do this by taking xhr.responseText and putting it through both JSON.parse and JSON.stringify, passing in a space argument to tell JSON.stringify to spread it out nicely.
Now that we've pretty-printed it, we can immediately see what data it contains and which part of the data we want. Let's change the previous example's onSuccess call to extract the weather, temp and humidity and put them in a nice, human-friendly format for us to enjoy:
Ajax.get(url).onSuccess{ case xhr =>
  if (xhr.status == 200) {
    val json = js.JSON.parse(
      xhr.responseText
    )
    val name = json.name.toString
    val weather = json.weather
                      .pop()
                      .main
                      .toString

    def celsius(kelvins: js.Dynamic) = {
      kelvins.asInstanceOf[Double] - 273.15
    }.toInt
    val min = celsius(json.main.temp_min)
    val max = celsius(json.main.temp_max)
    val humid = json.main.humidity.toString
    target.appendChild(
      div(
        b("Weather in Singapore:"),
        ul(
          li(b("Country "), name),
          li(b("Weather "), weather),
          li(b("Temp "), min, " - ", max),
          li(b("Humidity "), humid, "%")
        )
      ).render
    )
  }
}
First we parse the incoming response, extract a bunch of values from it, and then stick it in a Scalatags fragment for us to see. Note how we can use the names of the attributes e.g. json.name even though name is a dynamic property which you can't be sure exists: this is because json is of type js.Dynamic, which allows us to refer to arbitrary parameters and methods on the underlying object without type-checking.
Calls on js.Dynamic resolve directly to javascript property/method references, and will fail at run-time with an exception if used wrongly. This is also why we need to call .toString or .asInstanceOfon the values before use: without these casts, the compiler can't be sure what kind of value is underneath the js.Dynamic type, and so we have to provide it the guarantee that it is what it needs.
Tying it together: Weather Search
At this point we've made a small app that allows us to search from a pre-populated list of words, as well as a small app that lets us query a remote web-service to find the weather in Singapore. The natural thing to do is to put these things together to make a app that will let us search from a list of countries and query the weather in any country we desire. Let's start!
lazy val box = input(
  `type`:="text",
  placeholder:="Type here!"
).render

lazy val output = div(
  height:="400px",
  overflowY:="scroll"
).render

box.onkeyup = (e: dom.Event) => {
  output.innerHTML = "Loading..."
  fetchWeather(box.value)
}

target.appendChild(
  div(
    h1("Weather Search"),
    p(
      "Enter the name of a city to pull the ",
      "latest weather data from api.openweathermap.com!"
    ),
    p(box),
    hr, output, hr
  ).render
)
This sets up the basics: an input box, an output div, and sets an onkeyup that fetches the weather data each time you hit a key. It then renders all these components and sticks them into the target div. This is basically the same stuff we saw in the early examples, with minor tweaks e.g. adding a maxHeight and overflowY:="scroll" to the output box in case the output is too large. Whenever we enter something in the box, we call the function fetchWeather, which is defined as:
def fetchWeather(query: String) = {
  val searchUrl =
    "http://api.openweathermap.org/data/" +
    "2.5/find?type=like&mode=json&q=" +
    query

  for{
    xhr <- Ajax.get(searchUrl)
    if query == box.value
  } js.JSON.parse(xhr.responseText).list match{
    case jsonlist: js.Array[js.Dynamic] =>
      output.innerHTML = ""
      showResults(jsonlist, query)
    case _ =>
      output.innerHTML = "No Results"
  }
}
This is where the actual data fetching happens. It's relatively straightforward: we make an Ajax.get request, JSON.parse the response, and feed it into the callback function. We're using a slightly different API from earlier: we now have the "type=like" flag, which is documented in the OpenWeatherMap API docs to return multiple results for each city whose name matches your query.
Notably, before we re-render the results, we check whether the query that was passed in is the same value that's in the box. This is to prevent a particularly slow ajax call from finishing out-of-order, potentially stomping over the results of more recent searches. We also check whether the .list: js.Dynamic property we want is an instance of js.Array: if it isn't, it means we don't have any results to show, and we can skip the whole render-output step.
def showResults(jsonlist: js.Array[js.Dynamic], query: String) = {
  for (json <- jsonlist) {
    val name = json.name.toString
    val country = json.sys.country.toString
    val weather = json.weather.pop().main.toString

    def celsius(kelvins: js.Dynamic) = {
      kelvins.asInstanceOf[Double] - 273.15
    }.toInt

    val min = celsius(json.main.temp_min)
    val max = celsius(json.main.temp_max)
    val humid = json.main.humidity.toString
    val (first, last) = name.splitAt(query.length)
    output.appendChild(
      div(
        b(span(first, backgroundColor:="yellow"), last, ", ", country),
        ul(
          li(b("Weather "), weather),
          li(b("Temp "), min, " - ", max),
          li(b("Humidity "), humid, "%")
        )
      ).render
    )
  }

}
Here is the meat and potatoes of this program: every time it gets called with an array of weather-data, we iterate over the cities in that array. It then does a similar sort of data-extraction that we did earlier, putting the results into the output div we defined above, including highlighting.
And that's the working example! Try searching for cities like "Singapore" or "New York" or "San Francisco" and watch as the search narrows as you enter more characters into the text box. Note that the OpenWeatherMap API limits ambiguous searches to about a dozen results, so if a city doesn't turn up in a partial-search, try entering more characters to narrow it down.
Interactive Web Pages Recap
In this chapter, we've explored the basics of how you can use Scala.js to build interactive web pages. The two main contributions are using Scalatags to render HTML in a concise, safe way, and making Ajax calls to external web services. We combined these two capabilities in a small weather-search app that let a user interactively search for the weather in different cities around the world.
Some things you may have noticed in the process:
- Using Scalatags to render HTML fragments, and managing them at runtime with callbacks and getting/setting properties, is really quite nice
-
Using
new dom.XMLHttpRequestto make web requests feels just like the Javascript code to do so -
Using
Ajax.get(...)and working with the resultant :Futurefeels a lot cleaner than directly using the Javascript API
You're at this point reasonably pro
We've by this point done a bunch of work in the browser: we've made a small game that runs in the web browser on the HTML5 canvas, and we've made a number of small web-apps that interact with HTML and 3rd party web-services. However, there's a whole other side to the Scala.js ecosystem: the command line interace, or CLI.
Even though the goal of Scala.js is to get your code running in peoples' browsers, it still is useful to be familiar with the things that you can do in the command-line. It is much easier to write-code-print-results in the command line without having to set up a HTML page and opening a browser to test it, and this extends to things like unit test suites, which are almost exclusively run in the command-line using sbt ~test to keep re-running them when the code changes.
The Scala.js command line is where you go to do things to your Scala.js code. Although Scala.js comes with standalone executables that can be used from any shell (sh, bash, zsh, etc.) the primary supported way of setting up, compiling and testing your Scala.js applications is through SBT: Scala's primary build tool.
You've already used fragments of the Scala.js CLI in earlier chapters of this book: ~fastOptJS is what you used for development, fullOptJS for publishing. Apart from these, Scala.js allows you to execute code via Rhino/Node.js/PhantomJS from the command-line, as well as running test-suites under the same conditions. This chapter will go deeper into the various things you can do with the Scala.js command line:
-
compile: converting code from Scala source into not-yet-executable Scala.js IR -
package: bundling up our Scala.js IR into a.jarfile, for publishing or distribution as a library -
fastOptJS: aggregating our Scala.js IR and converting it to a.jsexecutable. -
fullOptJS: aggregating our Scala.js IR and converting it to a smaller, faster.jsexecutable. -
run: run your compiled Scala.js code as Javascript in Rhino, Node.js or Phantom.js -
test: run your compiled Scala.js code as a test suite in Rhino, Node.js or Phantom.js
Now, let's open up your SBT console in your Scala.js app
>
And let's get started!
Commands
The most fundamental thing you can do in the Scala.js CLI is to compile your code. Let's go through the various mechanisms of "compiling" things:
The compile Command
> compile
Just as you can compile Scala-JVM projects, you can also compile Scala.js projects. Like compiling Scala-JVM projects, this leaves a bunch of .class files in your target directory. Unlike Scala-JVM projects, this also leaves a bunch of .sjsir files, which correspond to your Scala.js output files:
classes
└── example
    ├── Point$.class
    ├── Point$.sjsir
    ├── Point.class
    ├── Point.sjsir
    ├── ScalaJSExample$$anonfun$main$1.class
    ├── ScalaJSExample$$anonfun$run$1.class
    ├── ScalaJSExample$.class
    ├── ScalaJSExample$.sjsir
    └── ScalaJSExample.class
However, unlike on Scala-JVM, you cannot directly run the .sjsir files spat out by the Scala.js compiler. These files are an Intermediate Representation, which needs to go through the next step in the compilation pipeline before being turned into Javascript.
The package Command
> package
Also like on Scala-JVM, Scala.js also supports the package command. This command generates a .jar like it does in Scala-JVM, except this version appends this weird _sjs0.6 suffix.
target/scala-2.11/
└── example_sjs0.6_2.11-0.1-SNAPSHOT.jar
The purpose of this suffix is to link the compiled .jar file to the version of Scala.js used to compile it. This allows you to make sure that you don't accidentally depend on a version of a jar that is incompatible with your current version.
Again, unlike Scala-JVM, these .jar files are not directly executable: the .sjsir files need further processing to turn into runnable Javascript. Instead, their sole purpose is to hold bundles of .sjsir files to be published and depended-upon: they can be publishLocaled to be used by other projects on your computer, or publishSigneded to Maven Central, just like any Scala-JVM project.
The fastOptJS Command
> fastOptJS
fastOptJS is a command we've used in earlier chapters. It basically runs the Fast Optimization stage of the compilation pipeline. This results in a moderately-sized executable, which you can then load in the browser with a <script> tag and run.
This is the first phase which actually results in an executable blob of Javascript. I won't go into much detail about this command: you've used it before, and more details about the particular kind of optimization and how it fits into the large process is available in the chapter on The Compilation Pipeline. Nonetheless, it's fast, produces not-too-huge output code, and is what you typically use for iterative development in the browser.
The fullOptJS Command
> fullOptJS
fullOptJS is another command that we've seen before: it performs an aggressive, somewhat slower Full Optimization pass on the generated Javascript. This results in a much smaller executable Javascript blob, which you can also load via a <script> tag and run.
Again, I won't go into much details, as exactly what this optimization does is described in the chapter on the Compilation Pipeline. This command is somewhat too-slow to be running during iterative development, and is instead typically used just before deployment to minimize the size of the file your users have to download.
The run Command
> run
Here's something you haven't seen before: the run command gives you the ability to run a Scala.js program from the command line. This prints its output to standard output (i.e. the terminal). Like Scala-JVM, you need a main method to run to kick off your program. Unlike Scala-JVM, the main method is marked on an object which extends scala.scalajs.js.JSApp, e.g.
// src/main/scala/RunMe.scala
object RunMe extends scala.scalajs.js.JSApp{
  def main(): Unit = {
    println("Hello World!")
    println("In Scala.js, (1.0).toString is ${(1.0).toString}!")
  }
}
Running sbt run with the above Scala.js code will print out
Hello World!
In Scala.js, (1.0).toString is 1!
This exhibits the weirdness of Double.toString in Scala.js, which is one of the few ways in which Scala.js deviates from Scala-JVM. This also shows us we're really running on Scala.js: on Scala-JVM, (1.0).toString returns "1.0" rather than "1"!
One thing you may be wondering is: when you run a Scala.js program in the terminal, how does it execute the output Javascript? What about the DOM? and Ajax calls? Can it access the filesystem? The answer to all these questions is "it depends": it turns out there are multiple ways you can run Scala.js from the command-line, dictated by the stage and the environment.
By default, runs are done in the PreLinkStage, which uses the Rhino environment. With the sbt setting jsDependencies += RuntimeDOM, the Scala.js runner will automatically set up env.js in Rhino so that you have access to an emulation of the DOM API.
You can enable a different stage, FastOptStage or FullOptStage, with the following sbt command:
> set scalaJSStage in Global := FastOptStage
In FastOptStage and FullOptStage, the environment can be one of Node.js or PhantomJS. These JavaScript VMs must be installed separately.
- By default, Node.js is used.
-
With the sbt setting
jsDependencies += RuntimeDOM, PhantomJS is used instead, so that a headless DOM is available.
Typically, the best way to get started is using Rhino, since it's setup-free, and setting up Node.js or PhantomJS later as necessary. The next two sections elaborate on the differences between these ways of running your code. Check out the later sections on Headless Runtimes and Stages to learn more about the other settings and why you would want to use them.
The test Command
> test
The sbt test command behaves very similarly to sbt run. It also runs on Rhino, Node.js or PhantomJS, dependending of the stage and the dependency on the DOM.
The difference is that instead of simply running your main method, sbt test runs whatever test-suite you have set-up, which will look through your tests/ folder to find suites of tests it has to run, and aggregate the results formatted nicely for you to see. The exact operation of this depends on which testing library you're using.
We won't spend much time talking about sbt test here. Not because it's not important: it most certainly is! Rather, we will be spending a good amount of time setting up tests in the next chapter, so feel free to jump ahead if you want to see an example usage of sbt test.
Headless Runtimes
- Rhino is the default way of running Scala.js applications. The upside of using Rhino is that it is pure-Java, and doesn't need any additional binaries or installation. The downside of using Rhino is that it is slow: maybe a hundred times slower than the alternatives, making it not suitable for running long-running, compute-intensive programs.
-
Node.js, a relatively new Javascript runtime based on Google's V8 Javascript engine, Node.js lets you run your Scala.js application from the command line much faster than in Rhino, with performance that matches that of modern browsers. However, you need to separately install Node.js in order to use it. Node.js does not have DOM or browser-related functionality. You need to set the stage with
set scalaJSStage in Global := FastOptStageto run using Node.js. -
PhantomJS is a headless Webkit browser. This means that unlike Node.js, PhantomJS provides you with a full DOM and all its APIs to use in your tests, if you wish to e.g. test interactions with the HTML of the web page. On the other hand, it is somewhat slower than Node.js, though still much faster than Rhino. Like Node.js, it needs to be installed separately. You need to set the stage with
set scalaJSStage in Global := FastOptStage, as well as setting thejsDependencies += RuntimeDOMflag in your SBT configuration, to use PhantomJS.
These are your three options to run your Scala.js code via the command-line. Generally, it's easiest to get started with Rhino since it's the default and requires no setup, though you will quickly find it worthwhile to setup Node.js or PhantomJS to speed up your runs and tests.
Stages
Let us recap the three different stages of execution, and what they mean.
-
PreLinkStage(the default): this does not perform any optimization of the output Scala.js files, and does lazy-loading to minimize the amount of files being loading into the interpreter. This is necessary for Rhino because it can't handle large blobs of Javascript, but doesn't map to any compilation mode you'd use for the browser. -
FastOptStage: this performs the same compilation and optimization assbt fastOptJS, as described under Fast Optimizations. It then takes the entire output executable (which probably weighs around 1mb) and hands it to Node.js or PhantomJS, which then run it. -
FullOptStage: this performs the same compilation and optimization assbt fullOptJS, as described under Full Optimizations. This takes longer to run than theFastOptStage, and results in a smaller/faster executable. Practically speaking, this size/speed advantage does not matter from the command line, butFullOptStageis still useful to verify that the behavior does not change (it shouldn't!) under the aggressive full optimization. This is typically used in continuous integration builds, but rarely manually.
Hopefully by this point you more-or-less know your way around the Scala.js command-line tools. As mentioned earlier, command line tools make it much easier to run a bunch of Scala.js code, e.g. unit tests, without having to muck around with HTML pages or refreshing the browser. That will come in handy soon, as we're next going to learn to publish a standalone, distributable Scala.js module. And what's a module without tests...
We've spent several chapters exploring the experience of making web apps using Scala.js, but any large application (web or not!) likely relies on a host of libraries in order to implement large chunks of its functionality. Ideally these libraries would be re-usable, and can be shared among different projects, teams or even companies.
Not all code is developed in the browser. Maybe you want to run simple snippets of Scala.js which don't interact with the browser at all, and having to keep a browser open is an overkill. Maybe you want to write unit tests for your browser-destined code, so you can verify that it works without firing up Chrome. Maybe it's not a simple script but a re-distributable library, and you want to run the same command-line unit tests on both Scala.js and Scala-JVM to verify that the behavior is identical. This chapter will go through all these cases.
A Simple Cross-Built Library
As always, we will start with an example: in this case a toy library whose sole purpose in life is to take a series of timestamps (milliseconds UTC) and format them into a single, newline-delimited string. This is what the project layout looks like:
$ tree
.
├── build.sbt
├── project/build.sbt
└── library
    ├── js/src/main/scala/simple/Platform.scala
    ├── jvm/src/main/scala/simple/Platform.scala
    └── shared/src/main/scala/simple/Simple.scala
As you can see, we have three main places where code lives: js/ is where Scala-JS specific code lives, jvm/ for Scala-JVM specific code, and shared/ for code that is common between both platforms. Depending on your project, you may have more or less code in the shared/ folder: a mostly-the-same cross-compiled module may have most or all its code in shared/ while a client-server web application would have lots of client/server js/jvm-specific code.
Build Configuration
From the bash shell in the project root. Let's take a look at the various files that make up this project. First, the build.sbt files:
/*project/build.sbt*/
addSbtPlugin("org.scala-js" % "sbt-scalajs" % "0.6.13")
The project/build.sbt file is uneventful: it simply includes the Scala.js SBT plugin. However, the build.sbt file is a bit more interesting:
val library = crossProject.settings(
  libraryDependencies += "com.lihaoyi" %%% "utest" % "0.3.0",
  testFrameworks += new TestFramework("utest.runner.Framework")
).jsSettings(
  // JS-specific settings here
).jvmSettings(
  // JVM-specific settings here
)

lazy val js = library.js

lazy val jvm = library.jvm
Unlike the equivalent build.sbt files you saw in earlier chapters, this does not simply enable the ScalaJSPlugin to the root project. Rather, it uses the crossProject function provided by the Scala.js plugin to set up two projects: one in the app/js/ folder and one in the jvm/ folder. We also have places to put settings related to either the JS side, the JVM side, or both. In this case, we add a dependency on uTest, which we will use as the test framework for our library. Note how we use triple %%% to indicate that we're using the platform-specific version of uTest, such that the Scala.js or Scala-JVM version will be properly pulled in when compiling for each platform.
Source Files
Now, let's look at the contents of the .scala files that make up the meat of this project:
// library/shared/src/main/scala/simple/Simple.scala
package simple
object Simple{
  def formatTimes(timestamps: Seq[Long]): Seq[String] = {
    timestamps.map(Platform.format).map(_.dropRight(5))
  }
}
In Simple.scala we have the shared, cross-platform API of our library: a single object with a single method def which does what we want, which can then be used in either Scala.js or Scala-JVM. In general, you can put as much shared logic here as you want: classes, objects, methods, anything that can run on both Javascript and on the JVM. We're chopping off the last 5 characters (the milliseconds) to keep the formatted dates slightly less verbose.
However, when it comes to actually formatting the date, we have a problem: Javascript and Java provide different utilities for formatting dates! They both let you format them, but they provide different APIs. Thus, to do the formatting of each individual date, we call out to the Platform.format function, which is implemented twice: once in js/ and once in jvm/:
// library/js/src/main/scala/simple/Platform.scala
package simple
import scalajs.js

object Platform{
  def format(ts: Long) = {
    new js.Date(ts).toISOString()
  }
}
// library/jvm/src/main/scala/simple/Platform.scala
package simple
import java.text.SimpleDateFormat
import java.util.TimeZone
object Platform{
def format(ts: Long) = {
val fmt = new SimpleDateFormat(
"yyyy-MM-dd'T'HH:mm:ss.sss'Z'"
)
fmt.setTimeZone(TimeZone.getTimeZone("UTC"))
fmt.format(new java.util.Date(ts))
}
}
In the js/ version, we are using the Javascript Date object to take the millis and do what we want. In the jvm/ version, we instead use java.text.SimpleDateFormat with a custom formatter (The syntax is defined here).
Again, you can put as much platform-specific logic in these files as you want, to account for differences in the available APIs. Maybe you want to use Json.parse for parsing JSON blobs in js/, but Jackson or GSON for parsing them in jvm/.
Running the Module
> ;libraryJS/test ;libraryJVM/test
[info] Compiling 1 Scala source to library/js/target/scala-2.10/test-classes...
[info] ---------------------------Results---------------------------
[info] simple.SimpleTest		Success
[info]     format		Success
[info]         nil		Success
[info]         timeZero		Success
[info]     zero		Success
[info]         0
[info]
[info] Tests: 5
[info] Passed: 5
[info] Failed: 0
[success] Total time: 12 s, completed Feb 4, 2015 8:44:49 AM
[info] Compiling 1 Scala source to library/jvm/target/scala-2.10/test-classes...
[info] 1/5     simple.SimpleTest.format.nil		Success
[info] 2/5     simple.SimpleTest.format.timeZero		Success
[info] 3/5     simple.SimpleTest.format		Success
[info] 4/5     simple.SimpleTest.zero		Success
[info] 0.0
[info] 5/5     simple.SimpleTest		Success
[info] ---------------------------Results---------------------------
[info] simple.SimpleTest		Success
[info]     format		Success
[info]         nil		Success
[info]         timeZero		Success
[info]     zero		Success
[info]         0.0
[info]
[info] Tests: 5
[info] Passed: 5
[info] Failed: 0
[success] Total time: 2 s, completed Feb 4, 2015 8:44:51 AM
As you can see, both runs printed the same results, modulo three things:
-
The
"Compiling 1 Scala source to..."line, which tells us that both JS and JVM versions are being compiled. - The time taken: the second run is instant while the first takes eleven seconds! This is because by default we run on Rhino, which is a simple interpreter hundreds of times slower than running code natively on the JVM.
-
In Scala-JVM the double 1.0 is printed as
1.0, while in Scala.js it's printed as1. This is one of a small number of differences between Scala.js and Scala-JVM, and verifies that we are indeed running on both platforms!
Apart from running each sub-project manually as we did above, you can also simply hit test and SBT will run tests for both
Further Work
You've by this point set up a basic cross-building Scala.js/Scala-JVM project! If you wish, you can do more things with this project you've set up:
-
Flesh it out! Currently this module only does a single, trivial thing. If you've done any web development before, I'm sure you can find some code snippet, function or algorithm that you'd like to share between client and server. Try implementing it in the
shared/folder to be usable in both Scala.js and Scala-JVM -
Publish it! Both
sbt publishLocalandsbt publishSignedwork on this module, for publishing either locally, Maven Central via Sonatype, or Bintray. Running the command bare should be sufficient to publish both thejsorjvmprojects, or you can also specify which one e.g.jvm/publishLocalto publish only one subproject. -
Cross-cross build it! You can use
crossScalaVersionsin yourcrossProjectto build a library that works across all of {Scala.js, Scala-JVM} X {2.10, 2.11}. Many existing libraries, such as Scalatags or uTest are published like that.
Now that you've gotten your code cross-compiling to Scala.js/Scala-JVM, the sky's the limit in what you can do. In general, although a large amount of your Scala-JVM code does deal with files or networks or other Scala-JVM-speciic functionality, in most applications there is a large library of helpers which don't. These could easily be packaged up into a cross-platform library and shared with your front-end Scala.js (or even pure-Javascript!) code.
Other Testing Libraries
You can also try using a different testing library. While uTest was the first Scala.js testing library, it is definitely not the last! Here are a few alternatives worth trying:
These (and others) are built and maintained by members of the community, so if one of them does not fit your tastes, it is worth trying the others.
Note that you cannot use Scalatest or Specs2 in Scala.js. Despite the popularity of those libraries, they depend on too many Java-specific details of Scala-JVM to be easily ported to Scala.js. Thus you'll have to use one of the (relatively new) libraries which supports Scala.js, such as uTest or those above.
Historically, sharing code across client & server has been a holy-grail for web development. There are many things which have made it hard in the past:
- Javascript on the client v.s. PHP/Perl/Python/Ruby/Java on the server
- Most back-ends make heavy use of C extensions, and front-end code was tightly coupled to the DOM. Even if you manage to port the main language
There have been some attempts in recent years with more traction: Node.js, for example, has been very successful at running Javascript on the server, the Clojure/Clojurescript community has their own version of cross-built code, and there are a number of smaller, more esoteric platforms.
Scala.js lets you share code between client and server relatively straightforwardly. As we saw in the previous chapter, where we made a shared module. Let's work to turn that shared module into a working client-server application!
A Client-Server Setup
Getting started with client-server integration, let's go with the simplest configuration possible: a Spray server and a Scala.js client. Most of the other web-frameworks (Play, Scalatra, etc.) will have more complex configurations, but the basic mechanism of wiring up Scala.js to your web framework will be the same. Just like our project in Cross Publishing Libraries, our project will look like this:
$ tree
.
├── build.sbt
├── project/build.sbt
└── app
    ├── shared/src/main/scala/simple/FileData.scala
    ├── js/src/main/scala/simple/Client.scala
    └── jvm/src/main/scala/simple/
                            ├── Page.scala
                            └── Server.scala
First, let's do the wiring in project/build.sbt:
/*project/build.sbt*/
addSbtPlugin("org.scala-js" % "sbt-scalajs" % "0.6.13")

addSbtPlugin("io.spray" % "sbt-revolver" % "0.8.0")
And build.sbt:
/*build.sbt*/

val app = crossProject.settings(
  unmanagedSourceDirectories in Compile +=
    baseDirectory.value  / "shared" / "main" / "scala",
  libraryDependencies ++= Seq(
    "com.lihaoyi" %%% "scalatags" % "0.6.2",
    "com.lihaoyi" %%% "upickle" % "0.4.4"
  ),
  scalaVersion := "2.11.5"
).jsSettings(
  libraryDependencies ++= Seq(
    "org.scala-js" %%% "scalajs-dom" % "0.9.1"
  )
).jvmSettings(
  libraryDependencies ++= Seq(
    "com.typesafe.akka" %% "akka-http-experimental" % "2.4.11",
    "com.typesafe.akka" %% "akka-actor" % "2.4.12",
    "org.webjars" % "bootstrap" % "3.2.0"
  )
)

lazy val appJS = app.js
lazy val appJVM = app.jvm.settings(
  (resources in Compile) += (fastOptJS in (appJS, Compile)).value.data
)
Again, we are using crossProject to define our js/ and jvm/ sub-projects. Both projects share a number of settings: the settings to add Scalatags and uPickle to the build. Note that those two dependencies use the triple %%% instead of the double %% to declare: this means that for each dependency, we will pull in the Scala-JVM or Scala.js version depending on whether it's being used in a Scala.js project. Note also the packageArchetype.java_application setting, which isn't strictly necessary depending on what you want to do with the application, but this example needs it as part of the deployment to Heroku.
The js/ sub-project is uneventful, with a dependency on the by-now-familiar scalajs-dom library. The jvm/ project, on the other hand, is interesting: it contains the dependencies required for us to set up out Spray server, and one additional thing: we add the output of fastOptJS from the client to the resources on the server. This will allow the server to serve the compiled-javascript from our client project from its resources.
Next, let's kick off the Akka-HTTP server in our Scala-JVM main method:
package simple

import akka.actor.ActorSystem
import akka.http.scaladsl.Http
import akka.http.scaladsl.model._
import akka.http.scaladsl.server.Directives._
import akka.stream.ActorMaterializer
import scala.concurrent.ExecutionContext.Implicits.global
import scala.util.Properties

object Server{
  def main(args: Array[String]): Unit = {
    implicit val system = ActorSystem()
    implicit val materializer = ActorMaterializer()

    val port = Properties.envOrElse("PORT", "8080").toInt
    val route = {
      get{
        pathSingleSlash{
          complete{
            HttpEntity(
              ContentTypes.`text/html(UTF-8)`,
              Page.skeleton.render
            )
          }
        } ~
        getFromResourceDirectory("")
      } ~
      post{
        path("ajax" / "list"){
          entity(as[String]) { e =>
            complete {
              upickle.default.write(list(e))
            }
          }
        }
      }
    }
    Http().bindAndHandle(route, "0.0.0.0", port = port)
  }
  def list(path: String) = {
    val (dir, last) = path.splitAt(path.lastIndexOf("/") + 1)
    val files =
      Option(new java.io.File("./" + dir).listFiles())
        .toSeq.flatten
    for{
      f <- files
      if f.getName.startsWith(last)
    } yield FileData(f.getName, f.length())
  }
}
This is a not-very-interesting akka-http application: we set up a server on localhost:8080, have the root URL serve the main page on GET, and have other GET URLs serve resources. This includes the js-fastopt.js file that is now in our resources because of our build.sbt config earlier! We also add a POST route to allow the client ask the server to list files various directories.
The HTML template Page.skeleton is not shown above; I put it in a separate file for neatness:
package simple
import scalatags.Text.all._

object Page{
  val boot =
    "simple.Client().main(document.getElementById('contents'))"
  val skeleton =
    html(
      head(
        script(src:="/app-fastopt.js"),
        link(
          rel:="stylesheet",
          href:="https://cdnjs.cloudflare.com/ajax/libs/pure/0.5.0/pure-min.css"
        )
      ),
      body(
        onload:=boot,
        div(id:="contents")
      )
    )
}
This is a typical Scalatags HTML snippet. Note that since we're serving it directly from the server in Scala code, we do not need to leave a .html file somewhere on the filesystem! We can declare all HTML, including the skeleton of the page, in Scalatags. Otherwise it's the same as what we saw in earlier chapters: A simple HTML page which includes a script tag to run our Scala.js application.
Lastly, we'll set up the Scala.js main method, which we are calling in the <script> tag above to kick off the client-side application.
package simple

import scalatags.JsDom.all._
import scalajs.concurrent.JSExecutionContext.Implicits.runNow
import org.scalajs.dom
import dom.html
import dom.ext.Ajax
import scalajs.js.annotation.JSExport

@JSExport
object Client extends{
  @JSExport
  def main(container: html.Div) = {
    val inputBox = input.render
    val outputBox = ul.render
    def update() = Ajax.post("/ajax/list", inputBox.value).foreach{ xhr =>
      val data = upickle.default.read[Seq[FileData]](xhr.responseText)
      outputBox.innerHTML = ""
      for(FileData(name, size) <- data){
        outputBox.appendChild(
          li(
            b(name), " - ", size, " bytes"
          ).render
        )
      }
    }
    inputBox.onkeyup = (e: dom.Event) => update()
    update()
    container.appendChild(
      div(
        h1("File Search"),
        inputBox,
        outputBox
      ).render
    )
  }
}
Again this is a simple Scala.js application, not unlike what we saw in earlier chapters. However, there is one difference: earlier, we made our Ajax calls to api.openweathermap.org/.... Here, we're making it to /ajax: the same server the page is served from!
You may have noticed in both client and server, we have made reference to a mysterious FileData type which holds the name and size of each file. FileData is defined in the shared/ folder, so it can be accessed from both Scala-JVM and Scala.js:
package simple

case class FileData(name: String, size: Long)
Now, if we start the server with sbt appJVM/reStart and go to the browser at localhost:8080, we should see our web-page!
This is a real, live example running on a Heroku server. Feel free to poke around and explore the filesystem on the server, just to convince yourself that this actually works and is not just a mock up.
Client-Server Reflections
By now you've already set up your first client-server application. However, it might not be immediately clear what we've done and why it's interesting! Here are some points to consider.
Shared Templating
In both the client code and the server code, we made use of the same Scalatags HTML generation library. This is pretty neat: transferring rendering logic between client and server no longer means an annoying/messy rewrite! You can simply C&P the Scalatags snippet over. That means it's easy if you want to e.g. shift the logic from one side to the other in order to optimize for performance or time-to-load or other things.
One thing to take note of is that we're actually using subtly different implementations of Scalatags on both sides: on the server, we're importing from scalatags.Text, while on the client we're using scalatags.JsDom. The Text backend renders directly to Strings, and is available on both Scala-JVM and Scala.js. The JsDom backend, on the other hand, renders to html.Element-s which only exist on Scala.js. Thus while on the client you can do things like attach event listeners to the rendered html.Element objects, or checking their runtime .value, on the server you can't. And that's exactly what you want!
Shared Code
One thing that we skimmed over is the fact that we could easily define our case class FileData(name: String, size: Long) in the shared/ folder, and have it instantly and consistently available on both client and server. This perhaps does not seem so amazing: we've already done many similar things earlier when we were building Cross-platform Modules. Nevertheless, in the context of web development, it is a relatively novel idea to be able to ad-hoc share bits of code between client and server.
Sharing code is not limited to class definitions: anything can be shared. Objects, classes, interfaces/traits, functions and algorithms, constants: all of these are things that you will likely want to share at some point or another. Traditionally, people have simply re-implemented the same code twice in two languages, or have resorted to awkward Ajax calls to push the logic to the server. With Scala.js, you no longer need to do so: you can easily, create ad-hoc bits of code which are available on both platforms.
Boilerplate-free Serialization
The Ajax/RPC layer is one of the more fragile parts of web applications. Often, you have your various Ajax endpoints written once on the server, have a set of routes written to connect those Ajax endpoints to URLs, and client code (traditionally Javascript) made calls to those URLs with "raw" data: basically whatever you wanted, packed in an ad-hoc mix of CSV and JSON and raw-strings.
This has always been annoying boilerplate, and Scala.js removes it. With uPickle, you can simply call upickle.write(...) and upickle.read[T](...) to convert your collections, primitives or case-classes to and from JSON. This means you do not need to constantly re-invent different ways of making Ajax calls: you can just fling the data right across the network from client to server and back again.
What's Left?
We've built a small client-server web application with a Scala.js web-client that makes Ajax calls to a Scala-JVM web-server running on Spray. We performed these Ajax calls using uPickle to serialize the data back and forth, so serializing the arguments and return-value was boilerplate-free and correct.
However, there is still some amount of duplication in the code. In particular, the definition of the endpoint name "list" is duplicated 4 times:
path("ajax" / "list"){upickle.default.write(list(e))def list(path: String) = {def update() = Ajax.post("/ajax/list", inputBox.value).foreach{ xhr =>
Three times on the server and once on the client! What's worse, two of the appearances of "list" are in string literals, which are not checked by the compiler to match up with themselves or the name of the method list. Apart from this, there is one other piece of duplication that is unchecked: the type being returned from list (Seq[FileData]) is being repeated on the client in upickle.read[Seq[FileData]] in order to de-serialize the serialized data. This leaves three opportunities for error wide-open:
-
You could change the string literals
"list"and forget to change the method-namelist, thus confusing future maintainers of the code. -
You could change one of literal
"list"s but forget to change the other, thus causing an error at run-time (e.g. a 404 NOT FOUND response) -
You could update the return type of the
listmethod and forget to update theupickle.readdeserialization call on the client, resulting in a deserialization failure at runtime.
Neither of these scenarios is great! Although we've already made great progress in making our client-server application type-safe (via Scala.js on the client) and DRY (via shared code in shared/) we still have this tiny bit of annoying, un-checked duplication and danger lurking in the code-base. The basic problem is that what is normally called the "routing layer" in the web application is still unsafe, and so these silly errors can go un-caught and blow up on unsuspecting developers at run-time. Let's see how we can fix it.
Autowire
Autowire is a library that turns your request routing layer from a fragile, hand-crafted mess into a solid, type-checked, boilerplate-free experience. Autowire basically turns what was previously a stringly-typed, hand-crafted Ajax call and route:
def update() = Ajax.post("/ajax/list", inputBox.value).foreach{ xhr =>Into a safe, type-checked function call:
def update() = Ajaxer[Api].list(inputBox.value).call().foreach{ data =>Let's see how we can do that.
Setting up Autowire
To begin with, Autowire requires you to provide three things:
-
An
autowire.Serveron the Server, set up to feed the incoming request into Autowire's routing logic -
An
autowire.Clienton the Client, set up to take a serialized request and send it across the network to the server. -
An interface (A Scala
trait) which defines the interface between these two
Let's start with our client-server interface definition
package simple

case class FileData(name: String, size: Long)

trait Api{
  def list(path: String): Seq[FileData]
}
Here, you can see that in addition to sharing the FileData class, we are also creating an Api trait which contains the signature of our list method. The exact name of the trait doesn't matter. We need it to be in shared/ so that the code in both client and server can reference it.
Next, let's look at modifying our server code to make use of Autowire:
package simple

import akka.actor.ActorSystem
import akka.http.scaladsl.Http
import akka.http.scaladsl.model._
import akka.http.scaladsl.server.Directives._
import akka.stream.ActorMaterializer

import scala.concurrent.ExecutionContext.Implicits.global
import scala.util.Properties


object Router extends autowire.Server[String, upickle.default.Reader, upickle.default.Writer]{
  def read[Result: upickle.default.Reader](p: String) = upickle.default.read[Result](p)
  def write[Result: upickle.default.Writer](r: Result) = upickle.default.write(r)
}

object Server extends Api{
  def main(args: Array[String]): Unit = {
    implicit val system = ActorSystem()
    implicit val materializer = ActorMaterializer()

    val port = Properties.envOrElse("PORT", "8080").toInt
    val route = {
      get{
        pathSingleSlash{
          complete{
            HttpEntity(
              ContentTypes.`text/html(UTF-8)`,
              Page.skeleton.render
            )
          }
        } ~
          getFromResourceDirectory("")
      } ~
        post{
          path("ajax" / Segments){s =>
            entity(as[String]) { e =>
              complete {
                Router.route[Api](Server)(
                  autowire.Core.Request(
                    s,
                    upickle.default.read[Map[String, String]](e)
                  )
                )
              }
            }
          }
        }
    }
    Http().bindAndHandle(route, "0.0.0.0", port = port)
  }
  def list(path: String) = {
    val (dir, last) = path.splitAt(path.lastIndexOf("/") + 1)
    val files =
      Option(new java.io.File("./" + dir).listFiles())
        .toSeq.flatten
    for{
      f <- files
      if f.getName.startsWith(last)
    } yield FileData(f.getName, f.length())
  }
}
Now, instead of hard-coding the route "ajax" / "list", we now take in any route matching "ajax" / Segments, feeding the resultant path segments into the Router object:
path("ajax" / Segments){s =>
  entity(as[String]) { e =>
    complete {
      Router.route[Api](Server)(
        autowire.Core.Request(
          s,
          upickle.default.read[Map[String, String]](e)
        )
      )
    }
  }
}
The Router object in turn simply defines how you intend the objects to be serialized and deserialized:
object Router extends autowire.Server[String, upickle.default.Reader, upickle.default.Writer]{
  def read[Result: upickle.default.Reader](p: String) = upickle.default.read[Result](p)
  def write[Result: upickle.default.Writer](r: Result) = upickle.default.write(r)
}
In this case using uPickle. Note how the route call explicitly states the type (here Api) that it is to generate routes against; this ensures that only methods which you explicitly put in your public interface Api are publically reachable.
Next, let's look at the modified client code:
package simple
import scalatags.JsDom.all._
import org.scalajs.dom
import dom.html
import scalajs.js.annotation.JSExport
import scalajs.concurrent.JSExecutionContext.Implicits.runNow
import autowire._

object Ajaxer extends autowire.Client[String, upickle.default.Reader, upickle.default.Writer]{
  override def doCall(req: Request) = {
    dom.ext.Ajax.post(
      url = "/ajax/" + req.path.mkString("/"),
      data = upickle.default.write(req.args)
    ).map(_.responseText)
  }

  def read[Result: upickle.default.Reader](p: String) = upickle.default.read[Result](p)
  def write[Result: upickle.default.Writer](r: Result) = upickle.default.write(r)
}

@JSExport
object Client extends{
  @JSExport
  def main(container: html.Div) = {
    val inputBox = input.render
    val outputBox = ul.render
    def update() = Ajaxer[Api].list(inputBox.value).call().foreach{ data =>
      outputBox.innerHTML = ""
      for(FileData(name, size) <- data){
        outputBox.appendChild(
          li(
            b(name), " - ", size, " bytes"
          ).render
        )
      }
    }
    inputBox.onkeyup = (e: dom.Event) => update()
    update()
    container.appendChild(
      div(
        h1("File Search"),
        inputBox,
        outputBox
      ).render
    )
  }
}
There are two main modifications here: the existence of the new Ajaxer object, and the modification to the Ajax call-site. Let's first look at Ajaxer:
object Ajaxer extends autowire.Client[String, upickle.default.Reader, upickle.default.Writer]{
  override def doCall(req: Request) = {
    dom.ext.Ajax.post(
      url = "/ajax/" + req.path.mkString("/"),
      data = upickle.default.write(req.args)
    ).map(_.responseText)
  }

  def read[Result: upickle.default.Reader](p: String) = upickle.default.read[Result](p)
  def write[Result: upickle.default.Writer](r: Result) = upickle.default.write(r)
}
Like the Router object, Ajaxer also defines how you perform the serialization and deserialization of data-structures, again using uPickle. Unlike the Router object, Ajaxer also defines how the out-going Ajax call gets sent over the network. Here we're doing it using the Ajax.post method.
Lastly, let's look at the modified callsite for the ajax call itself:
def update() = Ajaxer[Api].list(inputBox.value).call().foreach{ data =>There are a few things of note here:
-
The previous call to
Ajax.postwith the path as a string has been replaced by callingAjaxer[Api].list(...).call(), since the logic of actually performing the POST is specified once-and-only-once in theAjaxerobject. -
While
Ajax.postreturned aFuture[dom.XMLHttpRequest]and left us to callupickle.readand deserialize the data ourselves,Ajaxer[Api].list(...).call()now returns aFuture[Seq[FileData]]! Thus we don't need to worry about making a mistake in the deserialization logic when we write it by hand.
Other than that, nothing much has changed. If you've done this correctly, the web application will look and behave exactly as it did earlier!
So why did we do this in the first place?
Why Autowire?
Overall, this set up requires some boilerplate to define the Ajaxer and Router objects, as well as the Api trait. However, these can be defined just once and used over and over; while it might be wasteful/unnecessary for making a single Ajax call, the cost is much less amortized over a number of Ajax calls. In a non-trivial web application with dozens of routes being called all over the place, spending a dozen lines setting up things up-front isn't a huge cost.
What have we gotten in exchange? It turns out that by using Autowire, we have eliminated the three failure modes described earlier, that could:
-
It is impossible for the route and the endpoint method-name to diverge accidentally: if the endpoint is called
list, the requests will go through the/listURL. No room for discussion, or to make a mistake - You cannot accidentally rename the route on the server without changing the client, or vice versa. Attempts to do so will cause a compilation error, and even your IDE should highlight it as red. Try it out!
- There is no chance of messing up the serialization/deserialization code, e.g. writing a response of type A on the server and trying to read a data-structure of type B on the client. You have no opportunity to make an error: you pass arguments to the Ajax call, and they are serialized/deserialized automatically, such that by the time you get access to the value on the server, it is already of the correct type! The same applies to serializing/deserializing the return-value on the client. There is simply no place for you as a developer to accidentally make a mistake!
Although the functionality of the web application is the same, it is mostly in terms of safety that we have made the biggest gains. All of the common failure modes described earlier have been guarded against, and you as a developer will have a hard time trying to make a mal-formed Ajax call. It's worth taking some time to poke at the source code to see the boundaries of the type-safety provided by autowire, as it is a very different experience from the traditional "route it manually" approach to making interactive client-server applications.
Hopefully this chapter has given you a glimpse of how a basic client-server application works using Scala.js. Although it is specific to a Spray server, there isn't any reason why you couldn't set up an equivalent thing for your Play, Scalatra or whichever other web framework that you're using.
It's probably worth taking a moment to play around with the existing client-server system you have set up. Ideas for improvement include:
- Try adding additional functionality to the client-server interface: what about making it show the contents of a file if you've entered its full path? This can be added as a separate Ajax call or as part of the existing one.
-
How about setting up the build.sbt so it serves the fully-optimized Scala.js blob,
client-opt.js? This is probably what you want before deployment into production, and the same technique as we used to serve the fast-optimized version applies here too. - What if you wanted to use another server rather than Spray? How about trying to set up a Play or Scalatra server to serve our Scala.js application code?
This half of the book is a set of detailed expositions on various parts of the Scala.js platform. Nothing in here is necessary for you to make your first demos, but as you dig deeper into the platform, you will likely need or want to care about these things so you can properly understand what's going on "under the hood"
Getting Started walks you through how to set up some basic Scala.js applications, but that only scratches the surface of the things you can do with Scala.js. Apart from being able to use the same techniques you're used to in Scala-JVM in the browser, Scala.js opens up a whole range of possibilities and novel techniques that are not found in typical Scala-JVM applications.
Although these techniques may technically be possible on the JVM, very few Scala-JVM applications are built in a way that can take advantage of them. Most Scala-JVM code runs on back-end servers which have a completely different structure from the client-side apps that Scala.js allows.
This client-side user-interface-focused code lends itself to completely different design patterns from those used to develop server-side code. This section will explore a number of techniques which are present
One note is that these are "Techniques" rather than "Libraries" because they have not been packaged up in a way that is sufficiently nice that you can use them out-of-the-box just by adding a dependency somewhere. Thus, they each require some small amount of boilerplate before use, though the amount of boilerplate is fixed: it does not grow with the size of your program, and anyway gives you a chance to tweak it to do exactly what you want.
Functional-Reactive UIs
Functional-reactive Programming (FRP) is a field with encompasses several things:
- Discrete: Handling of first-class event-streams like in RxJS
- Continuous: Handling of first-class signals, like in Elm
Why FRP
The value proposition of FRP is that in a "traditional" program, when an event occurs, events and changes propagate throughout the program in an ad-hoc manner. An event-listener may trigger additional events, call some callbacks, or set some mutable variables that subsequent code will read and react to.
This works, but the ad-hoc nature is both free-ing and limiting. You are free to do whatever you want in response to any action, but in return the developer who maintains your code (e.g. yourself 6 months from now) has no idea what your code is doing in response to any action: the possible consequence of an action is basically "Anything"!
Furthermore, because the propagation is ad-hoc, there is no way for the code to help ensure that you are propagating changes in a "valid" manner: it is thus easy for programmer errors to result in changes or events being incorrectly propagated. This most often results in data falling out of sync: a UI widget may forget to update when an action is taken, resulting in an inconsistent state being shown to the user, ultimately resulting in confused users.
FRP basically structures these event- or change-propagations as first-class values within the program, either as an EventSource[T] type that represents a discrete source of individual T events, or as a Signal[T] type which represents a continuous time-varying value T. This comes at some cost within the program: you now have to program using these EventSources or Signals, rather than just ad-hoc running callbacks or listening-to/triggering events all over the place. In exchange, you get more powerful tools to work with these values, making it easy for the library to e.g. ensure that changes always propagate correctly throughout your program, and that all values are always kept in sync.
FRP with Scala.Rx
Scala.Rx is a change-propagation library that implements the Continuous style of FRP. To begin with, we need to include it in our build.sbt dependencies:
libraryDependencies += "com.lihaoyi" %%% "scalarx" % "0.2.8"Scala.Rx provides you with smart variables that automatically track dependencies with each other, such that if one smart variable changes, the rest re-compute immediately and automatically. The main primitives in Scala.Rx are:
- Vars: Smart variables that can be set manually, and automatically notify their dependents that they need to recompute
- Rxs: Smart values which are set as some computation of other Rxs or Vars, which recompute automatically when their dependencies change, and notify their dependents
- Obss: Observers on either an Rx or a Var, which performs some action when it changes
Vars and Rxs roughly correspond to the idea of a Signal described earlier. The documentation for Scala.Rx goes into this in much more detail, so if you're curious you should read it. This section will jump straight into how to use Scala.Rx with Scala.js.
To begin with, let's set up our imports:
package advanced

import org.scalajs.dom
import scalajs.js
import scalajs.js.annotation.JSExport
import rx._
import scalatags.JsDom.all._
import dom.html
Here we are seeing the same dom and scalatags, imports we saw in the hands-on tutorial, as well a new import rx._ which bring all the Scala.Rx names into the local namespace.
Scala.Rx does not "natively" bind to Scalatags, but integrating them yourself is simple enough that it's not worth putting into a separate library. He's a simple integration:
implicit def rxFrag[T <% Frag](r: Rx[T]): Frag = {
  def rSafe: dom.Node = span(r()).render
  var last = rSafe
  Obs(r, skipInitial = true){
    val newLast = rSafe
    js.Dynamic.global.last = last
    last.parentNode.replaceChild(newLast, last)
    last = newLast
  }
  last
}
Scalatags requires that anything you want to embed in a Scalatags fragment be implicitly convertible to Frag; here we are providing one for any Scala.Rx Rx[T]s, as long as the T provided is itself convertible to a Frag. We call r().render to extract the "current" value of the Rx, and then set up an Obs that watches the Rx, replacing the previous value with the current one every time its value changes.
Now that the set-up is out of the way, let's consider a simple HTML widget that lets you enter text in a <textarea>, and keeps track of the number of words, characters, and counts how long each word is.
val txt = Var("")
val numChars = Rx{txt().length}
val numWords = Rx{
  txt().split(' ')
       .filter(_.length > 0)
       .length
}

val avgWordLength = Rx{
  txt().count(_ != ' ') * 1.0 / numWords()
}

val txtInput = textarea.render
txtInput.onkeyup = (e: dom.Event) => {
  txt() = txtInput.value
}

container.appendChild(
  div(
    txtInput,
    ul(
      li("Chars: ", numChars),
      li("Words: ", numWords),
      li("Word Length: ", avgWordLength)
    )
  ).render
)
This snippet sets up a basic data-flow graph. We have our txt Var, and a bunch of Rxs (numChars, numWords, avgWordLength) that are computed based on txt.
Next, we construct our Scalatags fragment: a textarea tag with a listener that updates txt, and a div containing the textarea and a list containing the bound values of our Rxs.
That's all we need to end up with a live-updating widget, which re-renders the necessary bits of the page when the contents of the text box changes! Note how the code basically flows top-to-bottom, like a batch-rendering program, but at the end of it we get a live widget. The code is much simpler than a similar widget built up using jQuery or Backbone.
Furthermore, there is no chance for the parts of the DOM which are "live" to fall out of sync. There is no visible logic that handles the individual re-calulations and re-renders: that is all done by Scala.Rx and by our rxFrag implicit. Because we do not need to write code for each site to keep each individual Rx and each DOM fragment in sync, that means there is no chance of the developer screwing it up and resulting in an out-of-sync page.
More Rx
That was a pretty simple example to get you started with a simple Scala.Rx application. Let's look at a more meaty example to see how we can use Scala.Rx to help structure our interactive web application:
val fruits = Seq(
  "Apple", "Apricot", "Banana", "Cherry",
  "Mango", "Mangosteen", "Mandarin",
  "Grape", "Grapefruit", "Guava"
)
val query = Var("")
val txtInput = input.render
txtInput.onkeyup = (e: dom.Event) => {
  query() = txtInput.value
}

val fragments =
  for(fruit <- fruits) yield Rx {
    val shown = fruit.toLowerCase
                     .startsWith(query())
    if (shown) li(fruit)
    else li(display := "none")
  }

container.appendChild(
  div(
    txtInput,
    ul(fragments)
  ).render
)
This is a basic re-implementation of the autocomplete widget we created in the chapter Interactive Web Pages, except done using Scala.Rx. Note that unlike the original implementation, we don't need to manage the clearing of the output area via innerHTML = "" and the re-rendering via appendChild(...). All this is handled by the same rxFrag code we wrote earlier.
Furthermore, this implementation is more efficient than the original: In the original, everything is always re-rendered every time, which can be a problem if the number of things being rendered is large. In this implementation, only when a fruit appears-in/disappears-from the list does re-rendering happen, and only for that particular fruit. For the bulk of the fruits which did not experience any change in appearance, the DOM is left entirely untouched.
Again, there is no chance for the developer to make a mistake updating things, because all this rendering and re-rendering is hidden from view inside the library.
Hopefully this has given you a sense of how you can use Scala.Rx to help build complex, interactive web applications. The implementation is tricky, but the basic value proposition is clear: you get to write your code top-to-bottom, like the most old-fashioned static pages, and have it transformed by Scala.Rx into an interactive, always-consistent web app. By abstracting away the whole event-propagation, manual-updating process inside the library, we have ensured that there is no place where the developer can screw it up, and the application's UI will forever be in sync with its data.
Asynchronous Workflows
In a traditional setting, Scala applications tend to have a mix of concurrency models: some spawn multiple threads and use thread-blocking operations or libraries, others do things with Actors or Futures, trying hard to stay non-blocking throughout, while most are a mix of these two paradigms.
On Scala.js, things are different: multi-threaded concurrency is a non-starter, since Javascript engines are all single-threaded. As a result, there are virtually no blocking APIs in Javascript: all operations need to be asynchronous if you don't want them to freeze the user interface of the browser while the operation is happening. Scala.js uses standard Javascript APIs and is no different.
However, Scala.js has much more powerful tools to work with than your typical Javascript libraries. The Scala standard library comes with a rich API for Futures & Promises, which are thankfully 100% asynchronous. Though this design was chosen for performance on the JVM, it perfectly fits our 100% asynchronous Javascript APIs. We have tools like Scala-Async, which works perfectly with Scala.js, and lets you create asynchronous computations in a much less confusing manner.
Futures & Promises
A Future represents an in-progress computation that may or may not have completed. It may encapsulate a web request, or an RPC, or a task happening on another thread. They are not a novel concept, and Scala provides a good in-built implementation of Futures that works well with Scala.js.
To motivate this, let's consider a simple example application that:
- Takes as user input a comma-separated list of city-names
-
Fetches the temperature in each city from
api.openweathermap.org - Displays the results when they are all back
We'll work through a few implementations of this.
To begin with, let's write the scaffolding code, that will display the input box, deal with the listeners, and all that:
val myInput = input(value:="London,Singapore,Berlin,New York").render
val output = div.render
myInput.onkeyup = (e: dom.KeyboardEvent) => {
  if (e.keyCode == KeyCode.enter){
    handle(myInput.value.split(','), output)
  }
}
container.appendChild(
  div(
    i("Press Enter in the box to fetch temperatures "),
    myInput,
    output
  ).render
)
So far so good. The only thing that's missing here is the mysterious handle function, which is given the list of names and the output div, and must handle the Ajax requests, aggregating the results, and displaying them in output. Let's also define a small number of helper functions that we'll use later:
def urlFor(name: String) = {
  "http://api.openweathermap.org/data/" +
  "2.5/find?mode=json&q=" +
  name
}
urlFor encapsulates the messy URL-construction logic that we need to make the Ajax call to the right place.
def parseTemp(text: String) = {
  val data = js.JSON.parse(text)
  val kelvins = data.list
                    .pop()
                    .main
                    .temp
                    .asInstanceOf[Double]
  kelvins - 272.15
}
parseTemp encapsulates the messy result-extraction logic that we need to get the data we want (current temperature, in celsius) out of the structured JSON return blob.
def formatResults(output: html.Element, results: Seq[(String, Double)]) = {
  output.innerHTML = ""
  output.appendChild(ul(
    for((name, temp) <- results) yield li(
      b(name), " - ", temp.toInt, "C"
    )
  ).render)
}
@JSExport
formatResults encapsulates the conversion of the final (name, celsius) data back into readable HTML.
Overall, these helper functions do nothing special, btu we're defining them first to avoid having to copy-&-paste code throughout the subsequent examples. Now that we've defined all the relevant scaffolding, let's walk through a few ways that we can implement the all-important handle method.
Direct Use of XMLHttpRequest
def handle0(names: Seq[String], output: html.Div) = {
  val results = mutable.Buffer.empty[(String, Double)]
  for(name <- names){
    val xhr = new XMLHttpRequest
    xhr.open("GET", urlFor(name))
    xhr.onload = (e: dom.Event) => {
      val temp = parseTemp(xhr.responseText)
      results.append((name, temp))
      if (results.length == names.length){
        formatResults(output, results)
      }
    }
    xhr.send()
  }
}
This is a simple solution that directly uses the XMLHttpRequest class that is available in Javascript in order to perform the Ajax call. Every Ajax call that returns, we aggregate in a results buffer, and when the results buffer is full we then append the formatted results to the output div.
This is relatively straightforward, though maybe knottier than people would be used to. For example, we have to "construct" the Ajax call via calling mutating methods and setting properties on the XMLHttpRequest object, where it's easy to make a mistake. Furthermore, we need to manually aggregate the results and keep track ourselves whether or not the calls have all completed, which again is messy and error-prone.
This solution is basically equivalent to the initial code given in the Raw Javascript section of Interactive Web Pages, with the additional code necessary for aggregation. As described in dom.extensions, we can make use of the Ajax object to make it slightly tidier.
Using dom.extensions.Ajax
def handle1(names: Seq[String], output: html.Div) = {
  val results = mutable.Buffer.empty[(String, Double)]
  for{
    name <- names
    xhr <- Ajax.get(urlFor(name))
  } {
    val temp = parseTemp(xhr.responseText)
    results.append((name, temp))
    if (results.length == names.length){
      formatResults(output, results)
    }
  }
}
This solution uses the dom.extensions.Ajax object, as described in dom.extensions. This basically wraps the messy XMLHttpRequest interface in a single function that returns a scala.concurrent.Future, which you can then map/foreach over to perform the action when the Future is complete.
However, we still have the messiness inherent in the result aggregation: we don't actually want to perform our action (writing to the output div) when one Future is complete, but only when all the Futures are complete. Thus we still need to do some amount of manual book-keeping in the results buffer.
Future Combinators
def handle2(names: Seq[String], output: html.Div) = {
  val futures = for(name <- names) yield{
    Ajax.get(urlFor(name)).map( xhr =>
      (name, parseTemp(xhr.responseText))
    )
  }

  for(results <- Future.sequence(futures)){
    formatResults(output, results)
  }
}
Since we're using Scala's Futures, we aren't limited to just map/foreach-ing over them. scala.concurrent.Future provides a rich api that can be used to deal with common tasks like working with lists of futures in parallel, or aggregating the result of futures together.
Here, instead of manually counting until all the Futures are complete, we instead create the Futures which will contain what we want (name and temperature) and store them in a list. Then we can use the Future.sequence function to invert the Seq[Future[T]] into a Future[Seq[T]], a single Future that will provide all the results in a single list when every Future is complete. We can then simply foreach- over the single Future to get the data we need to feed to formatResults/appendChild.
This approach is significantly neater than the previous two examples: we no longer have any mutation going on, and the logic is expressed in a very high-level, simple manner. "Make a bunch of Futures, join them, use the result" is much less error-prone than the imperative result-aggregation-and-counting logic used in the previous examples.
scala.concurrent.Future isn't limited to just calling .sequence on lists. It provides the ability to .zip two Futures of different types together to get their result, or .recover in the case where Futures fail. Although these tools were originally built for Scala-JVM, all of them work unchanged on Scala.js, and serve their purpose well in simplifying messy asynchronous computations.
Scala-Async
Let's look at how to use Scala-Async. To motivate us, let's consider a simple paint-like canvas application similar to the one we built in the section Making a Sketchpad using Mouse Input. This application will have a few properties:
- The user clicks and drags to begin drawing a line on the canvas
- When the user releases the mouse, we fill the shape that was formed by the dragging
- The user clicks again to clear the canvas; like most clicks, the action happens when the button is released
- And can repeat the process from the top, indefinitely
This is a toy example, but is enough to bring out the difficulty of doing things the "traditional" way, and why using Scala-Async with Scala.js is superior. To begin with, let's set the stage:
val renderer = canvas.getContext("2d")
  .asInstanceOf[dom.CanvasRenderingContext2D]

canvas.style.backgroundColor = "#f8f8f8"
canvas.height = canvas.parentElement.clientHeight
canvas.width = canvas.parentElement.clientWidth

renderer.lineWidth = 5
renderer.strokeStyle = "red"
renderer.fillStyle = "cyan"
renderer
To initialize the canvas with the part of the code which will remain the same, so we can look more closely at the code which differs.
Traditional Asynchrony
Let's look at a traditional implementation, using Scala.js but no special features. We'll just use the Javascript canvas.onmouveXXX operations directly.
// traditional
def rect = canvas.getBoundingClientRect()

var dragState = 0

canvas.onmousemove ={(e: dom.MouseEvent) =>
  if (dragState == 1) {
    renderer.lineTo(
      e.clientX - rect.left,
      e.clientY - rect.top
    )
    renderer.stroke()
  }
}
canvas.onmouseup = {(e: dom.MouseEvent) =>
  if(dragState == 1) {
    renderer.fill()
    dragState = 2
  }else if (dragState == 2){
    renderer.clearRect(0, 0, 1000, 1000)
    dragState = 0
  }
}
canvas.onmousedown ={(e: dom.MouseEvent) =>
  if (dragState == 0) {
    dragState = 1
    renderer.beginPath()
    renderer.moveTo(
      e.clientX - rect.left,
      e.clientY - rect.top
    )
  }
}
This is a working implementation, and you can play with it on the right. We basically set the three listeners:
-
canvas.onmousemove -
canvas.onmousedown -
canvas.onmouseup
And each listener is in charge of deciding what to do when it is it's turn to fire.
This code is pretty tricky and hard to follow. It's not immediately clear what it is doing. One thing you may notice is the presence of this dragState variable, which seems to add a lot to the confusion with branches all over the place. At first you may think you can simplify the code to do without it, but attempts to do so will reveal why it is necessary.
This variable is necessary because each mouse event could mean different things at different times. For example, canvas.onmousemove should do nothing it occurs between an canvas.onmousedown and canvas.onmouseup. canvas.onmouseup itself has two tasks: it either ends the dragging phase (which necessitates the fill-current-shape call) or it serves to clear the canvas if happening after a drag. And canvas.onmousedown should not start a new drag if the previous drawing hasn't been cleared from the canvas.
This is a pretty simple workflow for the user, and yet the code is already tricky enough it's not obvious that it's correct at first glance. More complex tools will have correspondingly more complex workflows, and it is easy to see how just another 1 or 2 more states can get out of hand.
Using Scala-Async
Now we've seen what a "traditional" approach looks like, let's look at how we would do this using Scala-Async.
// async
def rect = canvas.getBoundingClientRect()

type ME = dom.MouseEvent
val mousemove =
  new Channel[ME](canvas.onmousemove = _)
val mouseup =
  new Channel[ME](canvas.onmouseup = _)
val mousedown =
  new Channel[ME](canvas.onmousedown = _)

// Disabled due to scala-js#1469
async{
  while(true){
    val start = await(mousedown())
    renderer.beginPath()
    renderer.moveTo(
      start.clientX - rect.left,
      start.clientY - rect.top
    )

    var res = await(mousemove | mouseup)
    while(res.`type` == "mousemove"){
      renderer.lineTo(
        res.clientX - rect.left,
        res.clientY - rect.top
      )
      renderer.stroke()
      res = await(mousemove | mouseup)
    }

    renderer.fill()
    await(mouseup())
    renderer.clearRect(0, 0, 1000, 1000)
  }
}
We have an async block, which contains a while loop. Each round around the loop, we wait for the mousedown channel to start the path, waiting for either mousemove or mouseup (which continues the path or ends it respectively), fill the shape, and then wait for another mousedown before clearing the canvas and going again.
Hopefully you'd agree that this code is much simpler to read and understand than the previous version. In particular, the control-flow of the code goes from top to bottom in a "natural" fashion, rather than jumping around ad-hoc like in the previous callback-based design.
You may be wondering what these Channel things are, and where they are coming from. Although these are not provided by Scala, they are pretty straightforward to define ourselves:
class Channel[T](init: (T => Unit) => Unit){
  init(update)
  private[this] var value: Promise[T] = null
  def apply(): Future[T] = {
    value = Promise[T]()
    value.future
  }
  def update(t: T): Unit = {
    if (value != null && !value.isCompleted) value.success(t)
  }
  def |(other: Channel[T]): Future[T] = {
    val p = Promise[T]()
    for{
      f <- Seq(other(), this())
      t <- f
    } p.trySuccess(t)
    p.future
  }
}
The point of Channel is to allow us to turn event-callbacks (like those provided by the DOM's onmouseXXX properties) into some kind of event-stream, that we can listen to asynchronously (via apply that returns a Future) or merge via |. This is a minimal implementation for what we need now, but it would be easy to provide more functionality (filter, map, etc.) as necessary.
Scala-Async is a Macro; that means that it is both more flexible and more limited than normal Scala, e.g. you cannot put the await call inside a lambda or higher-order-function like .map. Like Futures, it doesn't provide any fundamentally new capabilities, but is a tool that can be used to simplify otherwise messy asynchronous workflows.
Although Scala.js tries very hard to maintain compatibility with Scala-JVM, there are some parts where the two platforms differs. This can be roughly grouped into two things: differences in the libraries available, and differences in the language itself. This chapter will cover both of these facets.
Language Differences
Primitive data types
All primitive data types work exactly as on the JVM, with the three following exceptions.
Floats can behave as Doubles by default
Scala.js underspecifies the behavior of Floats by default. Any Float value can be stored as a Double instead, and any operation on Floats can be computed with double precision. The choice of whether or not to behave as such, when and where, is left to the
implementation.
If exact single precision operations are important to your application, you can enable strict-floats semantics in Scala.js, with the following sbt setting:
scalaJSSemantics ~= { _.withStrictFloats(true) }Note that this can have a major impact on performance of your application on JS interpreters that do not support the Math.fround function.
toString of Float, Double and Unit
x.toString() returns slightly different results for floating point numbers and () (Unit).
// Scala-JVM
> println(())
()
> println(1.0)
1.0
> println(1.4f)
1.4
// Scala.js
> println(())
undefined
> println(1.0)
1
> println(1.4f)
1.399999976158142
In general, a trailing .0 is omitted. Floats print in a weird way because they are printed as if they were Doubles, which means their lack of precision shows up.
To get sensible and portable string representation of floating point numbers, use String.format() or related methods.
Runtime type tests are based on values
Instance tests (and consequently pattern matching) on any of Byte, Short, Int, Float, Double are based on the value and not the type they were created with. The following are examples:
-
1 matches
Byte,Short,Int,Float,Double -
128 (
> Byte.MaxValue) matchesShort,Int,Float,Double -
32768 (
> Short.MaxValue) matchesInt,Float,Double -
2147483647 matches
Int,Doubleif strict-floats are enabled, otherwiseFloatas well -
2147483648 (
> Int.MaxValue) matchesFloat,Double -
1.5 matches
Float,Double -
1.4 matches
Doubleonly if strict-floats are enabled, otherwiseFloatandDouble -
NaN,Infinity,-Infinityand-0.0matchFloat,Double
As a consequence, the following apparent subtyping relationships hold:
Byte <:< Short <:<  Int  <:< Double
               <:< Float <:<
if strict-floats are enabled, or
Byte <:< Short <:< Int <:< Float =:= Doubleotherwise.
Undefined behaviors
The JVM is a very well specified environment, which even specifies how some bugs are reported as exceptions. Some examples are:
-
NullPointerException -
ArrayIndexOutOfBoundsExceptionandStringIndexOutOfBoundsException -
ClassCastException -
ArithmeticException(such as integer division by 0) -
StackOverflowErrorand otherVirtualMachineErrors
Because Scala.js does not receive VM support to detect such erroneous conditions, checking them is typically too expensive.
Therefore, all of these are considered undefined behavior.
Some of these, however, can be configured to be compliant with sbt settings. Currently, only ClassCastExceptions (thrown by invalid asInstanceOf calls) are configurable, but the list will probably expand in future versions.
Every configurable undefined behavior has 3 possible modes:
- Compliant: behaves as specified on a JVM
- Unchecked: completely unchecked and undefined
- Fatal: checked, but throws UndefinedBehaviorErrors instead of the specified exception.
By default, undefined behaviors are in Fatal mode for fastOptJS and in Unchecked mode for fullOptJS. This is so that bugs can be detected more easily during development, with predictable exceptions and stack traces. In production code (fullOptJS), the checks are removed for maximum efficiency.
UndefinedBehaviorErrors are fatal in the sense that they are not matched by case NonFatal(e) handlers. This makes sure that they always crash your program as early as possible, so that you can detect and fix the bug. It is never OK to catch an UndefinedBehaviorError (other than in a testing framework), since that means your program will behave differently in fullOpt stage than in fastOpt.
If you need a particular kind of exception to be thrown in compliance with the JVM semantics, you can do so with an sbt setting. For example, this setting enables compliant asInstanceOfs:
scalaJSSemantics ~= { _.withAsInstanceOfs(
  org.scalajs.core.tools.sem.CheckedBehavior.Compliant) }
Note that this will have (potentially major) performance impacts.
For a more detailed rationale, see the section Why does error behavior differ?.
Reflection
Java reflection and, a fortiori, Scala reflection, are not supported. There is limited support for java.lang.Class, e.g., obj.getClass.getName will work for any Scala.js object (not for objects that come from JavaScript interop). Reflection makes it difficult to perform the optimizations that Scala.js heavily relies on. For a more detailed discussion on this topic, take a look at the section Why No Reflection?.
Regular expressions
JavaScript regular expressions are slightly different from Java regular expressions. The support for regular expressions in Scala.js is implemented on top of JavaScript regexes.
This sometimes has an impact on functions in the Scala library that use regular expressions themselves. A list of known functions that are affected is given here:
-
StringLike.split(x: Array[Char])
Symbols
scala.Symbol is supported, but is a potential source of memory leaks in applications that make heavy use of symbols. The main reason is that
JavaScript does not support weak references, causing all symbols created by Scala.js to remain in memory throughout the lifetime of the application.
Enumerations
The methods Value() and Value(i: Int) on scala.Enumeration use reflection to retrieve a string representation of the member name and are therefore -- in principle -- unsupported. However, since Enumerations are an integral part of the Scala library, Scala.js adds limited support for these two methods:
Calls to either of these two methods of the forms:
val <ident> = Value
val <ident> = Value(<num>)
are statically rewritten to (a slightly more complicated version of):
val <ident> = Value("<ident>")
val <ident> = Value(<num>, "<ident>")
Note that this also includes calls like
val A, B, C, D = Value
since they are desugared into separate val definitions.
Calls to either of these two methods which could not be rewritten, or calls to constructors of the protected <code>Val</code> class without an explicit name as parameter, will issue a warning.
Note that the name rewriting honors the nextName iterator. Therefore, the full rewrite is:
val <ident> = Value(
  if (nextName != null && nextName.hasNext)
    nextName.next()
  else
    "<ident>"
)
We believe that this covers most use cases of scala.Enumeration. Please let us know if another (generalized) rewrite would make your life easier.
Library Differences
Scala.js differs from Scala-JVM not just in the corner-cases of the language, but also in the libraries available. Scala-JVM has access to JVM APIs and the wealth of the Java libraries, while Scala.js has access to Javascript APIs and Javascript libraries. It's also possible to write pure-Scala libraries that run on both Scala.js and Scala-JVM, as detailed here.
This table gives a quick overview of the sorts of libraries you can and can't use when working on Scala.js:
| Can Use | Can't Use |
|---|---|
| Most of java.lang.* | java.lang.Thread, java.lang.Runtime, ... |
| Almost all of scala.* | scala.collection.parallel, scala.tools.nsc |
| Some of java.util.* | org.omg.CORBA, sun.misc.* |
| Macros: uPickle, Scala-Async, Scalaxy, etc | Reflection: Scala-Pickling, Scala-Reflect |
| Shapeless, Scalaz, Scalatags, uTest | Scalatest, Scalate |
| XMLHttpRequest, Websockets. Localstorage | Netty, Akka, Spray, File IO, JNI |
| HTML DOM, Canvas, WebGL | AWT, Swing, SWT, OpenGL |
| Chipmunk.js, Hand.js, React.js, jQuery | Guice, JUnit, Apache-Commons, log4j |
| IntelliJ, Eclipse, SBT, Chrome console, Firebug | Scala REPL, Yourkit, VisualVM, JProfiler |
We'll go into each section bit by bit
Standard Library
| Can Use | Can't Use |
|---|---|
| Most of java.lang.* | java.lang.Thread, java.lang.Runtime, ... |
| Almost all of scala.* | scala.collection.parallel, scala.tools.nsc |
| Some of java.util.* | org.omg.CORBA, sun.misc.* |
You can use more-or-less the whole Scala standard library in Scala.js, sans some more esoteric components like the parallel collections or the tools. Furthermore, we've ported some subset of the Java standard library that many common Scala libraries depends on, including most of java.lang.* and some of java.util.*.
There isn't a full list of standard library library APIs which are available from Scala.js, but it should be enough to give you a rough idea of what is supported. The full list of classes that have been ported to Scala.js is available under Available Java APIs
Macros v.s. Reflection
| Can Use | Can't Use |
|---|---|
| Macros: uPickle, Scala-Async, Scalaxy, etc | Reflection: Scala-Pickling, Scala-Reflect |
As described here, Reflection is not supported in Scala.js, due to the way it inhibits optimization. This doesn't just mean you can't use reflection yourself: many third-party libraries also use reflection, and you won't be able to use them either.
On the other hand, Scala.js does support Macros, and macros can in many ways substitute many of the use cases that people have traditionally used reflection for (see here). For example, instead of using a reflection-based serialization library like scala-pickling, you can use a macro-based library such as uPickle.
Pure-Scala v.s. Java Libraries
| Can Use | Can't Use |
|---|---|
| Shapeless, Scalaz, Scalatags, uTest | Scalatest, Scalate |
Scala.js has access to any pure-Scala libraries that you have cross-compiled to Scala.js, and cross-compiling a pure-Scala library with no dependencies is straightforward. Many of them, such as the ones listed above, have already been cross-compiled and can be used via their maven coordinates.
You cannot use any libraries which have a Java dependency. This means libraries like ScalaTest or Scalate, which depend on a number of external Java libraries or source files, cannot be used from Scala.js. You can only use libraries which have no dependency on Java libraries or sources.
Javascript APIs v.s. JVM APIs
| Can Use | Can't Use |
|---|---|
| XMLHttpRequest, Websockets. Localstorage | Netty, Akka, Spray, File IO, JNI |
| HTML DOM, Canvas, WebGL | AWT, Swing, SWT, OpenGL |
Apart from depending on Java sources, the other thing that you can't use in Scala.js are JVM-specific APIs. This means that anything which goes down to the underlying operating system, filesystem, GUI or network are unavailable in Scala.js. This makes sense when you consider that these capabilities are no provided by the browser which Scala.js runs in, and it's impossible to re-implement them ourselves.
In exchange for this, Scala.js provides you access to Browser APIs that do related things. Although you can't set up a HTTP server to take in-bound requests, you can make out-bound requests using XMLHttpRequest to other servers. You can't write to the filesystem or databases directly, but you can write to the dom.localStorage provided by the browser. You can't use Swing or AWT or WebGL but instead work with the DOM and Canvas and WebGL.
Naturally, none of these are an exact replacement, as the browser environment is fundamentally different from that of a desktop application running on the JVM. Nonetheless, there are many analogues, and if so desired you can write code to abstract away these differences and run on both Scala.js and Scala-JVM
Scala/Browser tooling v.s. Java tooling
| Can Use | Can't Use |
|---|---|
| Chipmunk.js, Hand.js, React.js, jQuery | Guice, JUnit, Apache-Commons, log4j |
Lastly, there is the matter of tools. Naturally, all the Scala tools which depend on the JVM are out. This means things like the Yourkit, VisualVM and JProfiler profilers, as well as things like the Scala command-line REPL which relies on classloaders and other such things to run on the JVM
On the other hand, you do get to keep and continue using many tools which are build for Scala but JVM-agnostic. For example, IDEs such a IntelliJ and Eclipse work great with Scala.js; from their point of view, it's just Scala, and things like code-navigation, refactoring and error-highlighting all work out of the box. SBT works with Scala.js too, and you see the same compile-erorrs in the command-line as you would in vanilla Scala, and even things like incremental compilation work un-changed.
Lastly, you gain access to browser tools that don't work with normal Scala: you can use the Chrome or Firefox consoles to poke at your Scala.js application from the command line, or their profilers/debuggers. With source maps set up, you can even step-through debug your Scala.js application directly in Chrome.
Scala.js is implemented as a compiler plugin in the Scala compiler. Despite this, the overall process looks very different from that of a normal Scala application. This is because Scala.js optimizes for the size of the compiled executable, which is something that Scala-JVM does not usually do.
Whole Program Optimizaton
At a first approximation, Scala.js achieves its tiny executables by using whole-program optimization. Scala-JVM, like Java, allows for separate compilation: this means that after compilation, you can combine your compiled code with code compiled separately, which can interact with the code you already compiled in an ad-hoc basis: code from both sides can call each others methods, instantiate each others classes, etc. without any limits.
Even things like package-private do not help you: Java packages are separate-compile-able too, and multiple compilation runs can dump things in the same package! You may think that private members and methods may be some salvation, but the Java ecosystem typically relies heavily on reflection, which depends on the fact that these private things remain exactly as-they-are.
Overall, this makes it difficult to do any meaningful optimization: you never know whether or not you can eliminate a class, method or field. Even if it's not used anywhere you can see, it could easily be used by some other code compiled separately, or accessed through reflection.
With Scala.js, we have decided to forgo reflection, and forgo separate compilation, in exchange for smaller executables. This is made easier by the fact that the pure-Scala ecosystem makes little use of reflection overall. Thus, at the right before shipping your Scala.js app to your users, the Scala.js optimizer gathers up all your Scala.js code, determines which things are used and which are not, and eliminates all the un-used classes/methods/variables. This allows us to achieve a much smaller code size than is possible with reflection/separate-compilation support. Furthermore, because we forgo these two things, we can perform much more aggressive inlining and other compile-time optimizations than is possible with Scala-JVM, further reducing code size and improving performance.
It's worth noting that such optimizations exist as an option on the JVM aswell: Proguard is a well known library for doing similar DCE/optimization for Java/Scala applications, and is extensively used in developing mobile applications which face similar "minimize-code-size" constraints that web-apps do. However, the bulk of Scala code which runs on the server does not use these tools.
How Compilation Works
The Scala.js compilation pipeline is roughly split into multiple stages:
-
Initial Compilation:
.scalafiles to.classand.sjsirfiles -
Fast Optimization:
.sjsirfiles to one smallish/fast.jsfile, or -
Full Optimization:
.sjsirfiles to one smaller/faster.jsfile
.scala files are the source code you're familiar with. .class files are the JVM-targetted artifacts which aren't used for actually producing .js files, but are kept around for pretty much everything else: the compiler uses them for separate compilation and macros, and tools such as IntelliJ or Eclipse use these files to provide IDE support for Scala.js code. .js files are the output Javascript, which we can execute in a web browser.
.sjsir files are worth calling out: the name stands for "ScalaJS Intermediate Representation", and these files contain compiled code half-way between Scala and Javascript: most Scala features have by this point been replaced by their Java/Javascript equivalents, but it still contains Types (which have all been inferred) that can aid in analysis. Many Scala.js specific optimizations take place on this IR.
Each stage has a purpose, and together the stages do bring benefits to offset their cost in complexity. The original compilation pipeline was much more simple:
-
Compilation:
.scalafiles to.jsfiles
But produced far larger (20mb) and slower executables. This section will explore each stage and we'll learn what these stages do, starting with a small example program:
def main() = {
  var x = 0
  while(x < 999){
    x = x + "2".toInt
  }
  println(x)
}
Compilation
As described earlier, the Scala.js compiler is implemented as a Scala compiler plugin, and lives in the main repository in compiler/. The bulk of the plugin runs after the mixin phase in the Scala compilation pipeline. By this point:
- Types and implicits have all been inferred
- Pattern-matches have been compiled to imperative code
-
@tailrecfunctions have been translated to while-loops,lazy vals have been replaced byvars. -
traits have been replaced by interfaces and classes
Overall, by the time the Scala.js compiler plugin takes action, most of the high-level features of the Scala language have already been removed. Compared to a hypothetical, alternative "from scratch" implementation, this approach has several advantages:
- It helps ensure that the semantics of these features always, 100% match that of Scala-JVM
- It reduces the amount of implementation work required by re-using the existing compilation phases
This first phase is mostly a translation from the Scala compiler's internal AST to the Scala.js Intermediate Representation, and does not contain very many interesting optimizations. At the end of the initial compilation, the Scala compiler with Scala.js plugin results in two sets of files:
-
The original
.classfiles, almost as if they were compiled on the JVM, but not quite. They are sufficiently valid that the compiler can execute macros defined in them, but they should not be used to actually run. -
The
.sjsirfiles, destined for further compilation in the Scala.js pipeline.
The ASTs defined in the .sjsir files is at about the same level of abstraction as the Trees that the Scala compiler is working with at this stage. However, the Trees within the Scala compiler contain a lot of cruft related to the compiler internals, and are also not easily serializable. This phase cleans them up into a "purer" format, (defined in the ir/ folder) which is also serializable.
This is the only phase in the Scala.js compilation pipeline that separate compilation is possible: you can compile many different sets of Scala.js .scala files separately, only to combine them later. This is used e.g. for distributing Scala.js libraries as Maven Jars, which are compiled separately by library authors to be combined into a final executable later.
Fast Optimization
Without optimizations, the actual JavaScript code emitted for the above snippet would look like this:
ScalaJS.c.Lexample_ScalaJSExample$.prototype.main__V = (function() {
  var x = 0;
  while ((x < 999)) {
    x = ((x + new ScalaJS.c.sci_StringOps().init___T(
      ScalaJS.m.s_Predef$().augmentString__T__T("2")).toInt__I()) | 0)
  };
  ScalaJS.m.s_Predef$().println__O__V(x)
});
This is a pretty straightforward translation from the intermediate reprensentation into vanilla JavaScript code:
-
Scala-style method
defs become Javascript-style prototype-function-assignment -
Scala
vals andvars become Javascriptvars -
Scala
whiles become Javascriptwhiles -
Implicits are materialized, hence all the
StringOpsandaugmentStringextensions are present in the output -
Classes and methods are fully-qualified, e.g.
printlnbecomesPredef().println -
Method names are qualified by their types, e.g.
__O__Vmeans thatprintlntakesObjectand returnsvoid
This is an incomplete description of the translation, but it should give a good sense of how the translation from Scala to Javascript looks like. In general, the output is verbose but straightforward.
In addition to this superficial translation, the optimizer does a number of things which are more subtle and vary from case to case. Without diving into too much detail, here are a few optimizations that are performed:
-
Dead-code elimination: entry-points to the program such as
@JSExported methods/classes are kept, as are any methods/classes that these reference. All others are removed. This reduces the potentially 20mb of Javascript generated by a naive compilation to a more manageable 400kb-1mb for a typical application - Inlining: under some circumstances, the optimizer inlines the implementation of methods at call sites. For example, it does so for all "small enough" methods. This typically reduces the code size by a small amount, but offers a several-times speedup of the generated code by inlining away much of the overhead from the abstractions (implicit-conversions, higher-order-functions, etc.) in Scala's standard library.
- Constant-folding: due to inlining and other optimizations, some variables that could have arbitrary values are known to contain a constant. These variables are replaced by their respective constants, which, in turn, can trigger more optimizations.
-
Closure elimination: probably one of the most important optimizations. When inlining a higher-order method such as
map, the optimizer can in turn inline the anonymous function inside the body of the loop, effectively turning polymorphic dispatch with closures into bare-metal loops.
Applying these optimizations on our examples results in the following JavaScript code instead, which is what you typically execute in fastOpt stage:
ScalaJS.c.Lexample_ScalaJSExample$.prototype.main__V = (function() {
  var x = 0;
  while ((x < 999)) {
    var jsx$1 = x;
    var this$2 = new ScalaJS.c.sci_StringOps().init___T("2");
    var this$4 = ScalaJS.m.jl_Integer$();
    var s = this$2.repr$1;
    x = ((jsx$1 + this$4.parseInt__T__I__I(s, 10)) | 0)
  };
  var x$1 = x;
  var this$6 = ScalaJS.m.s_Console$();
  var this$7 = this$6.outVar$2;
  ScalaJS.as.Ljava_io_PrintStream(this$7.tl$1.get__O()).println__O__V(x$1)
});
As a whole-program optimization, it tightly ties together the code it is compiling and does not let you e.g. inject additional classes later. This does not mean you cannot interact with external code at all: you can, but it has to go through explicitly @JSExported methods and classes via Javascript Interop, and not on ad-hoc classes/methods within the module. Thus it's entirely possible to have multiple "whole-programs" running in the same browser; they just will likely have duplicate copies of e.g. standard library classes inside of them, since they cannot share the code as it's not exported.
While the input for this phase is the aggregate .sjsir files from your project and all your dependencies, the output is executable Javascript. This phase usually runs in less than a second, outputs a Javascript blob in the 400kb-1mb range, and is suitable for repeated use during development. This corresponds to the fastOptJS command in SBT.
Full Optimization
Fd.prototype.main = function() {
  for(var a = 0;999 > a;) {
    var b = (new D).j("2");
    E();
    a = a + Ja(0, b.R) | 0
  }
  b = Xa(ed().pc.Sb);
  fd(b, gd(s(), a));
  fd(b, "\n");
};
The Google Closure Compiler (GCC) is a set of tools that work with Javascript. It has multiple levels of optimization, doing everything from basic whitespace-removal to heavy optimization. It is an old, relatively mature project that is relied on both inside and outside Google to optimize the delivery of Javascript to the browser.
Scala.js uses GCC in its most aggressive mode: Advanced Optimization. GCC spits out a compressed, minified version of the Javascript (above) that Fast Optimization spits out: e.g. in the example above, all identifiers have been renamed to short strings, the while-loop has been replaced by a for-loop, and the println function has been inlined.
As described in the linked documentation, GCC performs optimizations such as:
- Whitespace removal
- Variable and property renaming
- Dead code elimination
- Inlining
Notably, GCC does not preserve the semantics of arbitrary Javascript! In particular, it only works for a subset of Javascript that it understands and can properly analyze. This is an issue when hand-writing Javascript for GCC since it's very easy to step outside that subset and have GCC break your code, but is not a worry when using Scala.js: the Scala.js optimizer (the previous phase in the pipeline) automatically outputs Javascript which GCC understands and can work with.
There is some overlap between the optimizations performed by the Scala.js optimizer and GCC. For example, both apply DCE and inlining in some form. However, there are also a lot of optimizations specific to each tool. In general, the Scala.js optimizer is more concerned about producing very efficient JavaScript code, while GCC shines at making that JavaScript as small as possible (in terms of the number of characters).
The combination of both these tools produces small and fast output blobs: ~100-400kb. This takes 5-10 seconds to run, which makes it somewhat slow for iterative development, so it's typically only run right before final testing and deployment. This corresponds to the fullOptJS command in SBT.
This hopefully has given a good overview of how the Scala.js compilation pipeline works. The pipeline and optimizer is a work-in-progress, and is changing all the time in an attempt to achieve ever-smaller executables and ever-faster code.
This whole chapter has been focused on the what but not the why. The chapter on Scala.js' Design Space contains a section which talks about why we care so much about small executables.
Scala.js is a relatively large project, and is the result of both an enormous amount of hard work as well as a number of decisions that craft what it's like to program in Scala.js today. Many of these decisions result in marked differences from the behavior of the same code running on the JVM. This chapter explores the reasoning and rationale behind these decisions.
Why No Reflection?
Scala.js prohibits reflection as it makes dead-code elimination difficult, and the compiler relies heavily on dead-code elimination to generate reasonably-sized executables. The chapter on The Compilation Pipeline goes into more detail of why, but a rough estimate of the effect of various optimizations on a small application is:
- Full Output - ~20mb
- Naive Dead-Code-Elimnation - ~800kb
- Inlining Dead-Code-Elimnation - ~600kb
- Minified by Google Closure Compiler - ~200kb
The default output size of 20mb makes the executables difficult to work with. Even though browsers can deal with 20mb Javascript blobs, it takes the browser several seconds to even load it, and up to a minute after that for the JIT to optimize the whole thing.
Dead Code Elimination
To illustrate why reflection makes things difficult, consider a tiny application:
@JSExport
object App extends js.JSApp{
  @JSExport
  def main() = {
    println(foo())
  }
  def foo() = 10
  def bar = "i am a cow"
}
object Dead{
  def complexFunction() = ...
}
When the Scala.js optimizer, looks at this application, it is able to deduce certain things immediately:
-
AppandApp.mainare exported via@JSExport, and thus can't be considered dead code. -
App.foois called fromApp.main, and so has to be kept around -
App.baris never called fromApp.mainorApp.foo, and so can be eliminated -
Dead, includingDead.complexFunction, are not called from any live code, and can be eliminated.
The actual process is a bit more involved than this, but this is a first-approximation of how the dead-code-elimination works: you start with a small set of live code (e.g. @JSExported things), search out to find the things which are recursively reachable from that set, and eliminate all the rest. This means that the Scala.js compiler can eliminate, e.g., parts of the Scala standard library that you are not using. The standard library is not small, and makes up the bulk of the 20mb of the uncompressed blob.
Whither Reflection?
To imagine why reflection makes this difficult, imagine a slightly modified program which includes some reflective calls in App.main
@JSExport
object App extends js.JSApp{
  @JSExport
  def main() = {
    Class.forName(userInput()).getMethod(userInput()).invoke()
  }
  def foo() = 10
  def bar = "i am a cow"
}
object Dead{
  def complexFunction() = ...
}
Here, we're assuming userInput() is some method which returns a String that was input by the user or otherwise somehow decided at runtime.
We can start the same process: App.main is live since we @JSExported it, but what objects or methods are reachable from App.main? The answer is: it depends on the values of userInput(), which we don't know. And hence we don't know which classes or methods are reachable! Depending on what userInput() returns, any or all methods and classes could be used by App.main().
This leaves us a few options:
- Keep every method or class around at runtime. This severely hampers the compiler's ability to optimize, and results in massive 20mb executables.
- Ignore reflection, and go ahead and eliminate/optimize things assuming reflection did not exist.
- Allow the user to annotate methods/classes that should be kept, and eliminate the rest.
All three are possible options: Scala.js started off with #1. #3 is the approach used by Proguard, which lets you annotate things e.g. @KeepApplication to preserve things for reflection and preventing Proguard from eliminating them as dead code.
In the end, Scala.js chose #2. This is helped by the fact that overall, Scala code tends not to use reflection as heavily as Java, or dynamic languages which use it heavily. Scala uses techniques such as lambdas or implicits to satisfy many use cases which Java has traditionally used reflection for, while friendly to the optimizer.
There are a range of use-cases for reflection where you want to inspect an object's structure or methods, where lambdas or implicits don't help. People use reflection to serialize objects, or for routing messages to methods. However, both these cases can be satisfied by...
Macros
The Scala programming language, since the 2.10.x series, has support for Macros in the language. Although experimental, these are heavily used in many projects such as Play and Slick and Akka, and allow a developer to perform compile-time computations and generate code where-ever the macros are used.
People typically think of macros as AST-transformers: you pass in an AST and get a modified AST out. However, in Scala, these ASTs are strongly-typed, and the macro is able to inspect the types involved in generating the output AST. This leads to a lot of interesting techniques around macros where you synthesize ASTs based on the type (explicit or inferred) of the macro callsite, something that is impossible in dynamic languages.
Practically, this means that you can use macros to do things such as inspecting the methods, fields and other type-level properties of a typed value. This allows us to do things like serialize objects with no boilerplate:
import upickle._

case class Thing(a: Int, b: String)
write(Thing(1, "gg"))
// res23: String = {"a": 1, "b": "gg"}
Or to route messages to the appropiate methods without boilerplate, and without using reflection!
The fact that you can satisfy these use cases with macros is non-obvious: in dynamic languages, macros only get an AST, which is basically opaque when you're only passing a single value to it. With Scala, you get the value together with it's type, which lets you inspect the type and generate the proper serialization/routing code that is impossible to do in a dynamic language with macros.
Using macros here also plays well with the Scala.js optimizer: the macros are fully expanded before the optimizer is run, so by the time the optimizer sees the code, there is no more magic left: it is then free to do dead-code-elimination/inlining/other-optimizations without worrying about reflection causing the code to do weird things at runtime. Thus, we've managed to substitute most of the main use-cases of reflection, and so can do without it.
Why does error behavior differ?
Scala.js deviates from the semantics of Scala-JVM in several ways. Many of these ways revolve around the edge-conditions of a program: what happens when something goes wrong? An array index is out of bounds? An integer is divided-by-zero? These differences cause some amount of annoyance when debugging, since when you mess up an array index, you expect an exception, not silently-invalid-data!
In most of these cases, it was a trade-off between performance and correctness. These are situations where the default semantics of Scala deviate from that of Javascript, and Scala.js would have to perform extra work to emulate the desired behavior. For example, compare the division behavior of the JVM and Javascript.
Divide-by-zero: a case study
/*JVM*/
15 / 4              // 3
/*JS*/
15 / 4 // 3.25
On the JVM, integer division is a primitive, and dividing 15 / 4 gives 3. However, in Javascript, it gives 3.25, since all numbers of double-precision floating points.
Scala.js works around this in the general case by adding a | 0 to the translation, e.g.
/*JVM*/
15 / 4              // 3
/*JS*/
(15 / 4) | 0 // 3
This gives the correct result for most numbers, and is reasonably efficient (actually, it tends to be more efficient on modern VMs). However, what about dividing-by-zero?
/*JVM*/
15 / 0              // ArithmeticException
/*JS*/
15 / 0 // Infinity
(15 / 0) | 0 // 0
On the JVM, the JVM is kind enough to throw an exception for you. However, in Javascript, the integer simply wraps around to Infinity, which then gets truncated down to zero.
So that's the current behavior of integers in Scala.js. One may ask: can we fix it? And the answer is, we can:
/*JVM*/
1 / 0               // ArithmeticException
/*JS*/
function intDivide(x, y){
var z = x / y
if (z == Infinity) throw new ArithmeticException("Divide by Zero")
else return z
}
intDivide(1, 0) // ArithmeticException
This translation fixes the problem, and enforces that the ArithmeticException is thrown at the correct time. However, this approach causes some overhead: what was previously two primitive operations is now a function call, a local variable assignment, and a conditional. That is a lot more expensive than two primitive operations!
The Performance/Correctness Tradeoff
In the end, a lot of the semantic differences listed here come down to the same tradeoff: we could make the code behave more-like-Scala, but at a cost of adding overhead via function calls and other checks. Furthermore, the cost is paid regardless of whether the "exceptional case" is triggered or not: in the example above, every division in the program pays the cost!
The decision to not support these exceptional cases comes down to a value judgement: how often do people actually depend on an exception being thrown as part of their program semantics, e.g. by catching it and performing actions? And how often are they just a way of indicating bugs? It turns out that very few ArithmeticExceptions, ArrayIndexOutOfBoundsExceptions, or similar are actually a necessary part of the program! They exist during debugging, but after that, these code paths are never relied upon "in production".
Thus Scala.js goes for a compromise: in the Fast Optimization mode, we run the code with all these checks in place (this is work in progress; currently only asInstanceOfs are thus checked), so as to catch cases where these errors occur close-to-the-source and make it easy for you to debug them. In Full Optimization mode, on the other hand, we remove these checks, assuming you've already ran through these cases and found any bugs during development.
This is a common pattern in situations where there's a tradeoff between debuggability and speed. In Scala.js' case, it allows us to get good debuggability in development, as well as good performance in production. There's some loss in debuggability in development, sacrificed in exchange for greater performance.
Small Executables
Why do we care so much about how big our executables are in Scala.js? Why don't we care about how big they are on Scala-JVM? This is mostly due to three reasons:- When cross-compiling Scala to Javascript, the end-result tends to be much more verbose than when cross-compiled to Java Bytecode.
- Scala.js typically is run in web browsers, which typically do not work well with large executables compared to e.g. the JVM
- Scala.js often is delivered to many users over the network, and long download times force users to wait, degrading the user experience
These factors combined means that Scala.js has to put in extra effort to optimize the code to reduce it's size at compile-time.
Raw Verbosity
Scala.js compiles to Javascript source code, while Scala-JVM compiles to Java bytecode. Java bytecode is a binary format and thus somewhat optimized for size, while Javascript is textual and is designed to be easy to read and write by hand.
What does these mean, concretely? This means that a symbol marking something, e.g. the start of a function, is often a single byte in Java bytecode. Even more, it may not have any delimiter at all, instead the meaning of the binary data being inferred from its position in the file! On the other hand, in Javascript, declaring a function takes a long-and-verbose function keyword, which together with peripheral punctuation (., = , etc.) often adds up to tens of bytes to express a single idea.
What does this mean concretely? This means that expressing the same meaning in Javascript usually takes more "raw code" than expressing the same meaning in Java bytecode. Even though Java bytecode is relatively verbose for a binary format, it still is significantly more concise the Javascript, and it shows: the Scala standard library weighs in at a cool 6mb on Scala-JVM, while it weighs 20mb on Scala.js.
All things being equal, this would mean that Scala.js would have to work harder to keep down code-size than Scala-JVM would have to. Alas, not all other things are equal.
Browsers Performance
Without any optimization, a naive compilation to Scala.js results in an executable (Including the standard library) weighing around 20mb. On the surface, this isn't a problem: runtimes like the JVM have no issue with loading 20mb of Java bytecode to execute; many large desktop applications weigh in the 100s of megabytes while still loading and executing fine.
However, the web browser isn't a native execution environment; loading 20mb of Javascript is sufficient to heavily tax even the most modern web browsers such as Chrome and Firefox. Even though most of the code comprises class and method definitions that never have their contents executed, loading such a heavy load into e.g. Chrome makes it freeze for 5-10 seconds initially. Even after that, even after the code has all been parsed and isn't been actively executed, having all this Javascript makes the browser sluggish for up to a minute before the JIT compiler can speed things up.
Overall, this means that you probably do not want to work with un-optimized Scala.js executables. Even for development, the slow load times and initial sluggishness make testing the results of your hard-work in the browser a frustrating experience. But that's not all...
Deployment Size
Scala.js applications often run in the browser. Not just any browser, but the browsers of your users, who had come to your website or web-app to try and accomplish some task. This is in stark contrast the Scala-JVM applications, which most often run on servers: servers that you own and control, and can deploy code to at your leisure.
When running code on your own servers in some data center, you often do not care how big the compiled code is: the Scala standard library is several (6-7) megabytes, which added to your own code and any third-party libraries you're using, may add up to tens of megabytes, maybe a hundred or two if it's a relatively large application. Even that pales in comparison to the size of the JVM, which weighs in the 100s of megabytes.
Even so, you are deploying your code on an machine (virtual or real) which has several gigabytes of memory and 100s of gigabytes of disk space. Even if the size of the code makes deployment slower, you only deploy fresh code a handful of times a day at most, and the size of your executable typically does not worry you.
Scala.js is different: it runs in the browsers of your users. Before it can run in their browser, it first has to be downloaded, probably over a connection that is much slower than the one used to deploy your code to your servers or data-center. It probably is downloaded thousands of times per day, and every user which downloads it must pay the cost of waiting for it to finish downloading before they can take any actions on your website.
A typical website loads ~100kb-1mb of Javascript, and 1mb is on the heavy side. Most Javascript libraries weigh in on the order of 50-100kb. For Scala.js to be useful in the browser, it has to be able to compare favorably with these numbers.
Thus, while on Scala-JVM you typically have executables that (including dependencies) end up weighing 10s to 100s of megabytes, Scala.js has a much tighter budget. A hello world Scala.js application weighs in at around 100kb, and as you write more code and use more libraries (and parts of the standard library) this number rises to the 100s of kb. This isn't tiny, especially compared to the many small Javascript libraries out there, but it definitely is much smaller than what you'd be used to on the JVM.
Below is a list of classes from the Java Standard Library that are available from Scala.js. In general, much of java.lang, and parts of java.io, java.util and java.net have been ported over. This means that all these classes are available for use in Scala.js applications despite being part of the Java standard library.
There are many reasons you may want to port a Java class to Scala.js: you want to use it directly, you may be trying to port a library which uses it. In general, we haven't been porting things "for fun", and obscure classes like org.omg.corba will likely never be ported: we've been porting things as the need arises in order to support libraries (e.g. Scala.Rx that need them).
Available Java APIs
- java.lang.Appendable
- java.lang.AutoCloseable
- java.lang.Boolean
- java.lang.Byte
- java.lang.Character
- java.lang.CharSequence
- java.lang.Class
- java.lang.ClassLoader
- java.lang.Cloneable
- java.lang.Comparable
- java.lang.Double
- java.lang.Enum
- java.lang.Float
- java.lang.InheritableThreadLocal
- java.lang.Integer
- java.lang.Iterable
- java.lang.Long
- java.lang.Math
- java.lang.MathJDK8Bridge
- java.lang.Number
- java.lang.Readable
- java.lang.Runnable
- java.lang.Runtime
- java.lang.Short
- java.lang.StackTraceElement
- java.lang.StringBuffer
- java.lang.StringBuilder
- java.lang.System
- java.lang.Thread
- java.lang.ThreadLocal
- java.lang.Throwables
- java.lang.Void
- java.lang.annotation.Annotation
- java.lang.ref.PhantomReference
- java.lang.ref.Reference
- java.lang.ref.ReferenceQueue
- java.lang.ref.SoftReference
- java.lang.ref.WeakReference
- java.lang.reflect.Array
- java.io.BufferedReader
- java.io.ByteArrayInputStream
- java.io.ByteArrayOutputStream
- java.io.Closeable
- java.io.DataInput
- java.io.DataInputStream
- java.io.FilterInputStream
- java.io.FilterOutputStream
- java.io.Flushable
- java.io.InputStream
- java.io.InputStreamReader
- java.io.OutputStream
- java.io.OutputStreamWriter
- java.io.PrintStream
- java.io.PrintWriter
- java.io.Reader
- java.io.Serializable
- java.io.StringReader
- java.io.StringWriter
- java.io.Throwables
- java.io.Writer
- java.lang.MathJDK8Bridge
- java.math.BigDecimal
- java.math.BigInteger
- java.math.BitLevel
- java.math.Conversion
- java.math.Division
- java.math.Elementary
- java.math.Logical
- java.math.MathContext
- java.math.Multiplication
- java.math.Primality
- java.math.RoundingMode
- java.net.Throwables
- java.net.URI
- java.net.URLDecoder
- java.nio.Buffer
- java.nio.BufferOverflowException
- java.nio.BufferUnderflowException
- java.nio.ByteArrayBits
- java.nio.ByteBuffer
- java.nio.ByteOrder
- java.nio.CharBuffer
- java.nio.DataViewCharBuffer
- java.nio.DataViewDoubleBuffer
- java.nio.DataViewFloatBuffer
- java.nio.DataViewIntBuffer
- java.nio.DataViewLongBuffer
- java.nio.DataViewShortBuffer
- java.nio.DoubleBuffer
- java.nio.FloatBuffer
- java.nio.GenBuffer
- java.nio.GenDataViewBuffer
- java.nio.GenHeapBuffer
- java.nio.GenHeapBufferView
- java.nio.GenTypedArrayBuffer
- java.nio.HeapByteBuffer
- java.nio.HeapByteBufferCharView
- java.nio.HeapByteBufferDoubleView
- java.nio.HeapByteBufferFloatView
- java.nio.HeapByteBufferIntView
- java.nio.HeapByteBufferLongView
- java.nio.HeapByteBufferShortView
- java.nio.HeapCharBuffer
- java.nio.HeapDoubleBuffer
- java.nio.HeapFloatBuffer
- java.nio.HeapIntBuffer
- java.nio.HeapLongBuffer
- java.nio.HeapShortBuffer
- java.nio.IntBuffer
- java.nio.InvalidMarkException
- java.nio.LongBuffer
- java.nio.ReadOnlyBufferException
- java.nio.ShortBuffer
- java.nio.StringCharBuffer
- java.nio.TypedArrayByteBuffer
- java.nio.TypedArrayCharBuffer
- java.nio.TypedArrayDoubleBuffer
- java.nio.TypedArrayFloatBuffer
- java.nio.TypedArrayIntBuffer
- java.nio.TypedArrayShortBuffer
- java.nio.charset.CharacterCodingException
- java.nio.charset.Charset
- java.nio.charset.CharsetDecoder
- java.nio.charset.CharsetEncoder
- java.nio.charset.CoderMalfunctionError
- java.nio.charset.CoderResult
- java.nio.charset.CodingErrorAction
- java.nio.charset.MalformedInputException
- java.nio.charset.StandardCharsets
- java.nio.charset.UnmappableCharacterException
- java.nio.charset.UnsupportedCharsetException
- java.security.Guard
- java.security.Permission
- java.security.Throwables
- java.util.AbstractCollection
- java.util.AbstractList
- java.util.AbstractMap
- java.util.AbstractQueue
- java.util.AbstractRandomAccessListIterator
- java.util.AbstractSequentialList
- java.util.AbstractSet
- java.util.ArrayDeque
- java.util.ArrayList
- java.util.Arrays
- java.util.Collection
- java.util.Collections
- java.util.Comparator
- java.util.Date
- java.util.Deque
- java.util.Dictionary
- java.util.Enumeration
- java.util.EventObject
- java.util.Formattable
- java.util.FormattableFlags
- java.util.Formatter
- java.util.HashMap
- java.util.HashSet
- java.util.Hashtable
- java.util.Iterator
- java.util.LinkedHashMap
- java.util.LinkedHashSet
- java.util.LinkedList
- java.util.List
- java.util.ListIterator
- java.util.Map
- java.util.NavigableMap
- java.util.NavigableSet
- java.util.NavigableView
- java.util.Objects
- java.util.Optional
- java.util.package
- java.util.PriorityQueue
- java.util.Properties
- java.util.Queue
- java.util.Random
- java.util.RandomAccess
- java.util.Set
- java.util.SizeChangeEvent
- java.util.SortedMap
- java.util.SortedSet
- java.util.Throwables
- java.util.Timer
- java.util.TimerTask
- java.util.TreeSet
- java.util.UUID
- java.util.concurrent.Callable
- java.util.concurrent.ConcurrentHashMap
- java.util.concurrent.ConcurrentLinkedQueue
- java.util.concurrent.ConcurrentMap
- java.util.concurrent.ConcurrentSkipListSet
- java.util.concurrent.CopyOnWriteArrayList
- java.util.concurrent.Executor
- java.util.concurrent.ThreadFactory
- java.util.concurrent.ThreadLocalRandom
- java.util.concurrent.Throwables
- java.util.concurrent.TimeUnit
- java.util.concurrent.atomic.AtomicBoolean
- java.util.concurrent.atomic.AtomicInteger
- java.util.concurrent.atomic.AtomicLong
- java.util.concurrent.atomic.AtomicLongArray
- java.util.concurrent.atomic.AtomicReference
- java.util.concurrent.atomic.AtomicReferenceArray
- java.util.concurrent.locks.Lock
- java.util.concurrent.locks.ReentrantLock
- java.util.regex.Matcher
- java.util.regex.MatchResult
- java.util.regex.Pattern
- scala.scalajs.js.typedarray.TypedArrayBufferBridge
Porting Java APIs
The process for making Java library classes available in Scala.js is relatively straightforward:
- Find a class that you want to use in Scala.js, but is not implemented.
- Write a clean-room implementation in Scala, without looking at the source code of OpenJDK. This is due to legal-software-license incompatibility between OpenJDK and Scala.js. Reading the docs or specification are fine, as is looking at the source of alternate implementations such as Harmony
- Submit a pull-request to the Scala.js repository, including your implementation, together with tests. See the existing tests in the repository if you need examples of how to write your own.
In general, this is a simple process, for "pure-Java" classes which do not use any special JVM/Java-specific APIs. However, this will not be possible for classes which do! This means that classes that make use of Java-specific things like:
- Threads
- Filesystem APIs
- Network APIs
-
sun.misc.Unsafe
And other similar APIs will either need to be rewritten to not-use them. For example, AtomicXXXs can be written without threading/unsafe APIs because Javascript is single-threaded, making the implementation for e.g. an AtomicBoolean pretty trivial:
package java.util.concurrent.atomic

class AtomicBoolean(private[this] var value: Boolean) extends Serializable {
  def this() = this(false)

  final def get(): Boolean = value

  final def compareAndSet(expect: Boolean, update: Boolean): Boolean = {
    if (expect != value) false else {
      value = update
      true
    }
  }

  // For some reason, this method is not final
  def weakCompareAndSet(expect: Boolean, update: Boolean): Boolean =
    compareAndSet(expect, update)

  final def set(newValue: Boolean): Unit =
    value = newValue

  final def lazySet(newValue: Boolean): Unit =
    set(newValue)

  final def getAndSet(newValue: Boolean): Boolean = {
    val old = value
    value = newValue
    old
  }

  override def toString(): String =
    value.toString()
}
Others can't be ported at all (e.g. java.io.File) simply because the API capabilities they provide (blocking reads & writes to files) do not exist in the Javascript runtime.